
You are currently reading the English (main) version of the KOReader User Guide. Also volunteers are translating this guide to other languages. We have many translations in progress, as you can see in the overall translation status below. But we only link to the languages which are translated above 50% for usability reasons.
More than 80% translated
50% to 80% translated
To see all the languages currently being translated and to contribute to the translation efforts of the user guide, please visit the Weblate translation page of our project.
Overall translation status of the user guide

This guide is primarily designed for color screens. If you are using it for the first time, we highly recommend reading this on a computer, tablet or mobile. Because seeing user interface elements highlighted in color will make your life easier while learning how to use KOReader. Of course you can read this on your e-ink device too, but the experience will not be optimal.
You can use the search function of your browser to find a specific topic or keyword (generally Ctrl + F). If you have a suggestion or question related to this user guide, you can write to this GitHub discussion thread.
Parts of the text in this guide are color coded according to their categories:
PARTS OF KOREADER (BLUE) |
Status bar, Book map... |
MENU PATHS (GREEN) |
TOP MENU /  / Highlight style / Highlight style |
EXTERNAL APPS (PURPLE) |
Calibre, Readwise, KoHighlights... |
We also have different boxes throughout the guide to inform or warn you:
KOReader is developed and supported by volunteers all around the world. You can be a part of this project too by:
- Fixing bugs and implementing new features
- Translating the program into your language or improving an existing translation
- Helping others with your knowledge in the forums or on GitHub issues and discussions
Check Reach us section for the links.
Guide last update: 2025-03-25
- WHAT CAN YOU DO WITH KOREADER ?
- BASIC USAGE INFORMATION
- LEARNING THE USER INTERFACE
- MOVING THROUGH YOUR BOOK
- CUSTOMIZING TEXT APPEARANCE
Despite its minimalistic looks, KOReader is a very powerful and customizable application. This section is like a table of contents which is how-to oriented. So if you are a new user, this is the best place to start. Here you can read what KOReader can do and learn how to do it by following these links to go to the mentioned sections.
- USB mass storage mode for supporting devices
- Cloud storage (Dropbox/FTP/Webdav) with suitable accounts
- KOReader can act as an SSH server, so you can use an SFTP application or your file manager to directly transfer files
- With the Calibre plugin you can send books from your Calibre Library directly to your KOReader devices over wifi
- With the News downloader plugin you can download RSS and Atom news entries to your device as HTML files
- With the Wallabag plugin you can retrieve articles from your Wallabag account (a server based read-it-later service like Pocket)
- Change fonts (including your own), font size, contrast, boldness, kerning, word spacing, word expansion, text alignment, line spacing, column layout, margins...
- Use the included powerful style tweaks or write your own ones to change how your books are rendered precisely
- Invert screen colors for night mode manually or automatically
- Adjust your frontlight color warmth automatically
- Highlight text with different styles and colors, place bookmarks
- Two-tap mode for academic/longer highlights
- Add notes using a customizable keyboard including diacritic modifiers
- Take screenshots
- Track your reading statistics including reading progress, time range and calendar views
- Export your notes and highlights to your device as text, markdown, HTML, JSON or Kindle clippings format
- Synchronize to online services like Joplin, Readwise, Memos, Flomo and XMNote
- Powerful File Browser where you can copy, move, rename, create, delete files and folders and perform bulk operations
- See your library as you like with many detailed and mosaic views
- Add your books to your Favorites for quick access or create your own Collections with sorting and filtering
- Skim widget to quickly jump between pages, chapters, bookmarks
- Unique Book map to see a bird’s eye map of your book including all your notes and highlights
- Page browser to move through pages like a film reel
- Bookmarks browser to browse your highlights and notes easily
- Create an alternative table of contents automatically or manually if you don't like the one that comes with your book
- Hide and exclude certain parts of your book like Appendix, Index, References etc. for more accurate page counts
- Powerful gesture system with 200+ actions allows you to control every aspect of KOReader with a tap or swipe
- If you have a keyboard (internal, wired or bluetooth) you can also assign keyboard shortcuts to these actions
- Or create your own menus with your favorite actions with Quick Menu and access them with a tap or swipe
- Create Profiles to control every aspect of KOReader and automate actions
- Search the document by selecting or entering text (including regular expressions)
- Search in your bookmarks, highlights and notes
- Lookup text in Wikipedia or in installed dictionaries and translate it by a long-tap
- Translate whole page at once between more than 130 languages
- With our poweful plugin system, you can even discuss the text with ChatGPT (after installing the plugin)
- KOReader can update itself
- Dim or turn off your screen light after a set interval
- Set your page refresh intervals for different reading conditions
- Set your own screensaver from many options like random images, book cover, reading, progress etc.
- Set battery charge limit alarms to prevent deep discharge/over charge
- Set a memory usage alert (useful for devices for smaller memory) and optionally restart KOReader upon reaching this limit
- Crop margins automatically or manually
- Reflow documents to extract text and read easier on a small screen
- Apply OCR to documents without text layers, like scanned old books
- Different zoom types and page flow directions to read multi-column documents like scientific articles easily
- Auto straighten tilted documents, like scanned old books
- Save your highlights directly into PDFs which allows you to see them without KOReader
- Special Panel zoom feature for reading mangas
- Adjustable screen refresh settings for perfectly balancing between ghosting and speed
- Add your own CSS style tweaks for books
- User patches system which allows you to change the core behaviors of KOReader
- Create a QR code from your clipboard to share text and links to other devices
- View HTML source of an EPUB document
- Create and edit text files on your device
- Open a terminal emulator and run commands on your device
- See your CPU, memory and battery usage stats
KOReader supports PDF, EPUB, DJVU, MOBI, CBZ, CBT, DOCX, RTF, HTML, TXT, XPS, FB2, PDB, CHM and MD files. It can also open ZIP archives and show image files.
There are many ways to transfer your documents to your device. Note that you may need to restart KOReader to index the transferred documents (or refresh directory if you have Pocketbook/Android).
In addition to transferring files the same way you would with the built-in reader application, other options are available depending on your device:
- USB mass storage mode within KOReader: This mode is available for KOBO and some CERVANTES devices.
- Cloud storage (Dropbox/FTP/Webdav): To use this function you have to add accounts for a cloud storage server via menu shown below. Process is explained via info buttons in the menu while adding accounts:
TOP MENU (in File Browser) /
 / Cloud storage
 - SSH/SFTP access: KOReader can act like an SSH server, which you can access from a computer to transfer files (available on Kobo, Kindle, Cervantes). You can use an SFTP application (like Filezilla) or access via your file manager if your operating system supports. Check our wiki for how-to and also see the warning box below.
- Calibre transfer: With the Calibre plugin you can send documents from your Calibre Library directly to your KOReader devices via a wifi connection. Check our wiki for how-to.
- News downloader: With this plugin you can download RSS and Atom news entries as HTML files. Check wiki for how-to.
- Wallabag: With this plugin you can retrieve articles from Wallabag, a server based read-it-later service like Pocket. Check wiki page for more info.
WARNING Be careful if you decide to use the SSH feature without a password, because this allows open access to your device. But if you are using a local wifi and turn on your device wifi for a short time, this risk is negligible.
Following methods are available for accessing your books:
- File Browser - Dedicated section is here: File Browser usage
- Favorites - A list which you can add your books by long pressing on them in the File Browser
- History - List of books you opened
- Collections - Personalized book lists you created. Dedicated section is here: Collections
You can change how these screens look from:
 / Display mode
If you want to change how many items are visible on these screens, look here:
/ Settings / Mosaic and detailed list settingsYou can assign gestures for each of these dialogs. For example while reading a book, you can access your History or Favorites with a gesture and open another book without going through the File Browser.
You can search a book in the History screen by filename or book metadata from the upper left hamburger menu button.
You can also set KOReader to start with Favorites or History screen instead of File Browser via:
/ Start with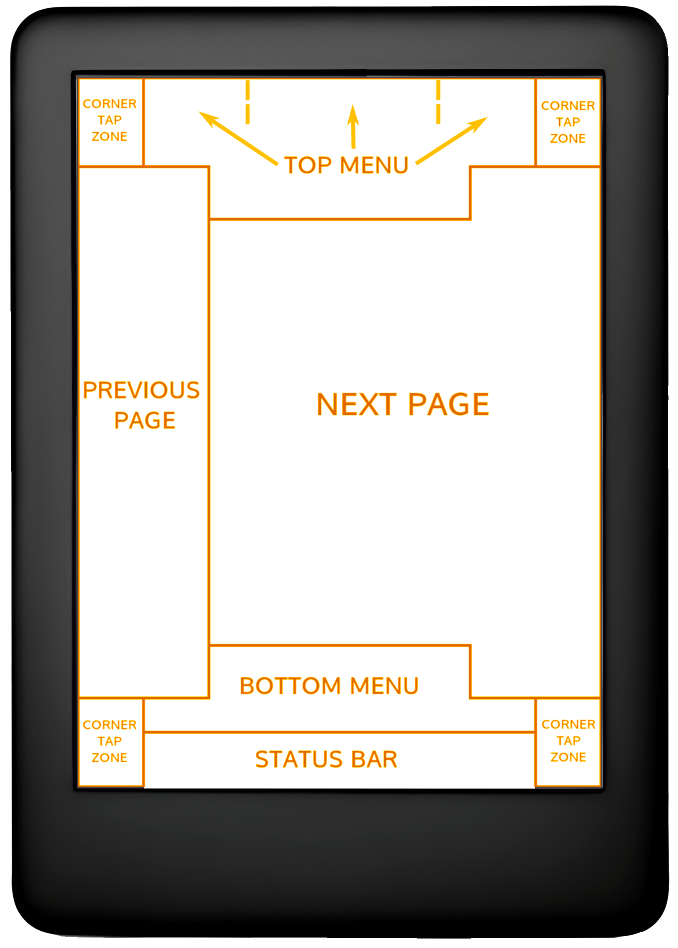
In the image above, you can see the positions of the default tap zones of KOReader. To show the top menu or bottom menu you can tap the indicated zones. You can also swipe down the upper zone to show the top menu. On non-touch devices like Kindle 4 you can open the bottom menu by pressing the button that corresponds to the ENTER/OK action.
If you want top open both menus at the same time, you can set top menu zone to open both the top and bottom menu at the same time via this menu:
 / Taps and Gestures / Activate Menu
Corner tap zones can be used for many different type of gestures including TAP, DOUBLE TAP, TWO FINGER TAP and TAP and HOLD.
PREVIOUS PAGE and NEXT PAGE zones can also be used for DOUBLE TAP gestures at the same time.
Status bar zone can be tapped to cycle between the status bar items if only one item is visible. If all items are visible, tapping will show and hide the status bar.
- Changing the font*:TOP MENU / / Font
- Make the font biggerBOTTOM MENU /

- Make the font bolderBOTTOM MENU /

- Invert the colors on screen (white on black)TOP MENU / / Night Mode
You can also change other formatting options from the BOTTOM MENU to fine tune the appearance of your text. These are just quick tips to get you started of course. We have a full section dedicated to CUSTOMIZING TEXT APPEARANCE
You can control your screen light via this menu. If you have warm lighting (normal white LEDs+orange ones) you can control them separately from this dialog. You can also define a gesture for this dialog:
/ FrontlightYou can choose a book cover or a custom image as screensaver via this menu:
/ Screen / ScreensaverYou can use JPG/PNG files as screensaver (properly dithered grayscale images look best). Transfer the files from your computer into any folder on your device. And choose this folder as your screensaver folder via this menu:
/ Screen / Screensaver / SettingsPlease refer to this Mobileread forum post for advanced information about preparing screensaver images.
If you are looking for information about keyboard shortcuts, click here to go that section. This heading only explains the keyboard usage.
- Tap outside the input field to close the keyboard, tap the input field to show the keyboard again
- Swipe up keys to enter uppercase version of that letter (or lowercase if you are already in shift mode)
- You can change the appearance of the keyboard:
TOP MENU / / Device / Keyboard / Keyboard settings
- You can select more than one layout:
TOP MENU / / Device / Keyboard / Keyboard layout
- You can change between your selected layouts by tapping the
 icon on the keyboard
Koreader keyboard allows entering extra characters when you tap and hold a key. Most frequently used extra characters are shown below. You can tap and hold the key in the gray box to get the surrounding characters:
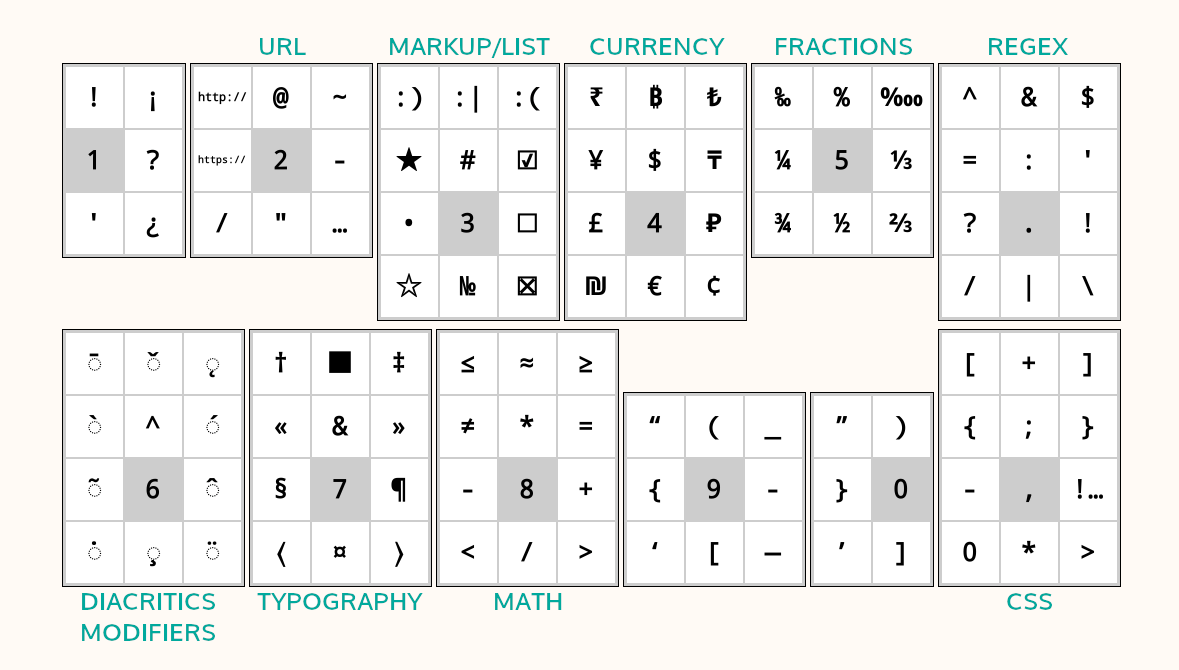
In addition to the long-press popup, you can also enter these extra characters by swiping on a key. In the example below, you can swipe up on the a key to enter an uppercase A or swipe other directions to enter the characters shown. Note that the example shown includes the full popup for demonstration. You don’t need to open this popup, you can directly swipe on the keys. Once you get used to the locations of the extra characters, you can enter them much quicker this way.
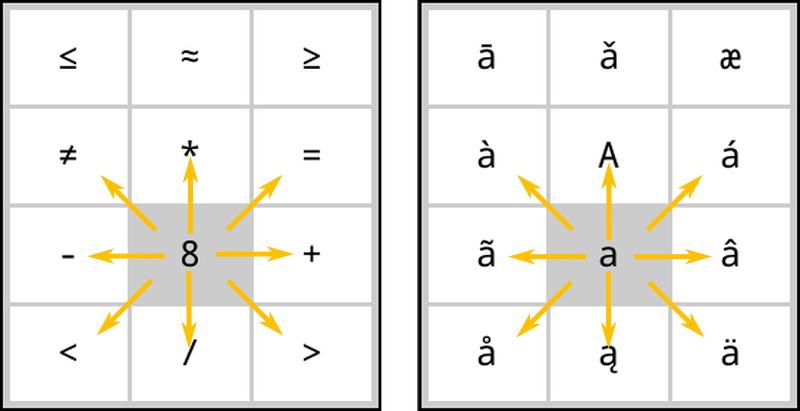
If this feature interferes with your usage, you can disable it by unchecking:
/ Device / Keyboard / Swipe to input additional charactersAdditionally there are some shortcuts for easier text manipulation. You can tap and hold these keys for extra actions:
- Left Arrow - Moves the cursor to the beginning of the line
- Right Arrow - Moves the cursor to the end of the line
Also backspace key behaves different when you make swipe gestures on it:
- Tap: Delete a character
- Long-press: Delete the whole line
- Swipe left: Delete part of the word left of the cursor
- Swipe up: Delete the whole word
For more information, you can check the related wiki page.
KOReader also integrates the Chinese stroke keyboard for inputting simplified and traditional Chinese characters. You can find more info about it in our wiki.
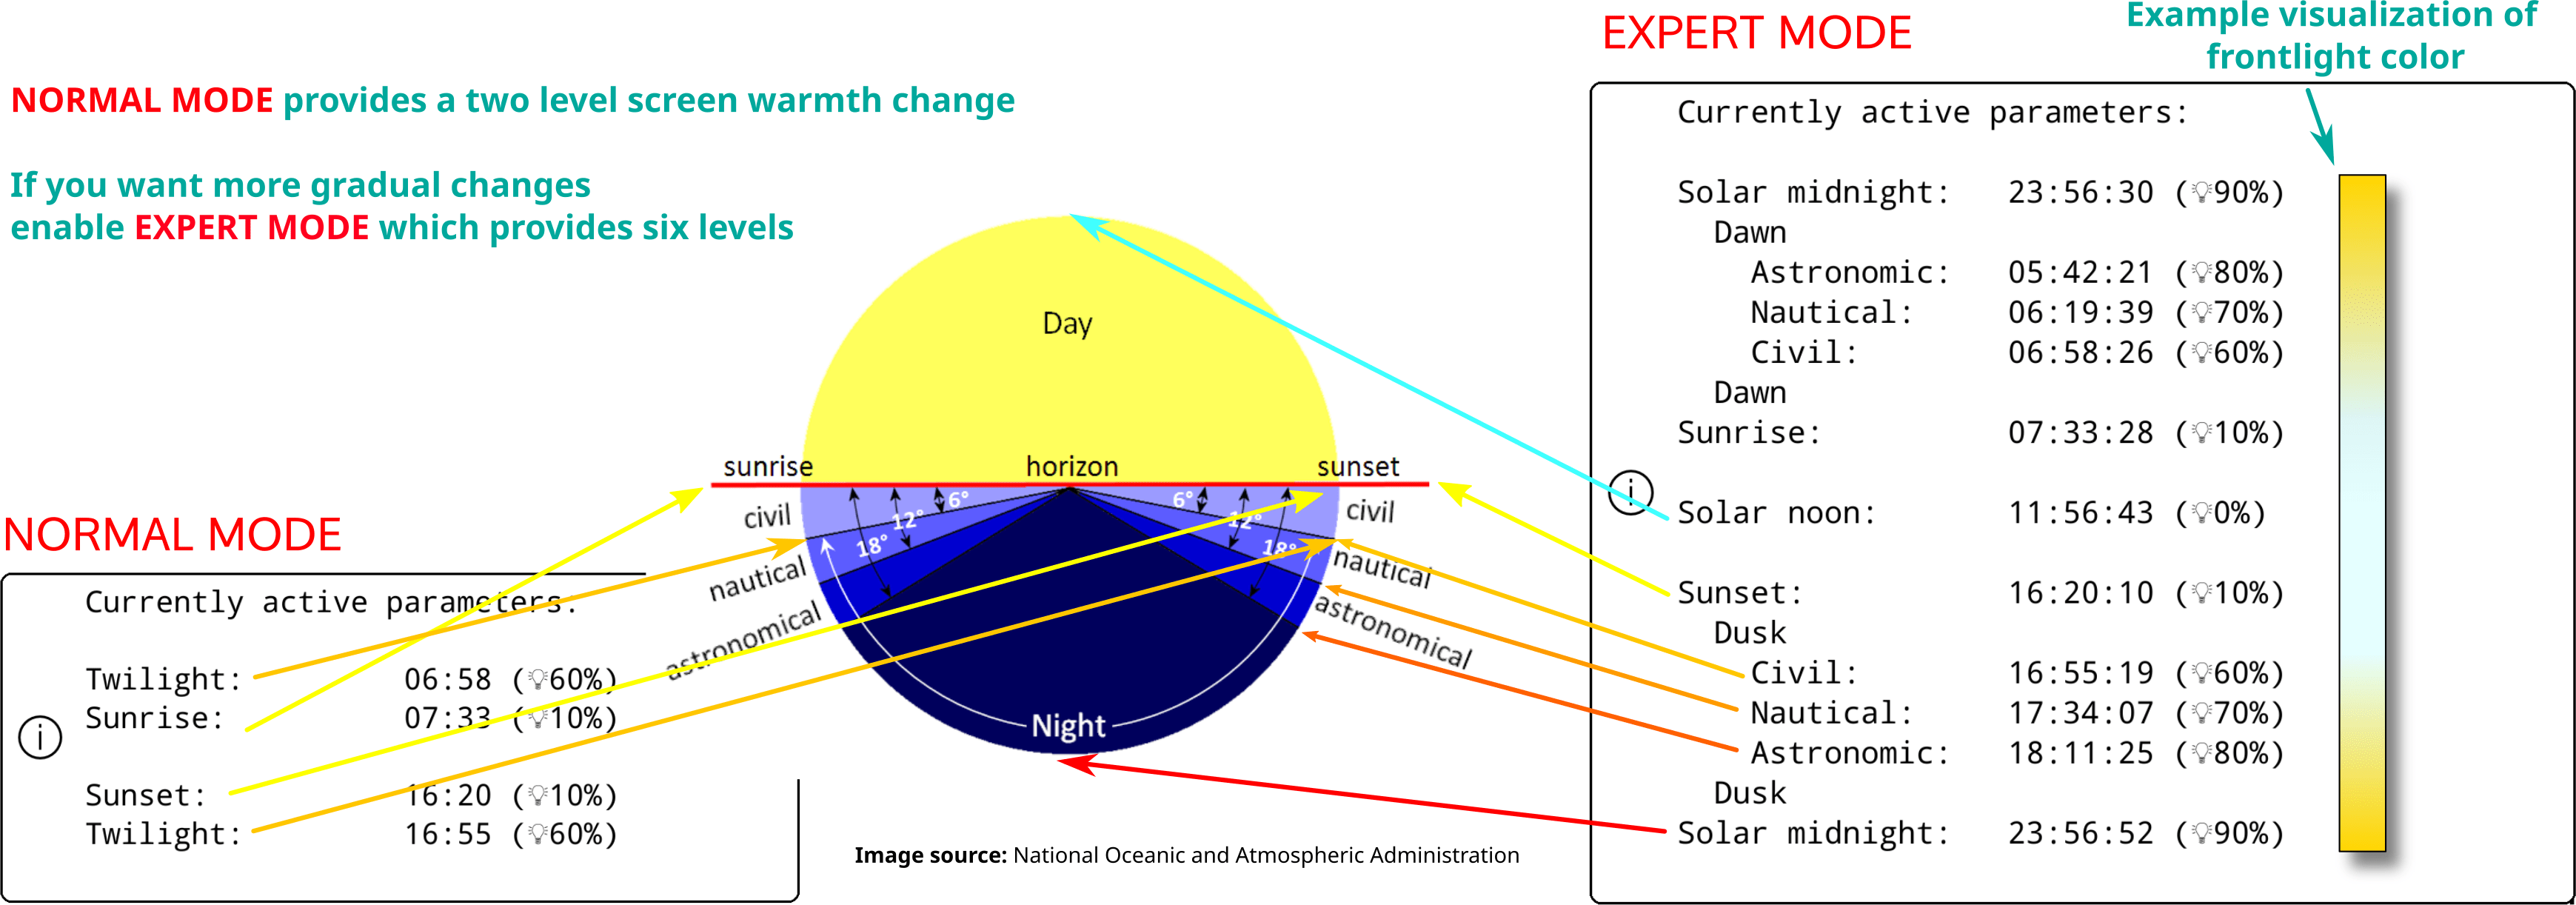
This plugin allows you to adjust frontlight warmth in devices with natural (yellow/orange) light and set night mode (inverted screen colors – white text on black background) automatically according to a schedule. It can control them both or you can choose only warmth control or only night mode control mode, so you can adjust the other one manually.
This plugin comes enabled as default when you install KOReader. If for some reason it is not in the menu, you can enable it here:
/ More tools / Auto Warmth and Night ModeYou can adjust the warmth of your screen frontlight automatically in two different ways:
Fixed schedule: In this mode your frontlight warmth changes according to the daily schedule you entered. This mode is static, it doesn’t account for daylight length. The schedule stays the same all around the year.
Sun's position: This option calculates Sun’s position in your location according to coordinates and altitude information you entered. Frontlight warmth is adjusted gradually according to this calculated Sun position data. This mode is dynamic. As the length of daylight changes around the year, plugin adjusts the schedule accordingly.
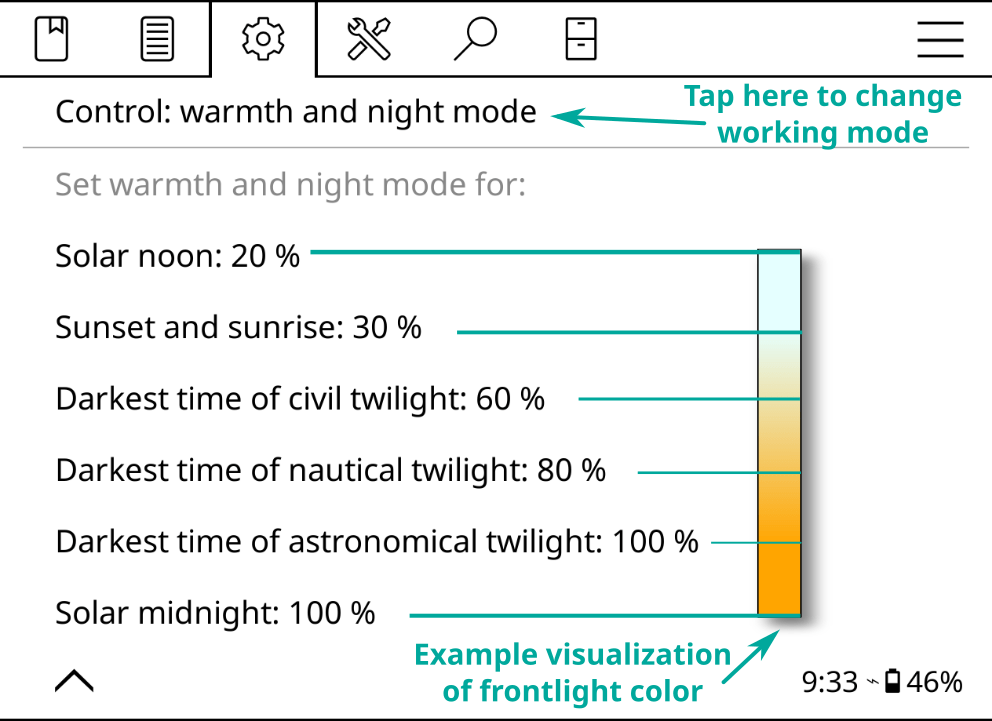
First have a look at this image to familiarize yourself with the terms used in the plugin:
- Go to the plugin menu: TOP MENU / / Screen / Auto Warmth and Night Mode
- Tap Activate menu item and then tap According to the fixed schedule
- Go back to previous menu and tap Fixed schedule settings menu item
- Set your warmth transition schedule by setting times for various items here. Refer to the image above for an explanation of items.
- Go to the plugin menu:
TOP MENU / / Screen / Auto Warmth and Night Mode
- Tap Activate menu item and then tap According to the sun's position
- Go back to previous menu and tap Location settings menu item. Set your coordinates (necessary) and altitude (optional) correctly and give a name to your location.
- Go back to previous menu and tap Warmth and night mode settings menu item
- Set your warmth transition schedule by setting times for various items here. Refer to the image above for an explanation of items.
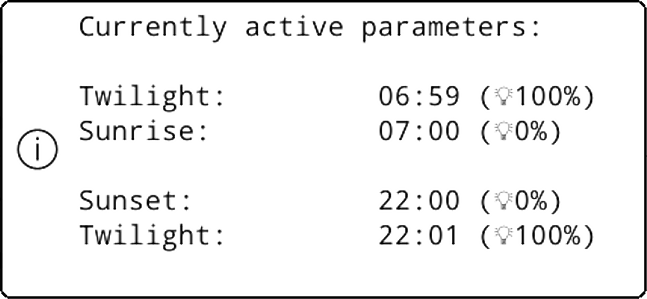
You can see your current schedule via Currently active parameters menu option.
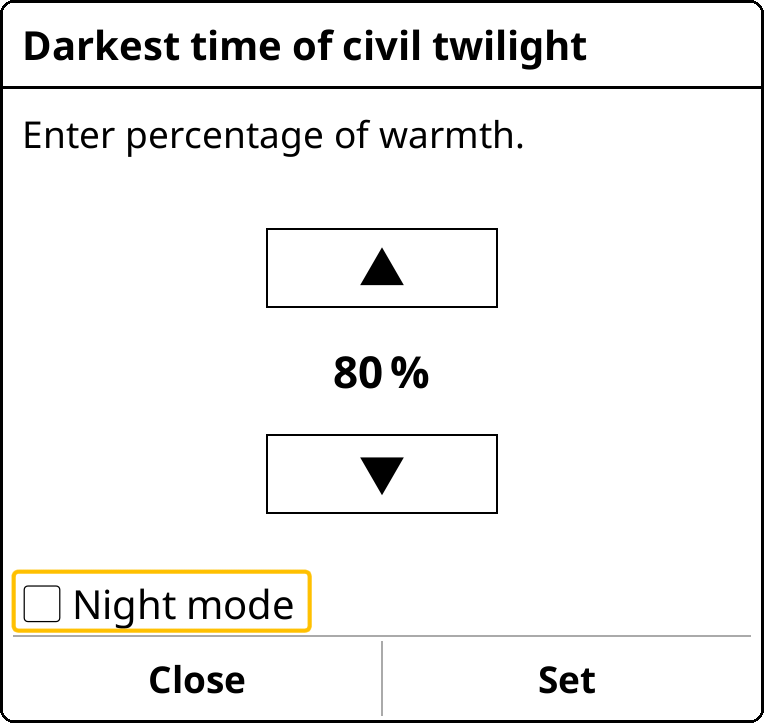
While setting the warm light percentages for different intervals, you can also set that interval to Night Mode, which inverts the screen colors when that interval starts. If your minimum frontlight is still too bright or if you prefer a dark page background, you can activate this feature. To enable this, in the dialog below, tap the Night mode checkbox and tap Set.
When you do this, a moon icon will appear in the menu next to this interval. To disable night mode, just disable the Night mode checkbox in that interval.
This feature turns your frontlight on at sunset and turns it off at sunrise according to your Currently active parameters in this plugin. You can override this change by manually turning your frontlight on/off. On the next sunrise/sunset, AutoWarmth will toggle it again if it is necessary. You can activate it by selecting Frontlight off during the day menu item in this plugin.
If you want your frontlight warmth to change quickly instead of a more gradual change:
- Set the mode to Fixed schedule following the instructions above
- And adjust the settings similar to the image below:
As you can see in these settings above, there is only a one minute difference between day-night transition. So the screen warmth goes from 0 to 100 (or reverse) in only one minute. You can increase this time separation to make the transition duration longer.
KOReader has a simple, mainly black and white user interface because gradients and different shades of gray can cause flashing and ghosting on e-ink screens which can degrade reading experience.
KOReader has 2 main interfaces: reading screen and file browser. We will explain reading screen here. File browser is explained under this section of the guide.
READING SCREEN has two menus:
- TOP MENU includes menu items related to the general usage of KOReader. You will access your books, KOReader preferences, plugins etc. here.
- BOTTOM MENU is focused on options for document formatting like font weight/size, line spacing etc. While adjusting your text appearance, you will mostly interact with the BOTTOM MENU.
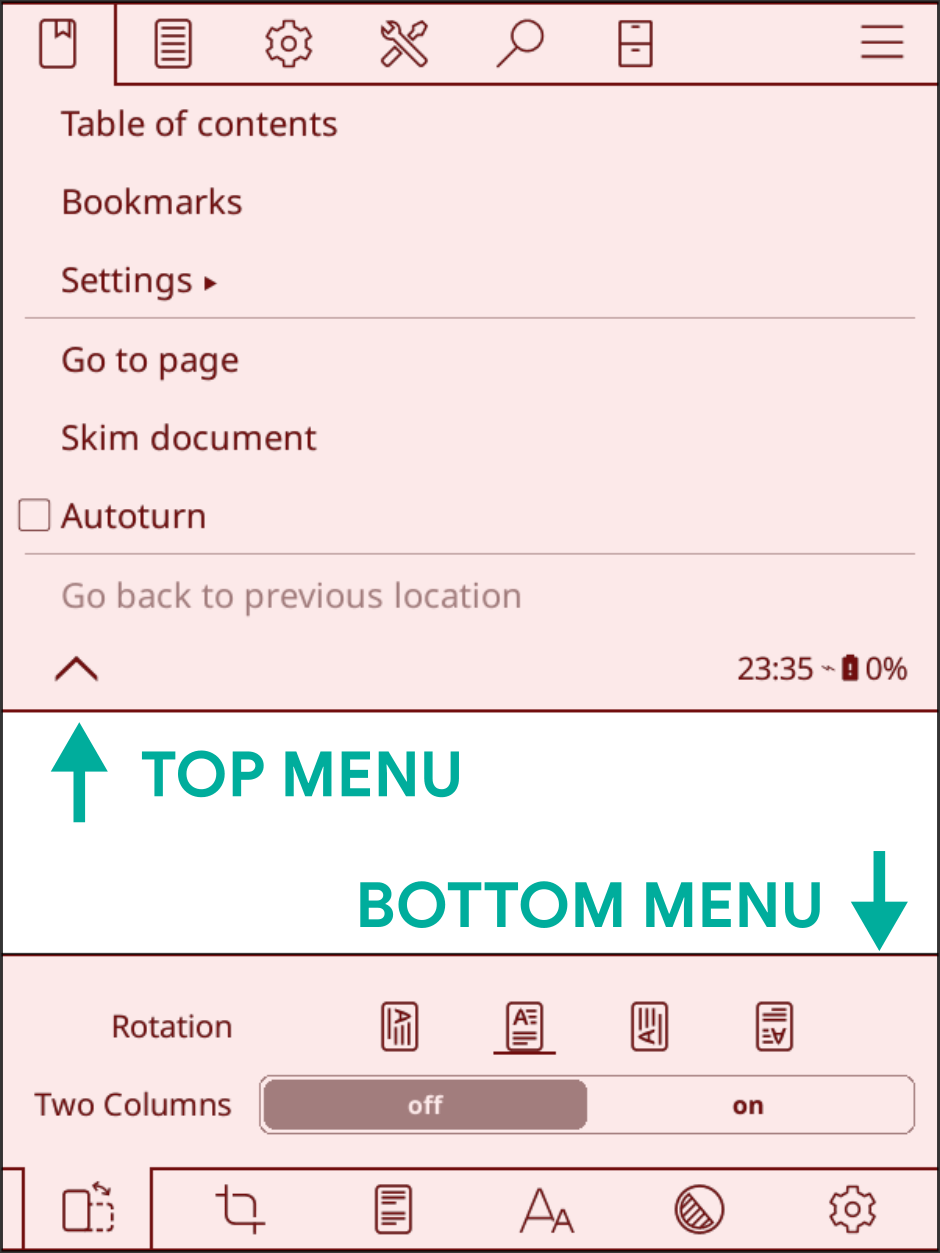
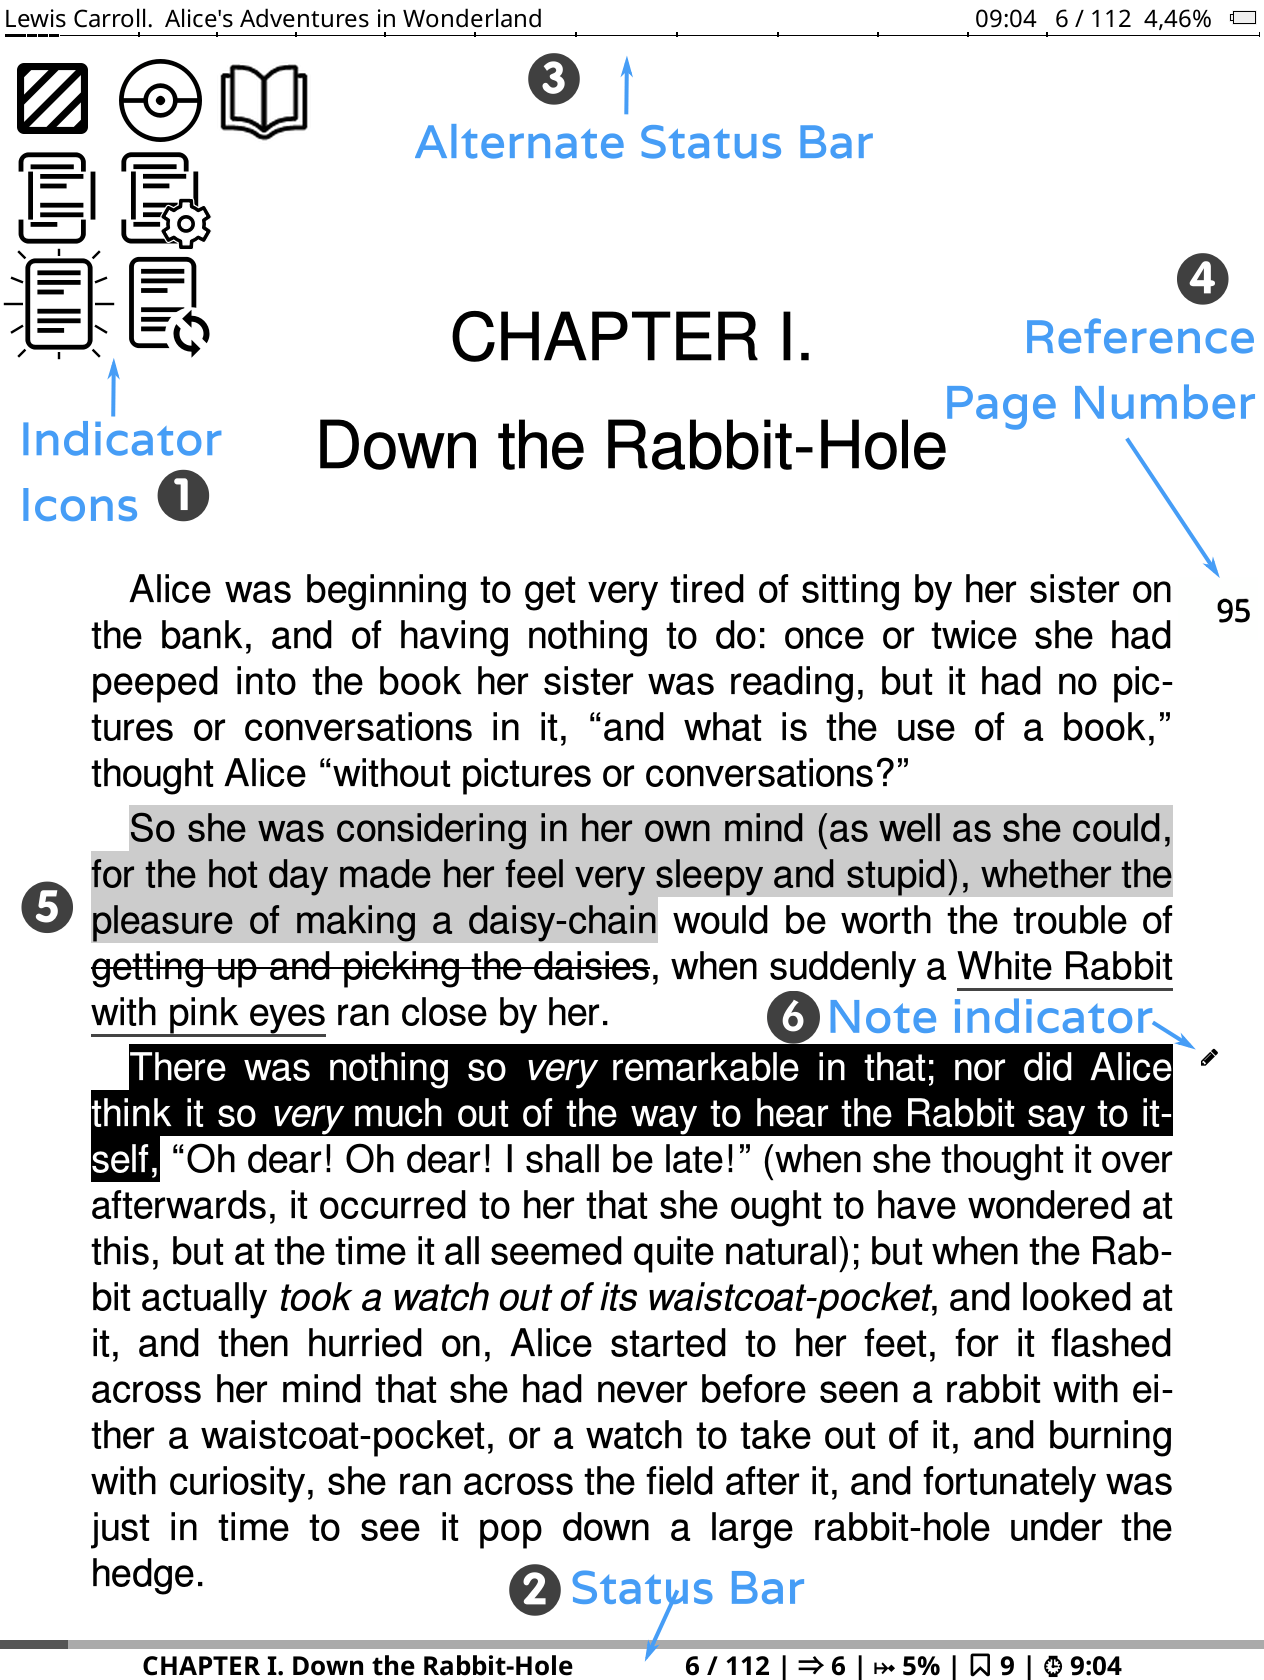
Image above shows the elements you can see on your reader screen when reading a book:
- Indicator icons: These icons inform you about certain ongoing processes and states. You will see them at the top left corner of your screen during certain operations. Normally they are smaller but here we show them bigger for clarity. Next heading explains these indicator icons in detail: Indicator icons
- Status bar:This is a highly configurable area where you can see various information about your book and KOReader. Click here to go to the section: Click here for details: Status bar
- Alternate Status bar: In addition to the default Status bar, we have an Alt status bar which appears at the top of the page if you enable it. Click here for details: Status bar
- Reference page numbers: If the publisher of your book included the page numbers from the paper printed version of the book, you will see them like this. Click here for more info: Page numbering and reference page numbers
- Highlight types: You can see the different highlight types here. Also you can make colored highlights if your device has a suitable screen. Click here to go to the section: Bookmarks, Highlighting and Notes
- Note marker: Note marker icon shows up when you add a note to a highlight. We have different types of note markers. Click here for more info: Bookmarks, Highlighting and Notes
KOReader has some indicators to inform you about certain ongoing processes and states as you can see in the image above. You will see them at the top left corner of your screen during certain operations.
   
|
Partial rendering icons This group of icons belong to the partial rendering procedure and probably you will see these icons more frequently than the others. You see these icons when you change the settings on the bottom menu. This feature, allows you to preview the text appearance adjustments much quicker by only rendering the current chapter instead of the whole book. Also rotating your screen orientation is now much faster thanks to this feature. This feature is ENABLED by default. If necessary, it can be disabled per book (with a tap), or globally (with a long-tap) on: TOP MENU /
/ Document / Enable partial renderingsAfter confirming your changes whole book has to be re-rendered so this is a multi-step procedure. These icons shows the stage of rendering as explained below: |
|
In this stage, document is partially rendered. Page count, footer info and many things are innacurate. You can see how the new settings look and adjust further. You can also turn pages, jump links in this state. |
|
A full rendering is happening in the background. You can still turn pages, jump links, change settings. |
|
Full rendering is done, but not yet applied because KOReader is waiting for you to be idle to reload the rest of the book (idle=not interacting with the device). You can still turn pages, jump links, change settings. |
|
|
You've been idle for a while so KOReader is now reloading the whole document. At this step KOReader is blocked to prevent interaction. |
 |
Highlighting icon This icon shows up when you are in the Select and highlight mode. KOReader has an additional highlight mode which allows you to start a highlight and turn pages to make long highlights which can span multiple pages. You can read about this in the BOOKMARKS, HIGHLIGHTING AND NOTES section of this guide. When you start a highlight in this mode, this icon is shown at the corner to remind you that you are still in the highlighting mode. It disappears when you finish your highlight by selecting the end of the passage or when you cancel the highlight (by tapping again on the beginning of your highlight or on this highlighting icon). |
 |
Pokemon ball icon This icon shows up when you press for a long time on a word (intentionally or accidentally). KOReader has a normal long press menu. And an additional very long press menu when you hold your finger longer than 3 seconds. This icon means that you activated this very long press menu. |
 |
Flip mode icon This icon shows up when you tap the top left corner if:
This mode temporarily displays the full page without cropping, scaled to fit your screen. You can turn the pages in this mode. To exit this mode, tap on this icon. |
Document types like epub, mobi, html naturally don't have fixed page numbers because they are reflowable documents. Which means, these documents can be adjusted according to the screen size and orientation of the device (unlike pdfs or djvu files for example, which have a fixed page size).
If you increase the font size of a reflowable document, your page count will increase too, because now less text will fit on a single page. This sometimes causes a problem because a highlight which you made on page 38 might be on page 42 after the font adjustment.
KOReader supports Reference page numbers feature which allows publishers to embed page numbers from printed books directly to the e-book version. When you enable this feature, KOReader doesn't calculate the page numbers itself. Instead, it shows you the embedded page numbers from the publisher. This means, the page number you see in your Status bar matches the print version of the book.
Benefits of reference page numbers:
- Reference page numbers enable accurate citations by matching the page numbers found in the printed versions.
- Reference page numbers can aid in navigation, especially for readers who are familiar with the print version of a book. It can help you find specific passages or quotes more easily in the digital version.
- Since digital books can be read on various devices and platforms, each with its own font size and display settings, shown page numbers can vary significantly. Reference page numbers provide a consistent point of reference when reading the same book on different devices like e-reader and phone at the same time.
You can enable this feature from:
 / Reference pages / Use reference page numbers
If you also check the Show reference page labels in margin option from the same menu, this page numbers will be shown next to the text in a small font.
Please note that this menu appears only if there are embedded Reference page numbers in your book.
KOReader have two status bars, a Bottom status bar which is enabled by default. And we have an Alt status bar which appears at the top of the page if you enable it. This Alt status bar is available only in reflowable documents (epub, html, docx, rtf, txt…).
Bottom status bar is the newer one which is actively maintained. Alt status bar is a remnant from earlier versions of KOReader so we are not adding new features to it. But you can still enable this Alt status bar if you find it useful. You can enable it from:
/ Alt Status BarYou can configure the Alt status bar from this menu:
/ Status Bar / Alt status barInstructions in the rest of this section are for the Bottom status bar.
You can configure the bottom status bar from this menu. Feel free to explore the SETTINGS sub-menu to customize your status bar as you like.
/ Status BarThere are many items you can show on the status bar. But by default, only one is shown at a time and you have to tap on the status bar to cycle between them. If you want to show all items at once, enable it from here:
/ Status Bar / Configure items / Show all selected items at onceIf you enabled the option above, you can't hide the status bar by tapping on it. If you want to hide it, you should assign a gesture here for toggling the status bar:
Sorting the status bar items:
/ Status Bar / Configure items / Arrange items in status barThere is a special status bar item named Custom text. This item can show your chosen text in the status bar. You can also use this feature to create a separator between the status bar items as you can see in the example below:

- First enable this option with a short press on it from this menu
TOP MENU / / Status Bar / Custom text: ‘KOReader’
- Then long-press on it again to open its settings. Enter a "space" character in the first box and enter the number of repetitions in the second box, which will determine how wide your separator will be.
You can choose another character as a separator. You can also move this item like other status bar items to change its order to adjust your groups.
Progress bar in the status bar normally shows your progress for the whole book. But it can also show your progress for the current chapter instead. This can be useful for example, if a book has lots of short chapters. In this case it might be hard to see your progress in the current chapter so chapter status bar can be more informative here. You can enable the feature from this menu:
/ Status Bar / Progress Bar / Show chapter-progress bar insteadAlso you can assign a gesture to switch between normal and chapter progress bars. You can find this action under:
Here we will only give an overview of the items in the top menu structure to make you familiar with the menu. Detailed information is available under the related sections of this guide.

- NAVIGATION: This menu contains items that allows you to navigate the book you are currently reading. Table of contents, bookmarks, book map...
- TYPESETTING: This menu contains items that allows you to change the appearance of your book. Font settings, style tweaks...
- SETTINGS: This menu contains settings for KOReader and your device. E-ink, light, gesture settings...
- TOOLS: This menu contains plugins that can expand the functionality of KOReader.
 SEARCH: This menu contains items related to search and lookup. Text search, dictionary, translation, Wikipedia...
- FILE BROWSER: This button opens the file browser which is the interface for managing your library.
 MAIN: This menu contains tools for accessing your books like history, favorites, collections. Also book information, update and exit items are under this menu.
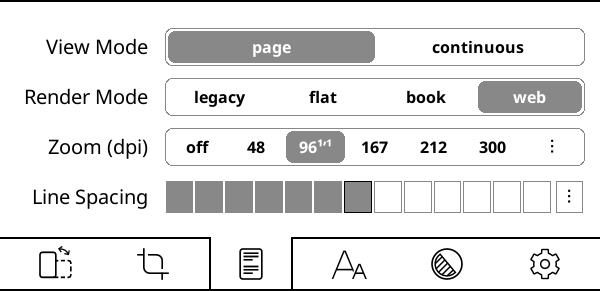
View mode: If you change to continuous mode you can scroll the document like a web page. This mode is more suitable for non e-ink screen types (LCD, OLED). In continuous mode you lose top and bottom margins so text may be cut on the first and last line of screen. To solve this problem you can enable Page overlap:
/ Page OverlapRender mode: This option determines how your document is rendered by KOReader. Default is WEB and generally you don’t need to change this setting. When a book (or saved web page) is very complicated (specified widths or margins, negative margins, floats etc.) and layout looks bad or overflow the screen, you can try other rendering modes.
Zoom (dpi): This setting can be thought of as a general zoom factor for the document (except font size). At 96 dpi (which is the default setting), images in the document are rendered at their original dimensions. Basically you will use this setting if you want to make images bigger without making the text bigger.
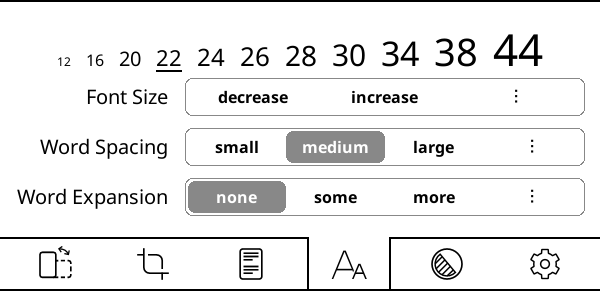
Word spacing and Word expansion settings are related and they determine how your text will look when it is justified. When you justify text, space is added between words so that both edges of each line are aligned with both margins. Since word counts of lines are not equal all the time, in justified alignment, text has to be compressed or expanded to fill the line.
Word spacing: How much the space characters in a line of text can be compressed to fit more words. This setting doesn’t affect words, it only changes the space between them.
Word expansion: If you have too much white space in a line, how much of that can be distributed into the words by expanding them. This setting affects the appearance of words. If you don’t want your words to expand, set this to none.
You can experiment with different settings until the text looks pleasing to you, then set them as defaults via their respective dialogs.
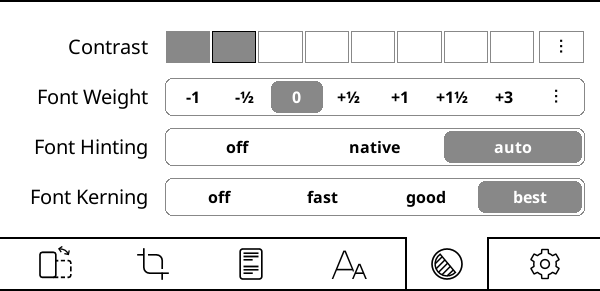
Contrast and Font weight are two options that you can use to make your text bolder (or lighter). You can achieve the same appearance with either of these options but they use different methods to achieve it. Of course you can use them both at the same time.
The differences between them can be summarized as:
+ Doesn’t change font width, book length stays the same
+ Doesn’t need to re-render document, faster
- Might look bad on LCD or low DPI screens
+ Will use proper weighted fonts if you have them installed
+ Looks better on LCD or low DPI screens
- Has to re-render fonts, slower
Font hinting adjusts your text for maximum readability according to your screen’s pixel grid. native uses font’s internal hinting instructions, auto uses FreeType’s hinting algorithm. auto is a safer choice because font files that you installed may have problematic hinting instructions. Also auto handles CJK text better. You can try different settings to see which one looks better on your device.
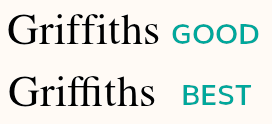
Font kerning adjusts the spacing between letters to achieve a visually pleasing result. Default is best option, which might be slower when opening files (depending on your device) but has better support for ligatures (see picture below for an example), joined Arabic glyphs and some other scripts. If your device is slow, you can try good which is faster and may still look correct with western latin-script text.
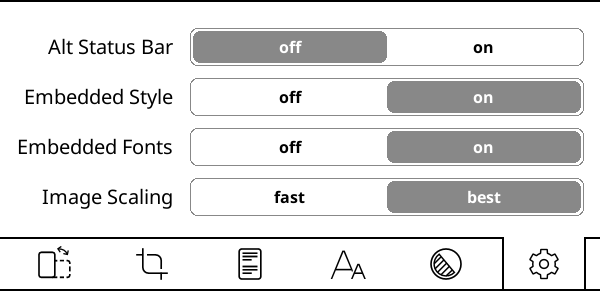
Alt status bar enables an alternative status bar which is available only in reflowable documents (EPUB, HTML, DOCX, RTF, TXT…). After enabling it here, you can configure alt status bar via:
/ Status Bar / Alt status barEmbedded style and embedded fonts determine if publisher’s styles and fonts embedded in the document will be used (or ignored) to render the document. These are general on/off switches. You can achieve more fine tuned tweaks for your document via:
/ Style TweaksImage scaling determines how images in your document are rendered. Best looks more pleasing but it is slower.
KOReader’s user interface and options can change depending on the file type you open. There are two main categories of documents:
- Fixed layout documents (pdf, djvu, image files...)
- Reflowable documents (epub, html, docx, rtf, txt…).
KOReader has lots of features so its menu system reflects this complexity. We have a Menu Search feature for finding menu items quickly. If you remember the name of a menu item but don't remember where it is, you can use this feature:
/ Help / Menu searchAlso you can assign this feature to a gesture or add it to your Quick Menu for faster access.
On the bottom menu if you tap and hold an option’s name, you can see its explanation. |
|
You can change the interface language via: TOP MENU /
/ Language |
|
If you want to change the size of user interface, there is a DPI setting for that: TOP MENU /
/ Screen / Screen DPIYou can choose a value from the menu or select Custom dpi to enter a value for fine tuning: Higher DPI = Bigger Interface. Note that there is also a Zoom (dpi) setting in the bottom bar. That one is related to the documents only. You can find the explanation in the next section. |
If you tap and hold an option or menu item (font weight, line spacing etc.), you can set its value as DEFAULT. The new value will only be applied to books opened from now on. Previously opened books will keep their settings. You can identify default values as a star (★) in the menu or as a black border around the indicators as seen below: 

|
You can close full screen dialogs (History, Table of Contents, Reading Statistics etc.) by swiping down. (Except Bookmarks window. You can use any multi swipe gesture to close this one) |
You can take a screenshot by making a long diagonal swipe with your finger. Also touching opposing diagonal corners will take a screenshot. You can use this second gesture for example when viewing an image. Also if your device has a keyboard, you can take a screenshot with the Alt + Shift + G shortcut. |
If you want to open a random page of a book, we have a Jump to a random page action which you can assign to any gesture. It is in the Reader category of the Gesture Manager. |

In dialogs containing adjustment arrow buttons like the one above, you can tap and hold on arrow buttons to change the value in bigger increments. You can close this type of dialog (non-full screen) by tapping outside of its window. You can move this type of dialog by holding its window title and dragging. You can make this type of dialog semi-transparent by tapping and holding the window title (when you want to see the text under it while adjusting a value). |
Creating new folders - In situations when you need to choose a location (cloud storage, move to archive plugin, exporter plugin), KOReader presents you a screen that looks like our File Browser. If you want to create a new folder while choosing:
|
KOReader supports dictionary lookup in EPUB and scanned PDF/DJVU documents. To see the dictionary definition or translation, just tap and hold a word. Pressing and holding a word brings up a dialog where you can also search the selection in the document for more occurrences or look it up on Wikipedia. |
If you want to check the current date you can tap on the clock in the TOP MENU. |
KOReader has three types of touch scrolling. You can access this from:
/ Taps and Gestures / Scrolling- Classic scrolling: This mode works exactly like your phone/tablet scrolling.
- Turbo scrolling: This mode allows you to scroll faster than classic scrolling. Also you can scroll several pages without lifting your finger. Scrolling amount is proportional to the distance you move your finger after you initiated scrolling.
- On-release scrolling: This scrolling type is more suitable for e-ink screens. Because unlike other scrolling types, this mode doesn’t refresh your page continuously while scrolling. It works like classic scrolling but intermediate steps are not shown. So when you scroll with your finger and then release, page jumps to that position. This is especially useful to reposition and adjust the view if your book contains pictures or tables and you want to see all of it.
This useful feature works like the Back button in your browser. When you jump to some other part of the book using Skim widget, Bookmarks list, Book map etc. KOReader remembers your previous location. This is useful for example if you follow an internal link or reference. With one tap you can go back to where you come from. You can access this feature from:
/ Go back to previous locationAlso you can go forward too, from the same menu. This feature is assigned to multiswipe gesture. You can assign this to another gesture if you want (like tapping a corner) or add it to your Quick Menu.
KOReader normally perform a full refresh on pages containing images (which you can observe as a black flash). The reason is to get rid of the residue and ghosting from the previous page. But this might not be necessary depending on your device and personal preferences. You can disable this auto-refresh behavior here:
/ Screen / E-ink Settings / Full refresh rate / Always flash on pages with imagesAlso you can disable black flashing of user interface from here if it disturbs you:
/ Screen / E-ink SettingsThere are different ways of moving through your document in KOReader with their own strengths. You can use the:
- Skim Widget
- Book Map
- Page Browser
Skim Widget is a very functional navigation tool. You can use it to:
- Jump to any part of your book by directly tapping on the progress bar or entering the page number
- Navigate between chapters
- Navigate between bookmarks
How to open the Skim Widget:
- With a long-tap on the Status Bar area at the bottom of your screen
- From this menu: TOP MENU / / Skim document
- You can assign a gesture to it
- You can add it to your Quick Menu
First let's have a quick look at the diagram below. You will see that we have two different Skim Widgets. They have the same functions, only their size is different:
- FULL-SIZE SKIM WIDGET: This is the default skim widget you will see when you install KOReader. It is bigger than the compact skim widget so buttons are more comfortable to press. This widget opens at the center of the screen.
- COMPACT SKIM WIDGET: This is the slimmer version of the default skim widget. It can be more useful if you are making highlights for example. Since this widget is smaller and opens at the top or bottom of the screen, it doesn't obstruct the page as much as the default widget.
If you want to use the compact skim widget, you can do this by choosing Top or Bottom from this menu:
/ Navigation / Skim dialog position:TIP Both skim widgets are movable. You can move them by pressing on an empty area of the widget and dragging. Also you can make these dialogs semi-transparent by long-pressing on an empty area on the widget. But semi-transparency is triggered only in its initial position. Once moved, long-pressing moves it back to the initial position.
Now back to the diagram. You can see that on some buttons, there are two descriptions in different colors: blue and orange. It means that this button has two functions: a normal press action and a long-press action. If you press normally, it will perform the BLUE function. If you press longer, it will perform the ORANGE function.
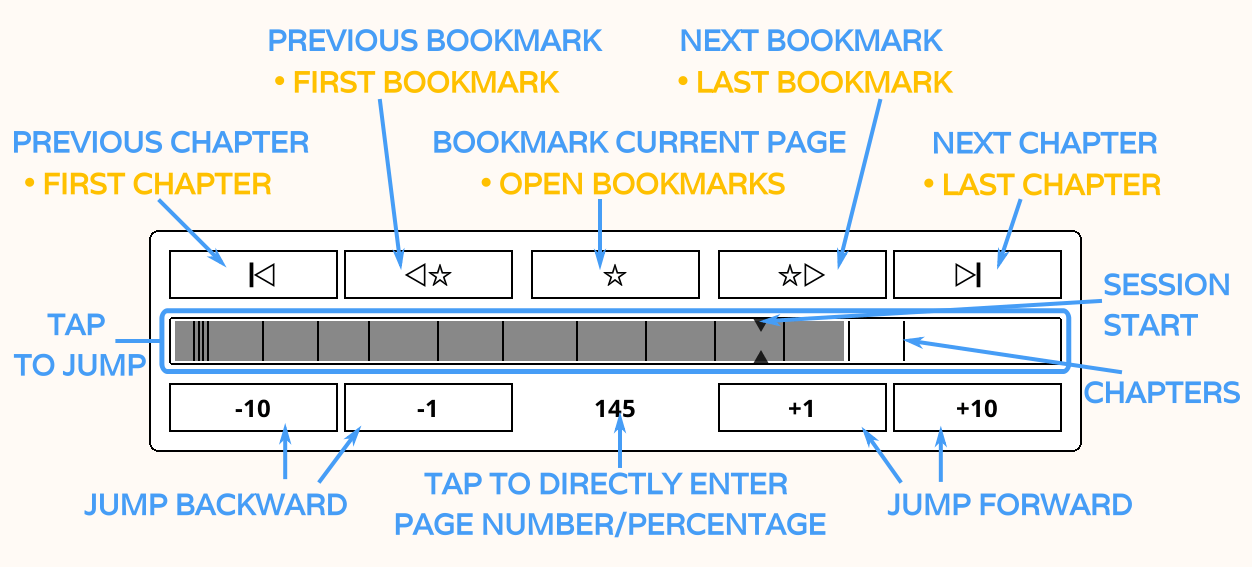
Explanations of the numbered items (long-press action in bold):
- Jump to the beginning of the previous chapter / Jump to the first page of the book
- Jump to the previous bookmark / Jump to the first bookmark in the book
- Bookmark current page / Open bookmarks dialog
- Jump to the next bookmark / Jump to the last bookmark in the book
- Jump to the beginning of the next chapter / Jump to the last page of the book
- Jump backward (-) or forward (+) this many pages
- This number shows the current page number. If you tap on it, a dialog opens which allows you to enter a page number or percentage to jump directly. If you long-press, it takes you back to the page where you opened the skim widget. This is useful for example if you want to check some other part of the book quickly and return to your reading where you left.
- This is the progress bar. Thin lines are the chapter marks which shows the beginning of the chapters. You can tap on this progress bar to jump to that part of the book. Little arrows are session start arrows which marks the place where you started reading this book in the current session. This arrows reset when you switch between books.
- This button in the compact skim widget works same as the long-press function of the item number 7. It takes you back to the page where you opened the skim widget. This is useful for example if you want to check some other part of the book quickly and return to your reading where you left.
TIP If you want to open a random page of a book, we have a Jump to a random page action which you can assign to any gesture. It is in the Reader category of the Gesture Manager.
KOReader can show chapter boundaries from your documents on the SKIM WIDGET and PROGRESS BAR.
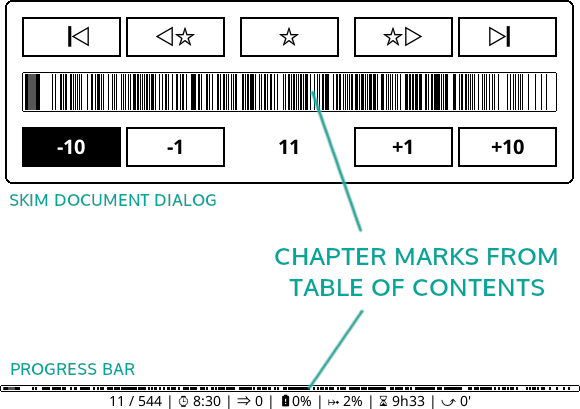
If your document has too many heading levels, your chapter marks can look crowded like the example above. You can change the depth of visible ToC mark levels via:
/ Settings / Progress Bars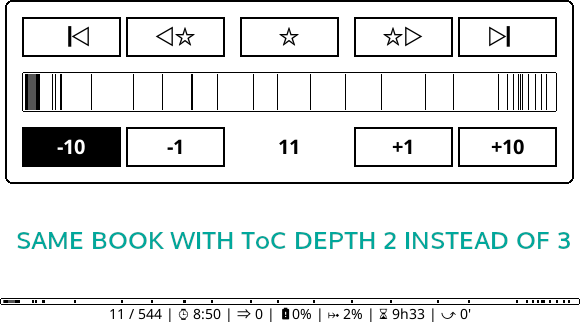
You can also use this reduced ToC for:
- chapter titles (if it is shown on Status Bar)
- chapter navigation
- reading time left estimates
These options are in the same menu.
If your document doesn’t have a Table of Contents, you can enable ALTERNATIVE TABLE OF CONTENTS. When this setting is enabled, KOReader will build a ToC from document headings (if available) or from individual HTML files in the EPUB. Long press on this menu item for extra info:
/ Settings / Alternative table of contentsYou can find more info about the table of contents tools available in KOReader in this relevant section of the guide: TABLE OF CONTENTS TOOLS
Book map is a powerful and unique feature of KOReader which can be very useful for getting an overview of a book. For example if you are reading a book non-linearly by skipping some parts to read them later, it would be hard to track your progress. Book Map can show you which parts of the book you have already read, at a glance.
Additionally you can:
- See how much time you have spent on each page (if Reading Statistics plugin is enabled)
- Check which pages have bookmark, highlights and notes
- Navigate directly to any part of the book like the SKIM WIDGET
You can access Book Map via menu and you can also assign a gesture for quicker access:
/ Book mapWhen you open the Book Map first time while reading a book, it will be in Grid View mode, fitting all chapters on a single screen to give the best initial overview of the book’s content. To get a detailed information about usage, tap the info icon at the upper left corner. You can close the Book Map by tapping X on the upper right corner or with any multiswipe gesture (UP-DOWN, LEFT-RIGHT etc.).
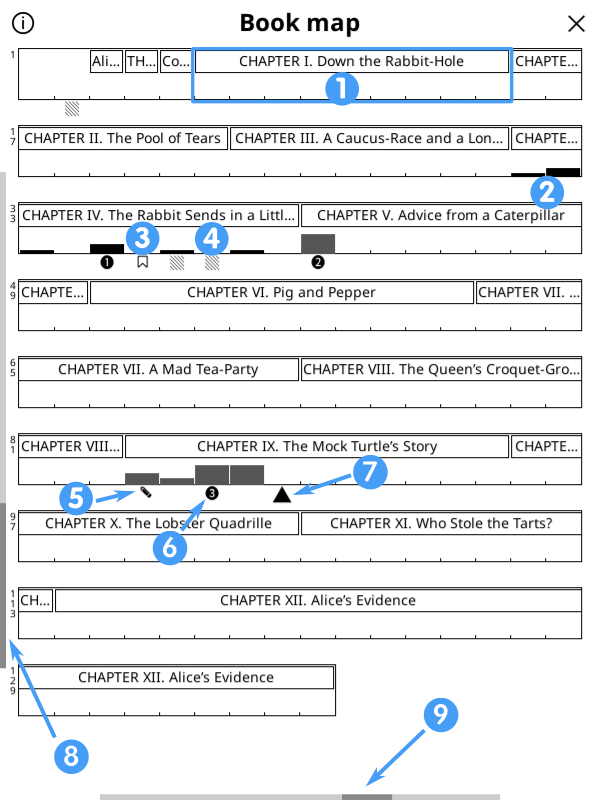
- Chapter boundaries
- Black bars indicate read pages. Higher bars means more time spent in page.
- Bookmark icon shows bookmarked pages as the name says.
- Striped square icon shows pages with highlights.
- Pencil icon shows pages with notes.
- Numbers in a circle shows your previous locations. When you choose Go back to previous location from the menu, you will jump back here in order.
- Triangle shows your current page.
- Vertical scrollbar shows your current view level.
- Vertical scrollbar shows your current page width level.
You can customize Book Map by changing these options:
- First try swiping LEFT and RIGHT along the bottom edge of the screen to change width of columns indicating pages and observe how it changes the scale of the map.
- Then try swiping UP and DOWN along the left edge of the screen to change chapter title depth and switch to the Flat View. See examples below.
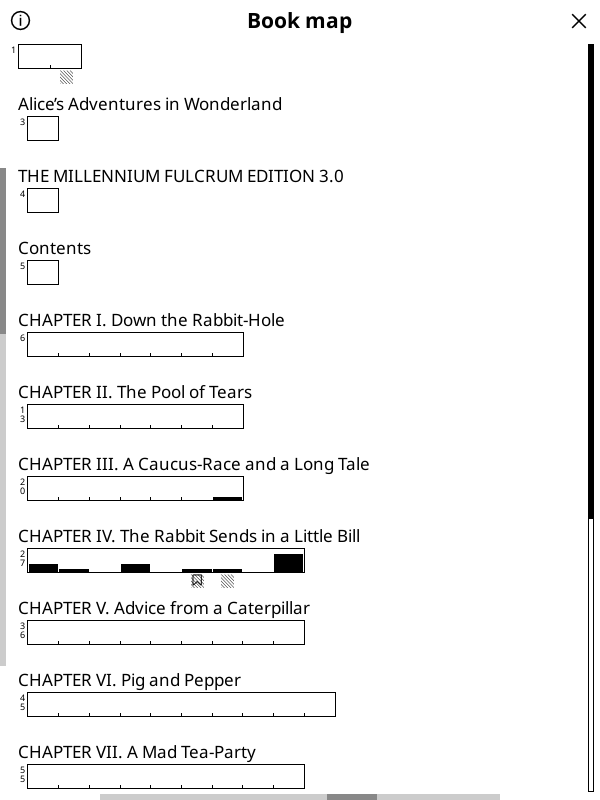
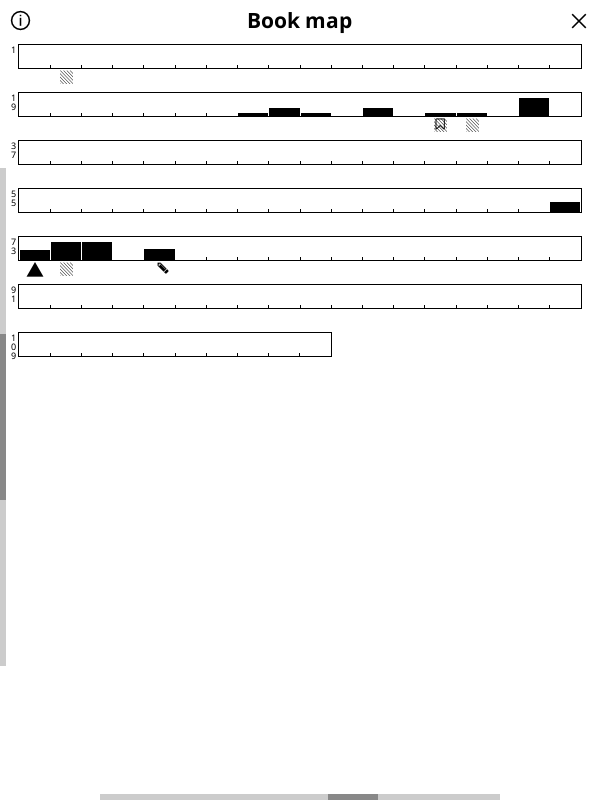
In addition to default Grid View above, here you can see the Flat View on the left and Grid View without chapter titles on the right. Note the changing left vertical scrollbar between views. If you want to switch back to the default view, you can long-press the info icon at the upper left corner.

When you tap the menu icon on the Book map screen you are presented with the menu above. Menu options are explained below:
- About book map: Short explanation of Book map usage and icon descriptions.
- Available gestures: Gestures you can use to change the settings of Book map instead of using this menu.
- Page browser on tap: If this is checked, when you tap on a page in Book map, Page browser opens. This shows you an overview of the area you selected. If you disable this option, a tap in Book map directly takes you to that page. But remember, depending on factors like your screen size, touch screen sensitivity, tap accuracy etc. you might end up in adjacent pages.
- Switch current/initial views: If you customized your Book map view, tapping this switches between the default view and your customized view.
- Switch grid/flat views: Switch between separate chapters or continuous chapters views.
- Chapter levels: Change the depth of chapter/sub chapter levels.
- Page slot width: Make each page slot wider or narrower.
- 10-page markers: As you increase this value, first it will add markers to every 10th page, then it will make them bigger and eventually it will add markers to every 5th page.
Page Browser can be used to navigate between pages like in a photo album by showing thumbnails of the pages as a grid. You can open Page Browser by tapping on the Book Map or from the menu. You can also assign a gesture for easier access.
/ Page browser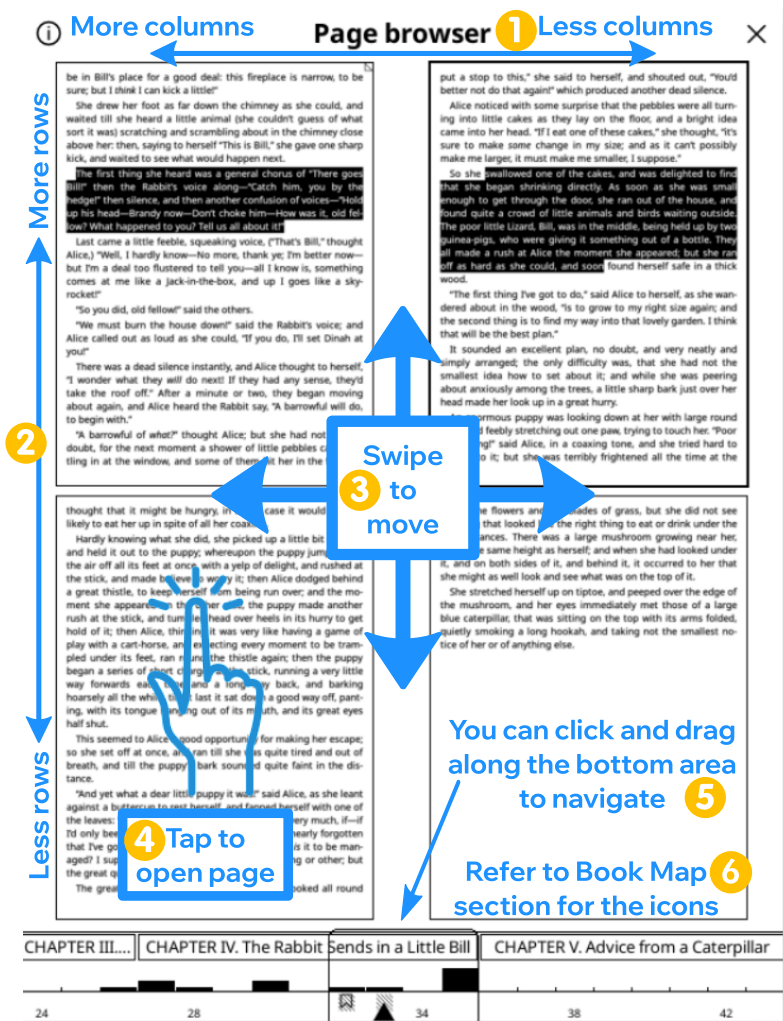
Usage of Page Browser is explained below. You can also tap on the top left corner hamburger menu button on this screen to see these explanations. A long-press on the same button adds/removes chapter titles from the bottom strip.
- Swipe left / right over this top edge to increase / decrease the number of the columns.
- Swipe up / down over this left edge to increase / decrease the number of the rows.
- Swipe the pages area to move the viewed pages. Up / down to scroll one row (2 pages in the example), left / right to scroll one screen (4 pages in the example).
- Tap any page to open that page in reading view.
- On the bottom area, tapping on a page focuses the thumbnail view on that page. Swiping left / right will jump one stripe width.
- Icons on the bottom area are same as the ones used in Book Map and explained under that section.
Book map and page browser has an Alternative theme with a different shading scheme which you can activate from their hamburger menus. This theme uses alternating colors for the chapter headings so chapter boundaries is more visible in the Book map and Page browser. But the usage of gray color in this theme requires flashing to black so it might be distracting for some users. You can try both and use the one you like.
Some of the digital books you come across might not have a proper table of contents (ToC). Depending on the preparation of the book, you can experience these ToC problems:
- No ToC in the book, so you can’t jump between the chapters or see the remaining reading times
- There is a ToC but it is not very useful because it has wrong or missing chapter titles
KOReader has some features that you can use when reading books with a problematic table of contents section.
Note that Alternative table of contents is not available on fixed layout documents like PDF, DJVU etc. because it requires HTML tags to create a ToC. Custom table of contents and Custom hidden flows features are available on all file types.
First feature is the Alternative table of contents which you can find in:
/ Settings / Alternative table of contentsAlternative table of contents tries to create a ToC from the headings in your book (H1 to H6 tags in the HTML files in your EPUB). If your book doesn’t contain any headings, it will try to build a ToC from the document fragments (individual HTML files in your EPUB book) which will point to the beginning of each file.
You can choose which heading levels to include (or ignore) in your ToC from this menu:
/ Style tweaks / Miscellaneous / Alternative ToC hintsCustom table of contents feature allows you to create your own ToC from the selected parts of your book. This ToC can contain only one level so you can’t have sub-chapters while using this feature. To create your own ToC, first enable:
/ Settings / Custom table of contentsOnce you enable this feature, new menu items will be added to the user interface which allows you to select your chapters. You can add a chapter to your ToC from two places:
- From a highlight: While reading a book, select a text like you are highlighting it or long press on a word. In the popup menu you will see the Start TOC chapter item. When you press on it, you will see a dialog asking you to enter your chapter title. The text you selected will be already entered in the dialog. Edit your title if necessary and press create.
- From the Page browser: Open the Page browser via
/ Page browserLong press on the page thumbnail that you want to be the beginning of your chapter and select Start TOC chapter item from the popup menu. You will see a dialog asking you to enter your chapter title.
When you are done creating your ToC and don’t want to see these extra buttons, you can disable them by unchecking:
/ Settings / Custom layout features / Edit modeCreating this ToC will not alter your original ToC which comes with your book. You can clear your Custom table of contents from this same menu (in case you want to create a new one). And you can disable this feature completely in the same way you enabled it, if you want to return to the original ToC. Note that if you disable this feature after creating a custom ToC to return to the original one, your custom ToC will not be deleted. You can still switch between the original and your custom ToC.
Some books or documents might contain long footnotes or bibliography sections. Like a scientific book which is 250 pages long but last 50 pages are Appendices, Index and References. Normally these pages are included in the progress bar and reading time calculations since they are part of the book. But generally these sections exist as a reference and they are not read completely so you might want to exclude them to make your remaining page count and time estimates more accurate. Or maybe you have an anthology book which contain some stories you have already read. Custom hidden flows feature of KOReader allows you to exclude these kind of parts of your book.
Have a look at the image for an overview of the process. Steps will be explained after the image:
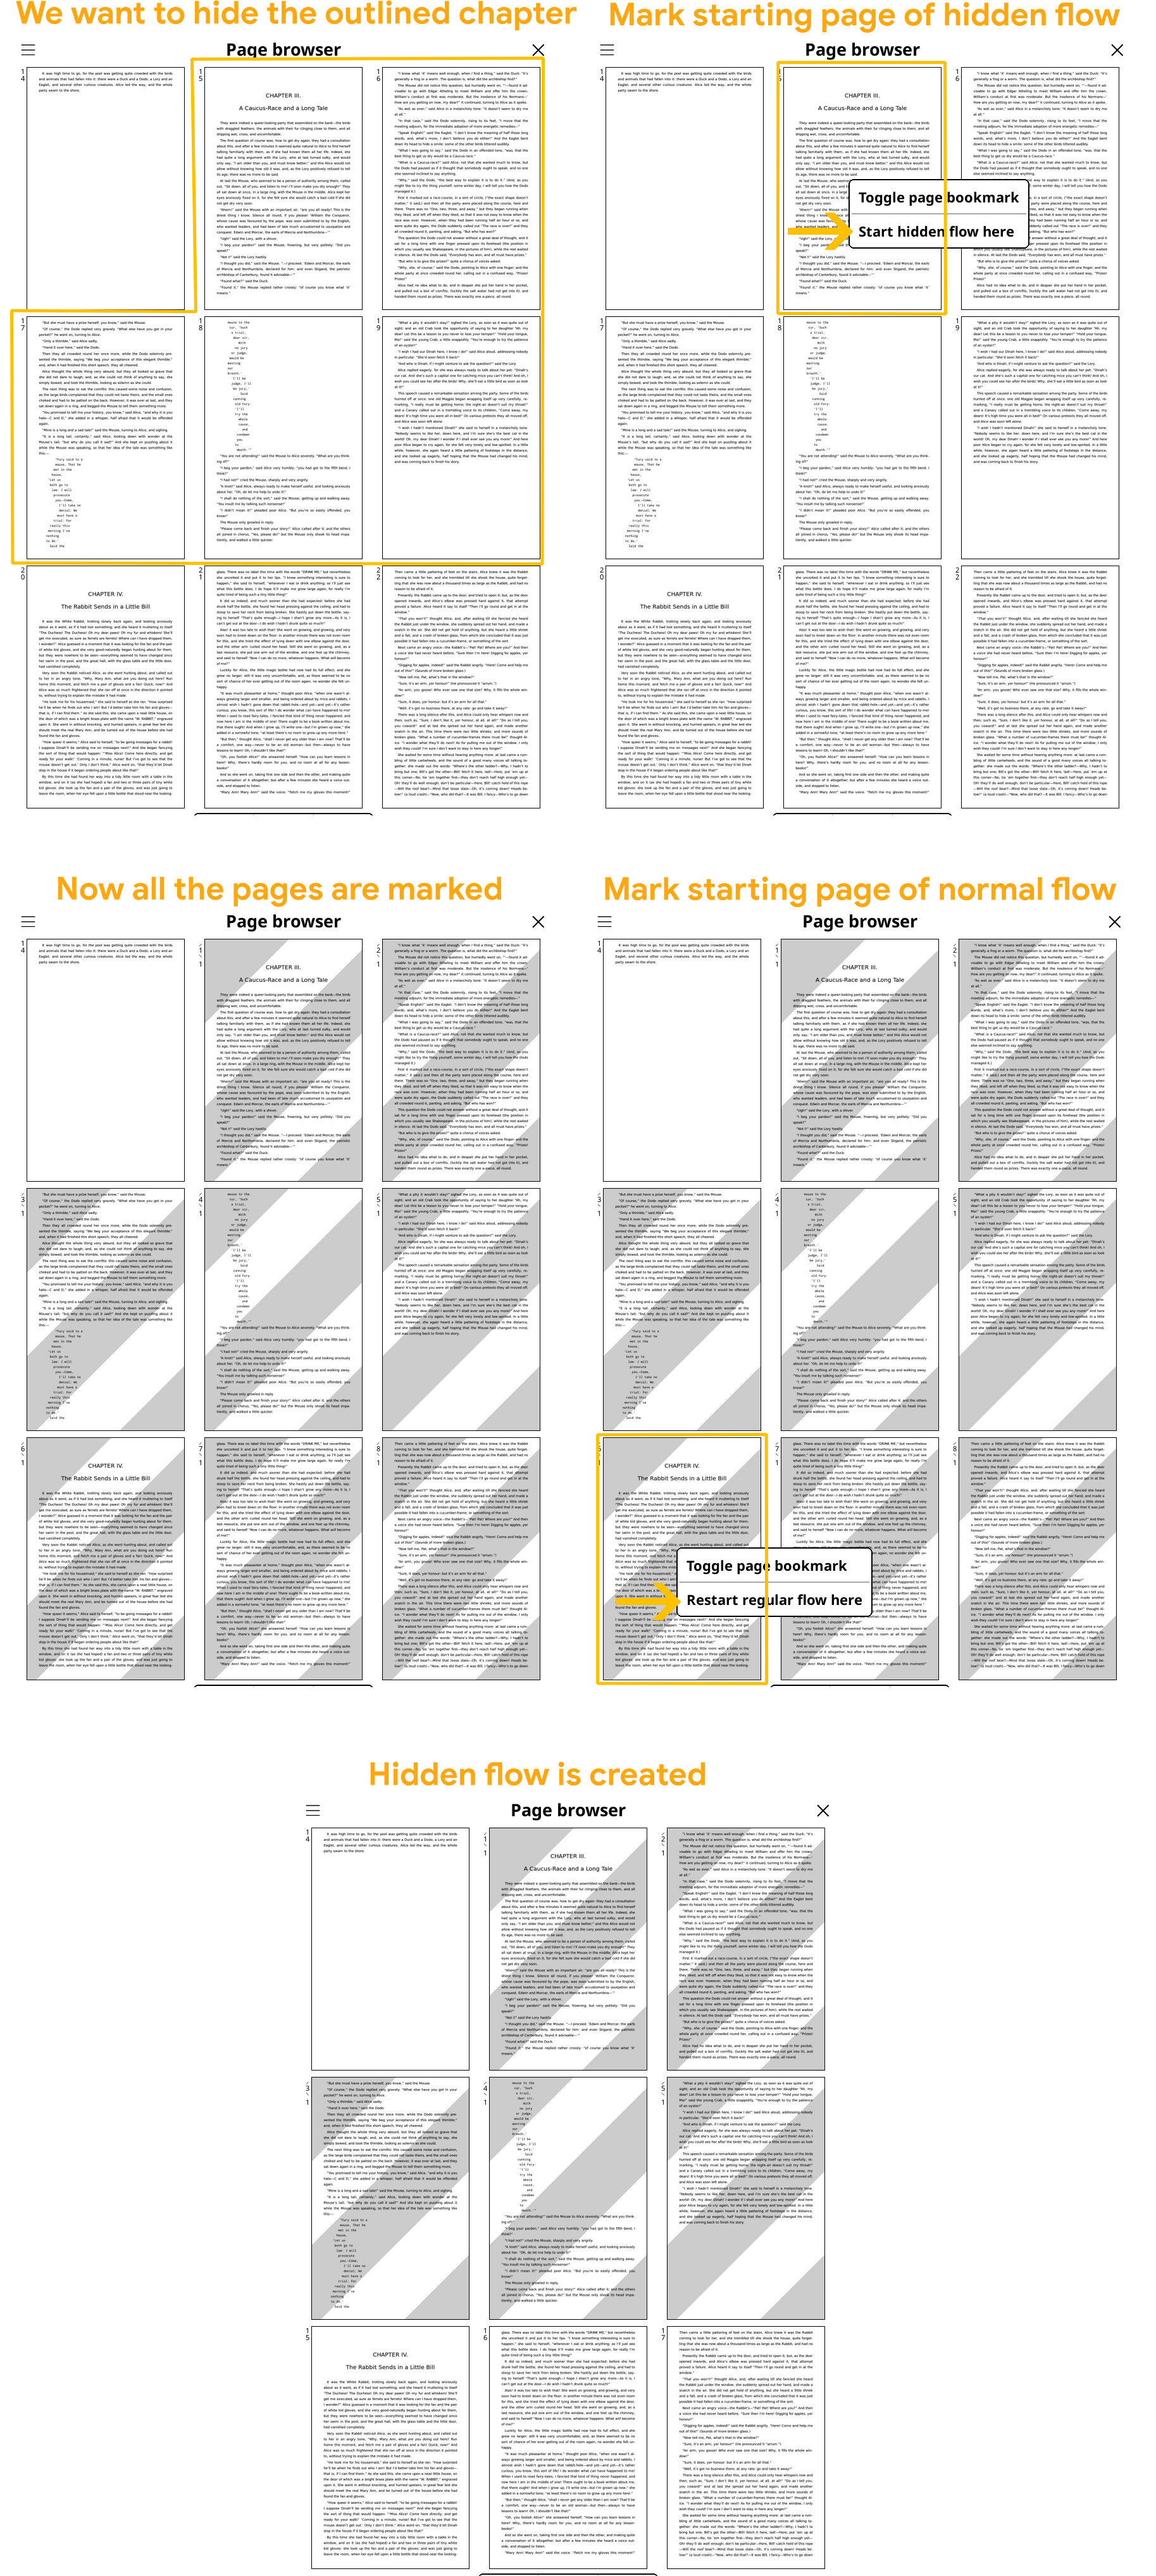
How to exclude a section by creating a hidden flow:
- Go to the first page of the section you want to exclude
- Open the Page browser via:
TOP MENU / / Page browser
- Long press on the page thumbnail that you want to be the beginning of your excluded section and select Start hidden flow here item from the popup menu.
- You will see that the pages starting from your selection now have a gray hatched background.
- Now go to the last page of your excluded section. You can navigate there from the Page browser or using other ways like Book map, Skim widget etc.
- Once you are at the last page of your excluded section, open the Page browser again (if you are not already in it).
- Find the last page of your hidden section and long press on the next page. Choose Restart regular flow here from the popup menu. You will see that the background of the remaining pages will return to normal color, indicating the end of hidden flow and the beginning of regular flow.
Working with the hidden sections:
When you create a hidden flow section as described above, KOReader’s behavior will be similar to the situation as if you removed a section of a paper book by cutting it out:
- These hidden flow sections will be skipped when turning pages. For example assume that you created a hidden flow for Chapter 10. Now you are on the last page of Chapter 9. When you turn the page, you will see Chapter 11.
- Page numbering will continue as if these hidden flow sections do not exist.
- These hidden sections will not be shown in your Progress bar (but read the explanation below) and will not be considered in time to read calculations. But they will still be visible in the Skim widget.
- Following direct links to the pages included in these hidden flow sections will still work. Also you can still reach these sections from the Table of contents, Book map, Page browser, Skim widget.
As we said above, your hidden flows will be excluded from your Progress bar. But if you jump to one of your hidden sections using any of the methods mentioned above, your Progress bar temporarily becomes this hidden section’s progress bar. You can imagine this as the progress bar is zooming into that hidden flow section. If you exit out of this hidden section by turning the page at the end of it, or using other navigation tools, your Progress bar will go back to showing the whole book again (with your custom hidden flows again not visible).
Removing and cleaning up hidden sections:
You can remove individual hidden flow sections from the Page browser in the same way you created them. You can also clear all of them at once with the menu item:
/ Settings / Custom layout features / Clear all marked pagesAs you work on creating hidden flows by tagging pages as Start hidden flow or Restart regular flow, some of the previously made ones may stop having an effect. For example in the case that you make Start hidden flow a few pages before an existing Start hidden flow, that existing one is no longer involved. This overlapping or obsolete tags are remembered for practical purposes. Again in the previous example, if you end that second hidden flow before the existing-but-no-longer-involved Start hidden flow, this deactive one will be involved again. You can clear all these inactive markers if they interfere with your custom flows, or once you finish making your hidden flows and happy with the results:
/ Settings / Custom layout features / Clear inactive marked pagesIn some reader applications, when you change a setting let's say the font used for books, it changes globally. Which means, if you change the default font to Verdana, any books you open next including the ones you are already reading will be shown in this Verdana font.
KOReader's approach is different from this. We save appearance settings per book. This gives you the flexibility to change your settings for the current book without affecting others. For example if you have some fantasy books, you can change the font to a medieval looking one just for these books. Or you can set some books to open in landscape orientation or double column mode.
To change a setting globally, tap and hold an option or menu item (font weight, line spacing etc.), to set its value as default. This new value will only be applied to books opened from now on as we said above. Previously opened books will keep their settings. You can identify default values as a star (★) in the menu or as a black border around the indicators as seen below:
So when you adjust your document defaults like default line spacing or default contrast, this new value will only be used for the new documents you open after the change. Your already opened books will not change.
But what if you want them to change too? For example, if you change your default font, you will probably adjust font weight and line spacing to more suitable values for this new font. You are satisfied with how the text looks and now you want all your books to look like this. With this feature you don’t need to change these values manually in all your opened books.
You can easily apply these changes to your already opened books by choosing:
/ Reset document settings to defaultWhen you tap this option, your current book settings will change to the latest defaults you have set. Don’t worry, this will only change the appearance of the book. Your reading position, highlights, notes and bookmarks will be preserved.
When you adjust a book to your liking, for example by changing line spacing, font contrast etc. you can save all the changes at once as defaults. Then you can apply these settings to other books with the Reset document settings to default option as explained above.
You can save your changes as defaults by choosing:
/ Save document settings as defaultThis powerful feature allows you to save all the BOTTOM MENU settings + font type as a profile. This means you can have different group of settings for different conditions or book types which you can apply at once instead of changing the settings manually every time.
For example you can create:
- Double column profile with two columns of small sized text, landscape orientation and minimum margins
- Night reading profile with bigger sans serif font and higher contrast for more visible text under low light
- Disabled styles profile with embedded style and embedded fonts disabled for badly structured books
After adjusting your settings to your liking, you can create a profile from them via:
/ Profiles / New with current document settingsAfter creating a profile with your settings, you have many options for applying it to another book:
- You can apply the profile from the Profiles menu
- You can assign a gesture to it
- You can show it in your Quick Menu
Click here to go to the QUICK MENU AND PROFILES section of the guide.
KOReader supports fonts in most widely used TrueType (.ttf) and OpenType formats (.otf). Font files with these extensions can be directly copied to /koreader/fonts/ folder on your device. Check our wiki for more info.
When starting up, KOReader compiles the available fonts from the font metadata/info and classifies them according to family and weights. This means you can add different weights and variants of a font and KOReader will try to use the most suitable one. Since it takes font family information from metadata, font names are not important when copying to your device. Installed fonts will be available after restarting KOReader.
Here are some example fonts which look good on an e-ink screen. You can find more of them on the Google Fonts website:
Serif:
Sans Serif:
Monospace:
If you are planning to use your own monospace font, probably you already have a favorite one, so we are not offering any examples here. But you can find and compare many monospace fonts at programmingfonts.org
/ Font / Font settings / Generate font test documentIf your book includes parts with Monospace fonts (like in programming books), Monospace text might look disproportional even if it is technically at the same size as the rest of the book. This is caused by differing font metrics. KOReader has an option that allows you to adjust the relative Monospace font size to fix this difference:
/ Font / Font settings / Monospace fonts scalingHere you can increase or decrease the size of your Monospace font by adjusting its scaling as a percentage of the default size.
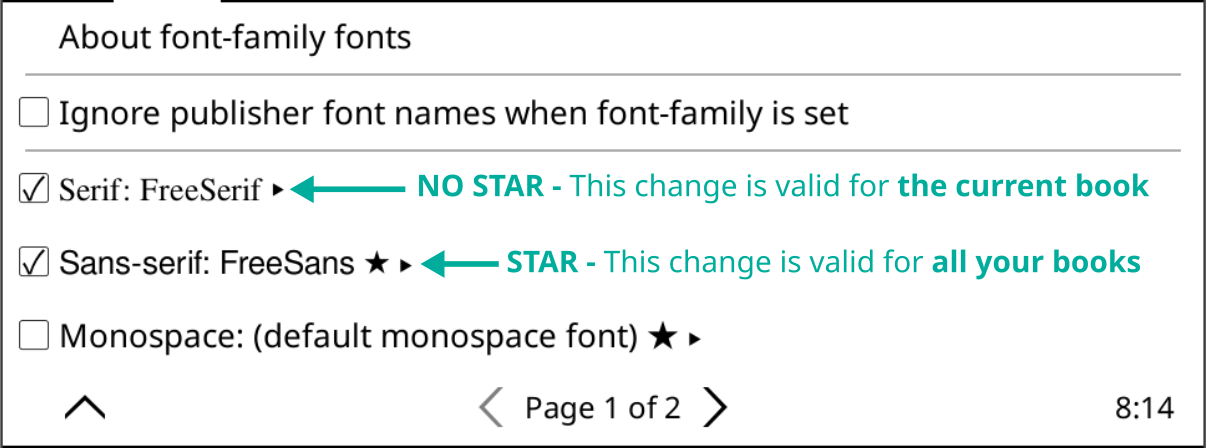
In HTML/CSS based documents like EPUBs, books can specify to use fonts by family instead of a specific font name. These families can be Serif, Sans-Serif, Monospace, Cursive, Fantasy, Emoji, Fang Song and Math. For example in a book, normal text can be shown in Sans-serif while dialogues are shown in Serif font. KOReader normally uses your default font for all these families except Monospace and Math (which is determined by the style of the text nodes, for example 'font-family: serif'). If you want these families to look distinct, you can assign specific fonts for them here:
/ Font / Font-family fontsTo change a family font for the current book just tap on the desired font name. If you want to set this for all your books, long-tap to set it as a default (★). If a book abuses this font family feature to the point where your default font is hardly used, you can disable that family font for this book by unchecking the association.
If you are switching between fonts frequently (i.e. monospace for programming books and serif for novels) there is a workaround which makes this easier than going into the menu each time. You can create profiles for your fonts and all font related settings like line spacing, contrast, bold etc. and add these profiles to a Quick Menu. So with a single gesture you can open your font selection menu and change the font like shown in the image below:
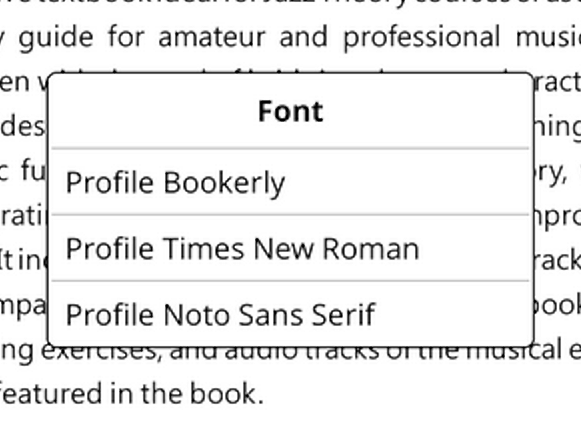
Check the QUICK MENU AND PROFILES section of this guide to learn how to do this.
!!! ADVANCED
Style tweaks feature of KOReader allows you to modify how your book is rendered by KOReader. We won't go through a full CSS course here. We just want to show you the basics so when you see a style tweak, you will at least have a rough idea what it does.
We can describe an EPUB document as a HTML file + some CSS rules. These CSS rules determine how different parts of the book (headings, bold text, quotes etc.) will be shown on a reader app. With style tweaks, you can change how your book will be rendered by adding new rules and/or overriding the rules written by the publisher that is embedded in your book.
Let's see this on an example style tweak:
img { width: 10px !important; height: 10px !important }
In plain language this rule says: "Ignore their original size and make all the images in this book 10 pixels wide and 10 pixels high." So if you add this style tweak to KOReader, all the images in your book will be shown tiny.
Now lets explain this tweak item by item:
- img - This is a CSS selector that targets all img (image) elements in the book.
- { width: 10px !important; height: 10px !important; } - This is the declaration block. It contains the styles which will be applied to the selected img elements.
- width: 10px !important; - This first part sets the width of the targeted img elements to 10 pixels. The !important declaration is an override switch which ensures that your width value takes precedence over any other existing width declaration applied to these images.
- height: 10px !important; - This part sets the height of the targeted img elements to 10 pixels. Again, the The !important declaration is an override switch which ensures that your width value takes precedence over any other existing height declaration applied to these images.
In summary, this CSS rule is designed to set a fixed width and height of 10 pixels for all img elements in your book, ignoring their original style.
These are some useful style tweaks that you can use directly or modify according to your liking. Next heading explains how to use them in KOReader.
- Add a separator line above each heading in a book:
H1, H2, H3, H4 { border-top: 2px solid black; }
- Add some margin above the headings:
H1, H2, H3, H4 { margin-top: 2em !important; }
- Or if the book have too much margin above the headings, remove them:
H1, H2, H3, H4 { margin-top: 0 !important; }
- Add a small gap between paragraphs to make the text more readable:
p + p { margin-top: 0.5em !important; margin-bottom: 0.5em !important; }
- Disable all images in an EPUB:
img { display: none !important; }
-
Make images very small instead of disabling them:
img { width: 10px !important; height: 10px !important }
-
Make the code block sections in computer science books tidier and more readable (Here you can see an example):
pre,code { font-size: 0.6em !important; line-height: 1.8em !important; background-color: #eee !important; margin: 1em 0 !important; padding: 1em 0 !important; }
Ok, now we have seen what style tweaks are. But how can we use them? There are three types of style tweaks in KOReader:
This heading is new, and the screenshot above and below. Anything to add?
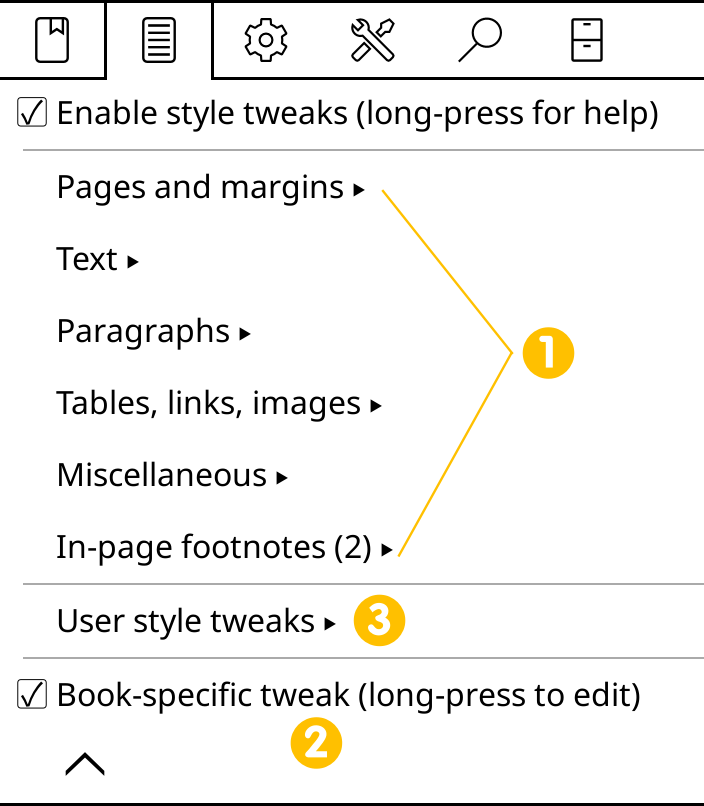
These tweaks are included in KOReader. They are the easiest to use since you just enable them from the menu to use them. You don't need to write any CSS code:
/ Style tweaksThey come in many categories. To apply a tweak to the current book only, tick the checkbox. If you want to get more information about this tweak or enable it for all the books, long-press on its name. A dialog will appear:
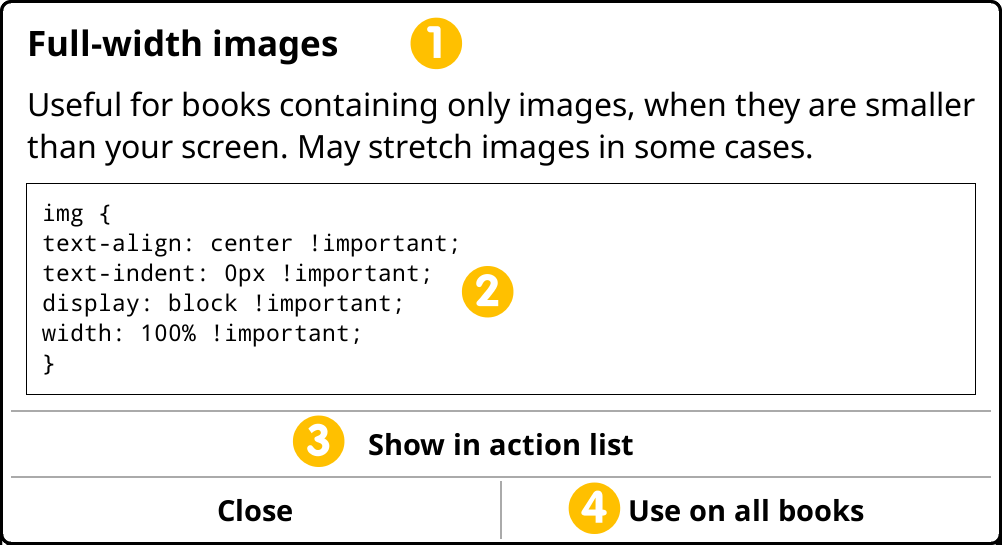
- This area shows the name and description of the tweak
- This box shows the CSS code of the tweak. You can tap on this area to copy the code to the clipboard. Then you can paste and modify this code in your Book-specific tweak as explained under the next heading.
- Show in action list button allows you to toggle this tweak with a gesture or add it to a Quick Menu. See the heading named "How to use tweaks efficiently" below for more info.
- Use on all books button activate this tweak for all your books. A star (★) will appear next to its name in the menu, indicating that this tweak will be applied to all books. You can disable this with the same steps.
As you can guess from its name, this type of tweaks are only active for the book which you created them in. This feature is more useful for testing your tweaks or if you need to fix something on the current book and you know that you won't need it on other books. After creating this type of tweak, if you decide that you will need it on other books too (i.e. from the same publisher), you can convert it to a user style tweak, which we will explain next.
To create a book specific tweak, use the integrated editor which you can find here:
/ Style tweaks / Book-specific tweakTIP In the editor we have a CSS menu on the bottom toolbar. This menu contains many useful CSS syntax and properties. When you open this menu please first read the Long-press for info help. Also you can long-press on CSS items in this menu to see a description.
These group of tweaks are different from the previous ones in the way they are created. Also unlike the previous type, they are not limited to a single book. They can be applied globally to all of your books.
Procedure is roughly like this, which we will explain in detail:
- Create your user tweak file
- Transfer it to your device
- Enable your tweak from the menu
1. Creating the user tweak file:
A user style tweak is actually a normal text file with a .css extension. You can create this file:
- On your computer
- On your device if it has a text editor (like Android OS based devices)
- In KOReader's integrated text editor which you can find in plugins
You can copy / paste the examples we mentioned above to your file.
2. Transferring the file to your device:
After creating the file(s) which contain your CSS rules, save or transfer them to the styletweaks folder under your KOReader installation. Give the files descriptive names because filename will be the title of the tweak in the KOReader menu system. You can use underscores "_" in your filenames, they will be treated as spaces in the menu. You need to restart KOReader after transferring your files so it can load them.
2. Enabling the tweak:
After the restart, open a book and go to this menu:
/ Style tweaks / User style tweaksNow you should see your tweak in the list with a checkbox next to it. To apply your tweak to the current book only, tick the checkbox. If you want this tweak to be enabled for all the books, long-press on its name. A dialog will appear. Tap the menu item Use on all books. A star (★) will appear next to its name in the menu, indicating that this tweak will be applied to all books. You can disable this with the same steps. See below for an example:
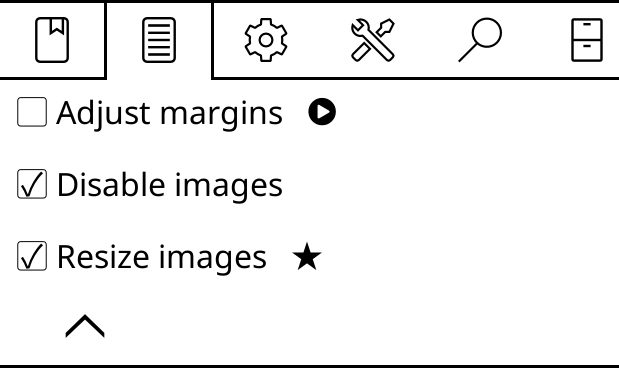
In the image above, I have 3 style tweak files in the styletweaks folder under my KOReader installation. First one is disabled because checkbox is empty. Second one is enabled for this book only since checkbox is marked but there is no star. Third one is enabled for all the books (★).
You might notice that there is also a right triangle icon next to the first tweak. This means that this tweak can be activated using gestures. This will explained in the next heading.
When creating your user style tweaks you can make multiple tweak files, each modifying some part of the book like in the example image above. You can have one file for the headings, others to modify paragraphs, links etc. This modular system allows you to enable tweaks depending on your document.
As we said above, you can toggle user style tweaks from this menu location:
/ Style tweaks / User style tweaksAlso we have easier ways to toggle your style tweaks than going to the menu every time.
1. You can assign a gesture to a tweak
To do this, first we have to add our user style tweak to the list of gesture actions:
- Go to the user style tweaks menu and long-press on your style tweak
- In the dialog press the button Show in action list
- A right triangle icon will appear next to your style tweak in the menu
You can see it in the example image above, next to the Adjust margins style tweak. Now this style tweak is added to the actions list. You can find it under Gesture Manager > Reflowable documents category. It will be at the end of the list.
2. You can add a tweak to your Quick Menu
To add a tweak to your Quick Menu, first it has to be added to the actions list as described in the heading above. Then you can follow the instructions under the Quick Menu section of this guide.
You can even combine both methods and create a special Quick Menu for your style tweaks and then assign it to a gesture. This way, with a simple gesture you can access all your style tweaks and activate them as needed.
Note that in some books, titles might not be in <H1> or <H2> elements, but in something like <p class="tit123">. You can find which selectors are used for a part of text by checking the source. To achieve this, select the text around the element which you are interested in, and choose View HTML from the dialog. In the example above, your style tweak would look like this:
P.tit123 { border-top: 2px solid black; }
instead of this:
H1 { border-top: 2px solid black; }
KOReader gives you options to interact with your book like you can do with a real book. Many settings of the bookmark window can be changed here:
/ Settings / BookmarksBOOKMARKS:
You can add (and remove) a bookmark by pressing the upper right corner. This is the equivalent of folding the corner of a page on a real book and shows a similar icon when you enable it.
HIGHLIGHTS:
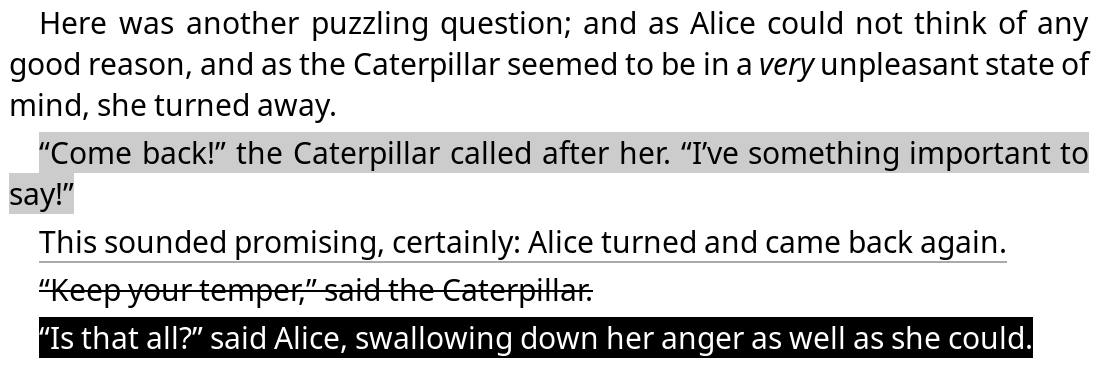
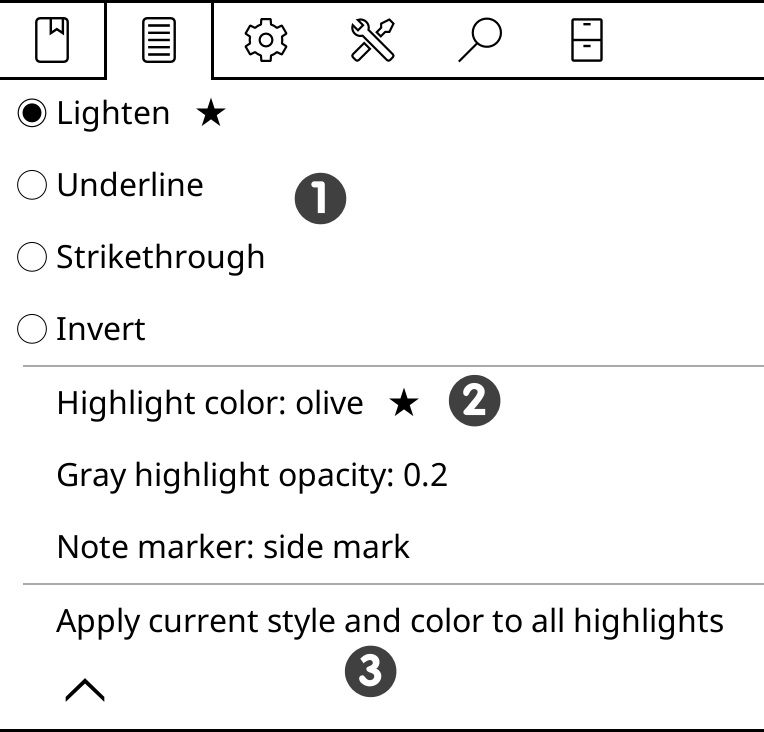
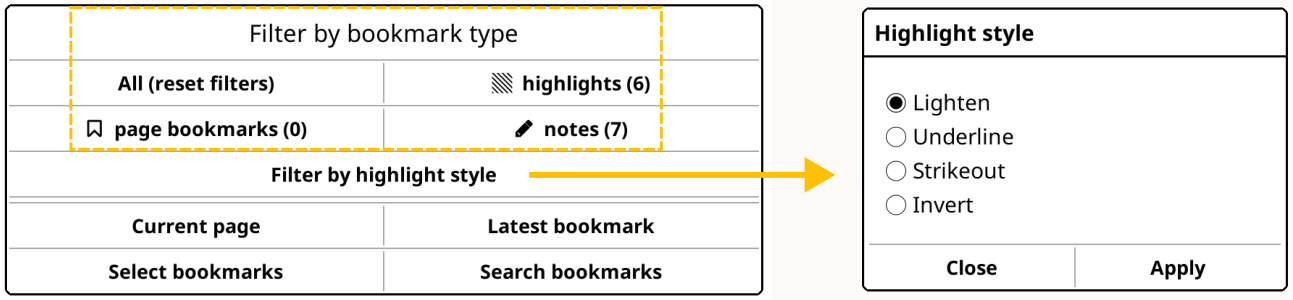
You can highlight text in 4 different styles. In the image below, you can see a normal paragraph followed by different styles of highlights. Lighten (with gray background), Underline, Strikeout and Invert.
You can use all these styles at the same time, like they are different colored highlight markers. Or you can decide your favorite style and set it as default from this menu by long pressing:
/ Highlight styleAlso if you have a device with a color screen, you can create highlights in different colors:
/ Highlights / Highlight color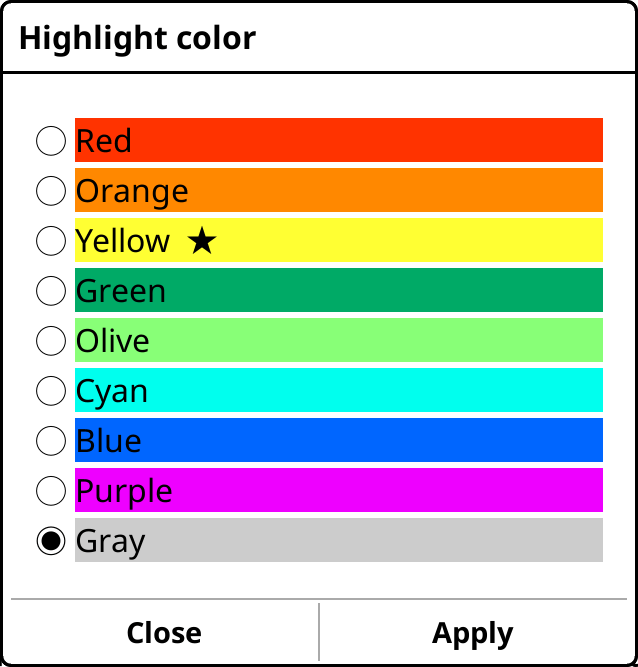
Some tips for color highlights:
- You can change the color of an existing highlight by tapping on it and choosing Color from the popup menu.
- You can combine the colors with different highlight styles like Underline and Strikethrough to create a powerful highlighting system. For example you can use a red strikethrough style for removals or orange underline style for important points etc.
- In the highlights menu you can long-press on a highlight type to set it as default (★)
- After selecting a color, you can long-press on the color name in this menu to set that color as default (★)
- You can press the Apply current style and color to all highlights option to make all the highlights in the current book same. Be careful, there is no undo!
NOTES:
You can also add notes to your highlights. Just tap on a highlight and choose Add note from the popup menu. You can also choose a Note marker that shows which highlights contain a note. There are three styles: Underline, Side line and Side mark (which is the pencil icon shown on the right side of the picture below):

To enable this feature and choose a Note marker style, go to:
/ Highlight style / Note markerKOReader has two highlighting modes for different use cases:
Normal mode is similar to selecting a text with your finger on a phone/tablet and more suitable if your highlights are shorter than one page.
- Long-press on the starting word
- Move your finger to the end of the passage
- Release finger
When you reach page boundaries, KOReader will turn the page for you to continue highlighting (only in EPUB/HTML documents). You can disable this feature from:
/ Taps and gestures / Long-press on text / Auto-scroll when selection reaches a cornerSelect and highlight mode is more suitable for highlighting longer passages which cross page boundaries. It might also work better if you have touch screen sensitivity problems or motor control issues with your hands. Because in this highlight mode you don’t need to drag your finger along the screen.
/ Taps and gestures / Long-press on text / Dictionary on single word selectionHow to highlight:
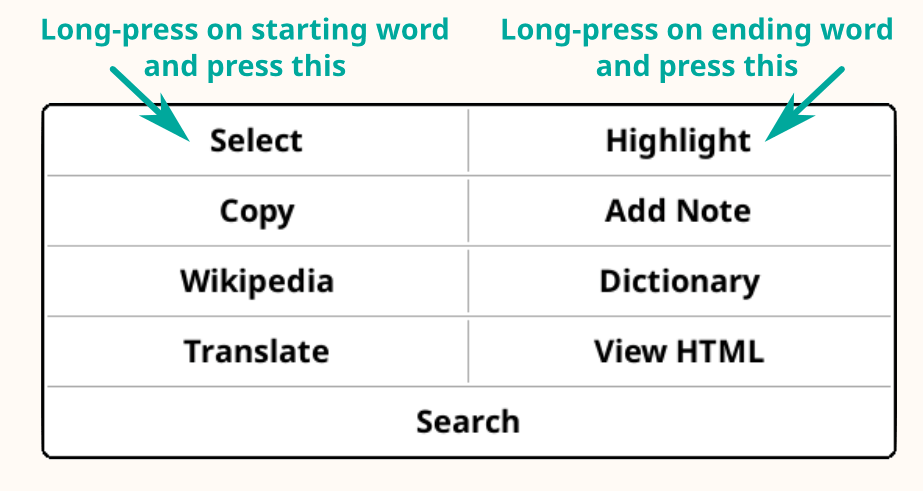
- Long-press (or drag if dictionary lookup is enabled as described above) on the starting word, popup menu will show up.
- Tap on Select, now you are in highlighting mode. When you are in this mode, you will see an indicator at the upper left corner of the screen (which you can tap on it to get more information). You can cancel highlighting by tapping on the beginning of highlight again. You can turn pages with taps/swipes and freely navigate the document (TOC, skim etc) in this mode.
- Long-press (or drag if dictionary lookup is enabled as described above) on the ending word for your highlight, menu will show up again.
- Tap Highlight this time to finish highlighting the passage.
This dialog normally opens at the center of the screen. If you want this dialog to open closer to your highlight location, you can change the center option here to gesture position (located on the second page of this menu):
/ Taps and Gestures / Long-press on text / Highlight dialog position / Taps and gestures / Long-press on text / Select and highlight / Highlight styleWhen you are highlighting, KOReader tries to include the related punctuation marks around your selection. For example if you highlight from the first word to the last word of a sentence, KOReader will automatically include the punctuation marks at the both ends of the sentence to your highlight.
But if you start highlighting from the middle of a sentence, period at the end will not be included because KOReader assumes that you want to make a partial highlight. So if you want the punctuation marks to be added to your highlight, be sure that you select the whole sentence. Also you can add these marks later by long pressing the Highlight edit buttons.
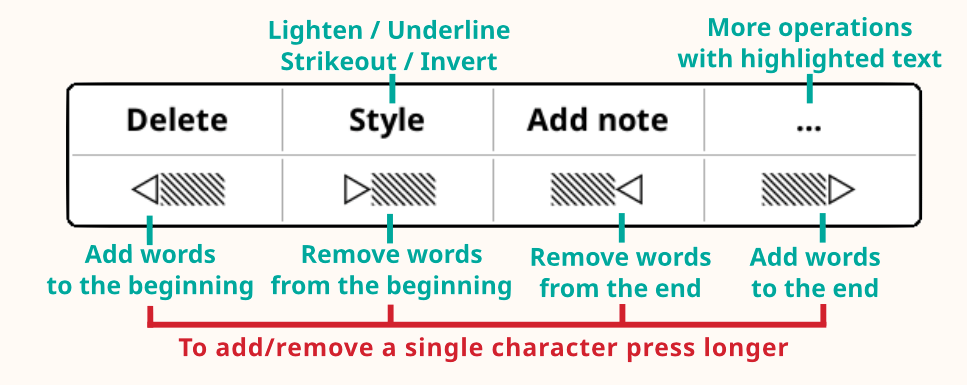
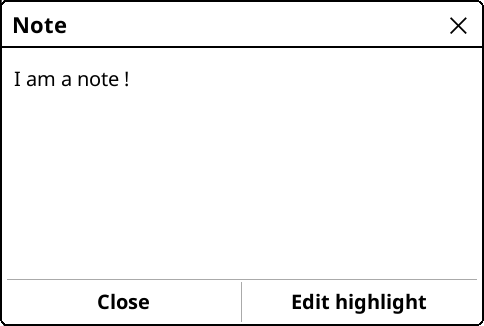
When you tap on an already highlighted text (without a note), you will see this popup menu. Delete and Add note items are clear. Bottom row menu items are used to extend or shrink the highlight.
When you tap on an already highlighted text with a note added, you will see this popup menu. Tap on Edit highlight to open the menu above where you can edit both the highlight and the contained note:
On your Bookmarks page you can filter the view to see only one type of bookmark by pressing the menu icon ( ) You can also filter by highlight style:
In addition to adding a note, KOReader also allows you to edit the highlighted text itself that is shown in your Bookmarks list. In some situations this might be more useful than adding a note to a highlight. For example imagine that you are reviewing a text. You want to highlight a sentence which contains many dates and one of the dates is wrong. When you want add a note to point to this mistake, you need to specify in your note, which one is wrong. But if you edit the text of a highlight, you can directly write "(this date needs to be checked)" next to the problematic date.
Note that this editing doesn't change the book content or the highlighted passage on the page. You will still see the same highlighted sentence in the reader. Your edit will be visible in the Bookmarks list. And when you export your highlights later, edited text will be the one that is exported.
To edit a highlight text, you can:
- Tap on the highlight
- Tap Details from the popup menu
- Tap Edit text from the details dialog
Also you can do it from the Bookmarks window:
- Go to the Bookmarks list via menu or gesture
- Long press on the highlight you want to edit
- Press Edit text in the menu
- Change the text in the dialog and press the Save button
If you want to revert an edited text to the original highlight, follow the steps above and at the step 3, instead of Edit text, press the Reset text button.
Normally when you open the Bookmarks list, only the content of your highlights are shown. If you added a note to a highlight, you will only see a pencil icon in the Bookmarks list. You can long-press on an item in this list to show (and edit) the added note. If you want to see the note text too in your Bookmarks list you can set it from here:
/ Settings / Bookmarks / Show in itemsYou can choose to show:
- Only highlight text (default behavior)
- Both highlight text and the note
- Note if there is one, otherwise highlight text
/ Settings / Bookmarks / Max lines per bookmarkAfter finishing a book, you can move it to a specific folder for archiving or processing purposes. Enable Move to archive plugin and set your target directory in the plugin’s settings (Set archive folder). After this, you can move a book to your archive folder using:
- Move to archive plugin menu
- With a gesture or
- With a Quick Menu entry
KOReader provides different ways of exporting your highlights and notes from your reader device:
This versatile plugin can export your highlights to local files or online services.
Local export
You can export your highlights to your device in these file formats:
- Text (.txt)
- HTML (.html)
- Markdown (.md)
- Kindle Clippings (.txt)
- JSON (.json)
You can choose your preferred export formats from:
/ Export Highlights / Choose formats and servicesYou can see the export location (and also change it if you want):
/ Export Highlights / Choose export folderOnline services
You can also export to these services over the network:
- Joplin - a note taking application
- Readwise - an online bookmarks/highlights application
- Memos - a self-hosted open source memo hub
- Flomo - an online note taking service
- XMNote - an Android bookmark organizer in Chinese language
You can find detailed setup instructions for these services on our related wiki page.
After selecting your formats, you can export the notes for the current book or all the books in your library from the same plugin menu.
If you want to export only some of the books in your library, you can do this from the File Browser:
- Select multiple books in the File Browser
- Tap on the menu button (shown as a check mark) at the top right corner
- Select Export highlights from the menu shown
/ Export Highlights / Choose highlight stylesKoHighlights is an external program that you can install on your computer. It can access your book notes and highlights when you plug your reader to your computer. Check the GitHub project page for download and instructions.
Calibre is an external program that you can install on your computer. You can import highlights into your Calibre database with its KOReader Sync plugin. You can install the mentioned plugin within the Calibre application. Check the project page for download and instructions.
KOReader provides you many ways to read a PDF/DJVU document which is optimized for bigger page sizes (generally A4 or Letter) on your smaller screen device:
1. You can enable Reflow
/ ReflowReflow tries to extract the text portion from your document (if it is available) and format it as a single column. Results are generally satisfactory. You can also set this as a default by tapping and holding on it.
2. You can enable Zoom To Content
 /
/ 
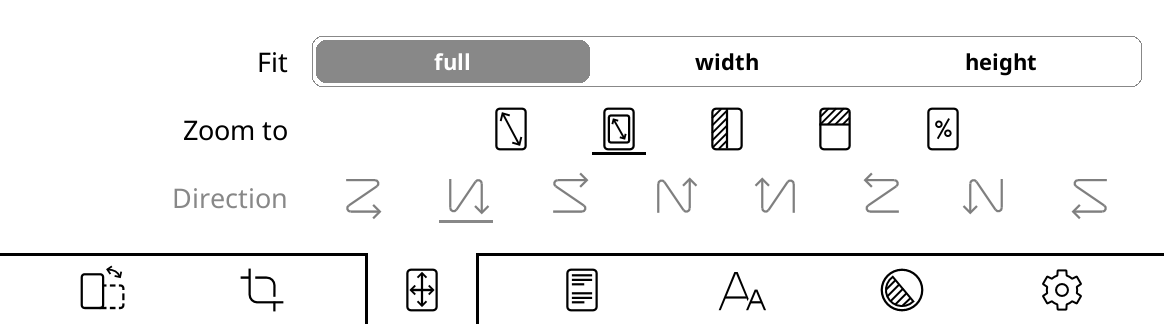
With this option KOReader tries to crop margins from your document so text can look bigger on your screen. You can set fit to width in the same menu which will try to fit only page width instead of whole page, so your text will look bigger.
3. You can try to use your device in Landscape orientation
This will make your screen wider so your document may look big enough to read comfortably.

4. You can zoom to 100 percent size and instead scroll the screen to read different parts
This is especially helpful with comic books. First enable column mode from this menu item:
/ 
Then select an appropriate flow direction for your document from the same menu:

- For example if you are reading an article which has two columns, you will scroll down until the end of page reading left column then go to right upper side to continue reading right column:

- Or if you are reading a comic book, you will want to go “right / down left / right” in a zigzag pattern:

- For a Japanese comic book (right-to-left panel order) this might be the reverse:

In this mode you can also adjust Horizontal/Vertical Overlap and Number of Columns from the same menu to fit the text on your screen better. Feel free to experiment with these settings.
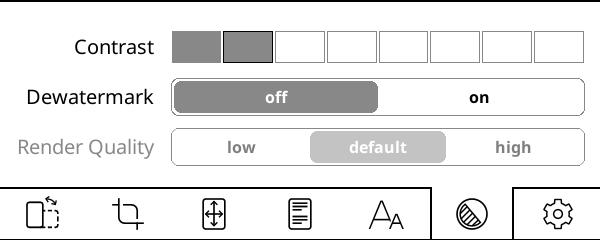
Contrast setting adjusts black levels in your document. Be aware that same contrast value applies to both text and images in your document. If you set it very high, your images may become too dark.
Dewatermark removes watermarks from the rendered document. It can also be used to remove gray backgrounds. This feature can convert a grayscale or color document to black & white to produce more contrast for easier reading.
Render quality (only active in Reflow mode) sets the quality of text and image extraction processing and output. High is more pleasing but it can be much slower (several seconds for page turn) than default depending on your document. If your PDF/DJVU files are slow, this is the first setting you should check.
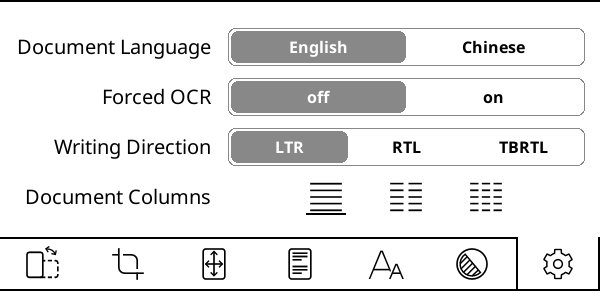
Document language sets the language that will be used by the OCR engine.
Forced OCR as the name says, forces the use of OCR even if the document has a text layer.
Writing direction (only active in Reflow mode) sets the direction of original document. Set this to RTL for languages like Arabic and Hebrew.
Document columns (only active in Reflow mode) sets the number of text columns in the original document.
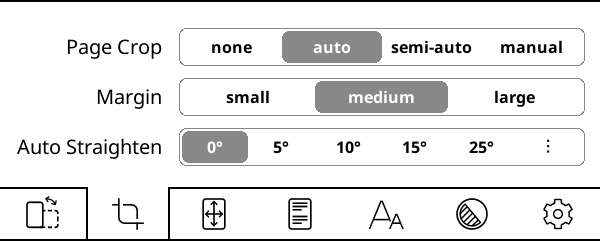
Auto straighten feature can straighten the pages of a problematic document, for example pages of a PDF which are scanned with an angle. It is available in PDF, DJVU, CBZ/CBT documents and image files. To enable, choose the maximum tilt angle which KOReader will try to correct. If it doesn’t correct you might have to choose a bigger angle. Note that this feature might slow down your reader depending on several factors.
For saving your highlights, you can use the Export highlights feature of KOReader which is explained in a previous section.
If you are making your highlights on a PDF document, KOReader can also save them directly to the PDF file. This can be useful in certain situations because with this method, your highlights become a part of the PDF file. This means you can see them on other applications or platforms without installing KOReader. For example if you are sending a file with highlights to another user, they don't have to install KOReader to see your highlights. You can just send the PDF file with your highlights saved into it and they can open and see them with a compatible PDF reader.
WARNING If you are using the Progress Sync plugin, saving PDF highlights will change your file so your synchronization will fail. If you are planning to use both features, in the Progress Sync plugin's settings, change the Document matching method to Filename instead of the default Binary matching:
/ Progress sync / Document matching methodWhich PDF readers can show these highlights?
PDF readers generally depend on some standard libraries to render PDF files. Two of the most known PDF libraries are MuPDF and Poppler libraries. KOReader uses the MuPDF library, so the highlights written to PDFs in KOReader are not currently visible on PDF readers which uses the Poppler library. You can find a compatibility list below. ✅ means you can see your KOReader highlights in this application, ❌ means you can't see them. And ⚠️ means the application needs some plugin to show them. List is ordered alphabetically within categories.
WARNING This list is not complete and might not be up to date. So we suggest you to test the compatibility yourself. Simply make a highlight in KOReader, write it into the PDF file and try opening the file on your intended reader to check if the highlight is visible.
- ✅ Chrome Browser (All platforms)
- ✅ Deepin Reader (Linux)
- ✅ Firefox Browser (All platforms)
- ✅ Ghostscript (All platforms)
- ✅ MuPDF (Windows/Android)
- ⚠️ Zathura (if MuPDF plugin is enabled)
- ❌ Adobe Acrobat Reader
- ❌ Evince (Linux)
- ❌ Foxit Reader
- ❌ LibreOffice Draw (as editor)
- ❌ Moon Reader (Android)
- ❌ Okular (Linux)
- ❌ SumatraPDF (Windows)
- ❌ Xpdf (Linux)
- ❌ Xreader (Linux)
Since making highlights for later usage can involve significant effort, if you are planning to use this feature, you should understand how it works in order to avoid frustrating situations.
QUICK SUMMARY: If you want to be able to delete or export your PDF highlights later, you have to copy the .sdr folder associated with your book when you backup or copy your book to other devices. Without this folder, KOReader can still show the saved highlights but it can't know where they are in the file, so it can't modify them. Please continue reading for more information about this.
How normal highlights work in KOReader
When you make a highlight in KOReader, whether the document is an EPUB or PDF, this highlight is written into a settings file. For example if you are reading Alice in Wonderland.epub you will have a folder named Alice in Wonderland.sdr in the same folder as your book. Your highlights will be kept in a file under this .sdr folder. Which means, if you delete this .sdr folder which is associated with your book, you will lose your highlights.
How PDF highlights work in KOReader
PDF highlights feature works a bit different than the description above. As we mentioned before, when you save your PDF highlights, they will be directly written into the PDF file, which means they become a part of the file itself. That's why you can send this PDF to another user and they can see the highlights with a compatible PDF reader. They won't need your .sdr folder which contains a record of your highlights because now the highlights are embedded directly into the PDF file.
Let's explain the problem which can arise when you are using this feature, on an example. Imagine that you are reading a PDF book on your e-reader with KOReader:
- You are making highlights and Save highlights to PDF option is enabled, so as you make these highlights, KOReader saves them to your PDF file.
- You want to continue reading the book on your phone with KOReader, so you copy this PDF file from your e-reader to your phone (but you didn't copy the .sdr folder, only the PDF file).
- When you open the book on your phone with KOReader, you will see that your highlights are still there.
Now the situation on both of your devices looks identical. Both your e-reader and phone KOReader shows the PDF file with the same highlights. But it only looks identical, actually there is a big difference.
KOReader on your e-reader has the knowledge of which highlights in this PDF file are made by KOReader because it has the .sdr folder. But KOReader on your phone doesn't have this knowledge. It only has the PDF file.
Difference arises when you try to delete the pdf highlights or export them. Your e-reader can both delete these PDF highlights and export them. But your phone KOReader can't, because as we said, it doesn't have the .sdr folder of your book so the highlights in the book look like a part of the original book from its point of view.
So in short, if you want to be able to delete or export your PDF highlights later, you have to copy the .sdr folder associated with your book when you backup or copy your book to other devices.
OCR (Optical Character Recognition) is the process of extracting text from images. In KOReader context, it is generally used for extracting text from scanned book pages in PDF files. KOReader relies on Tesseract Open Source OCR Engine for this task.
To use this feature you need to:
- Install Tesseract language data to your KOReader
- Add newly installed languages to koreader/defaults.lua configuration file (necessary only if your language is other than English or Chinese)
Comic books generally need more frequent page refreshes than the pure text content. For normal text, you can set your page refresh interval to high numbers without problem. But images can leave more residue and cause ghosting, especially depending on the panel of your e-reader.
KOReader allows you to assign any gesture to switch to different refresh rates. For example you can set swipe up left edge for every page refresh when reading comics and set swipe down left edge for every x page refresh for text only books. So when you open a comic, you can switch to more frequent refresh with a simple tap or swipe (or vice versa).
This action is under:
/ Taps and Gestures / Gesture manager / Screen and lights section / Full screen refresh rateThis feature makes reading comic books easier on smaller screens. You can enable it while you are reading a PDF, DJVU, CBZ or CBT document via:
/ Panel Zoom (manga/comic)When this option is enabled, KOReader tries to find the boundaries of rectangular panels on the screen. If you long-press on a panel, KOReader zooms in and shows just that panel.
As you can guess, this feature works best with comics that has clean panel boundaries. Also there is no page turn in this mode to jump to the next panel due to this boundary problem. You have to close the zoomed in panel and long-press on the next one. To do this, just swipe down this zoomed in panel. Also you can use any multiswipe gesture (any combination of up, down, left, right) to exit this view.
Procedure can be seen below:
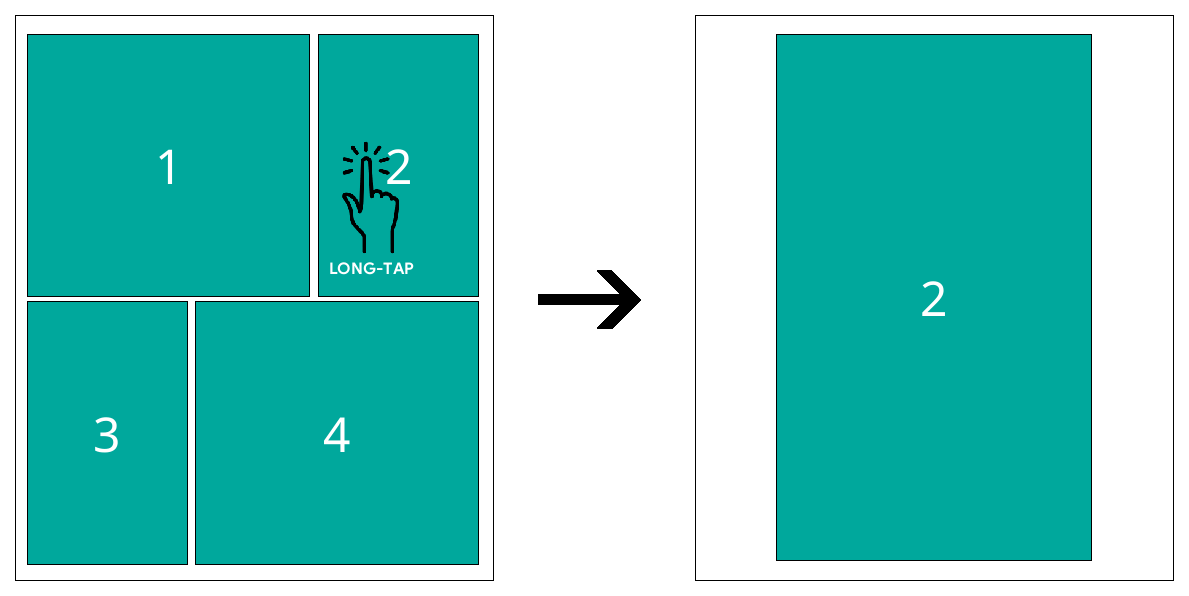
If you want to use this feature with other file types like EPUB, FB2, HTML or image files, you should open the file with a different engine: In the File Browser long-tap on the file name, tap Open with… and select MuPDF.
When you reach the last page of a book, KOReader shows you a dialog. In this dialog there is an Open next file action which will open the next file in the same directory as the current book. So you can put your series in separate directories and read them one after another without going back to the File Browser.

When opening this next file, KOReader skips the files that you have marked as finished. This feature is useful for example when you have a folder of manga files and you have already read some of them. You can mark a file as finished from the end of book dialog shown above. Also you can mark it from the File Browser by long-pressing on the file. After copying them to your device, you can:
- Open the File Browser in KOReader
- Long press on the ones you already finished and tap Mark as finished
Now you can read all the files by just tapping Open next file at the end of the book. KOReader will skip the ones you have already read.
If you like reading manga books on your e-ink device there are some tips that can make your experience better. Preparing your own manga files is the best solution if you're not satisfied with how comics look on your device.
File types like MOBI and EPUB are not suitable for handling primarily image content (e.g., manga/comics). MOBI support in KOReader is minimal to nonexistent, and EPUB’s text rendering priorities can cause problems when showing full-page images. For further technical details, please visit this GitHub issue.
Your best option is building a CBZ file which works better in KOReader. A file with .cbz extension is a zip file (with no compression) that is a collection of images. It saves multiple images, commonly .png or .jpeg files, organized into pages of the comic. KOReader can also open CBT files, which are similar to CBZ files but use TAR archive format.
Easiest way to convert a manga to CBZ is to get the manga as images from various websites, then convert them using Kindle Comic Converter (https://github.com/ciromattia/kcc). There are some useful settings like auto-rotating two-page splits to landscape and applying dithering so that eink-rendered gradients are smoothly dithered without jagged layers.
The best results can be achieved by resizing your images to exactly your e-reader screen size. A screen-specific CBZ which targets the exact screen size of the device, prevents rescaling during reading. KOReader downscales your images to your screen size while reading but this is not recommended because KOReader adds a dithering pass before scaling and this causes loss of quality.
But if you want to use your hand made CBZ on more than one device or you want to preserve high resolution for future proofing, your best option might be to make the CBZ for your highest resolution device. Or pick an arbitrary "high" resolution, possibly one that matches the source. 300 PPI or better (up to 450 or even 600), unless the source is lower of course. If we assume a screen size of 8", 1500×2000 is a good target resolution. For bigger images, you should try it on your device and see whether it can deal with it. Especially old Kindles with low memory can struggle with sizes like 3000×4000 for example. If you're automating the process, it might be worth considering creating both a lower and higher quality version (e.g., at 200/400 or 300/600 DPI).
/ Taps and gestures / Page turns / Invert page turn tap and swipes / buttonsThe following is an example procedure to process one manga file:
- Download Kindle Comic Converter (KCC) from https://github.com/ciromattia/kcc
- Download your manga from the source of your choosing (i.e. HakuNeko)
- Unpack the manga file. Now you should have a directory that contains only images (or subdirectories with images, no archives)
- Process this directory with KCC. Each directory will produce a single CBZ file, so if you want to make several volumes at once, select multiple directories at once
Some useful settings of KCC:
Spread splitter: This feature detects double pages and allows you to rotate or cut them in two.
Upscaling: Enlarge images that is smaller than your target resolution.
If you would like to enjoy your manga in a more immersive way, make sure that you selected the exact same resolution as your device’s screen resolution in KCC when creating your CBZ file. Also you can hide the bottom progress bar while reading your manga in KOReader. So you will have an immersive full screen view of your manga without obstructions.
!!! ADVANCED
After using KCC to create a CBZ file, you can apply additional dithering to the images. This way, eink-rendered gradients will be smoothly dithered without jagged layers. This step will produce fine-tuned manga volumes which look better in KOReader.
You can use ImageMagick to process your images. ImageMagick, is a powerful open-source software suite for displaying, creating, converting, modifying, and editing raster images. You can download ImageMagick and use it from the command line to process many images at once.
- Unpack the prepared CBZ file that you created with KCC,
- Download the following file dither_pack.zip (located on Yandex Disk) which contains two batch files (.BAT) and a GIF color template.
- Extract these three files next to your images that will be processed
- Edit the _magick_manga_ditherN_resize.bat and change the resolution to your device resolution (in both places in the BAT file).
WARNING Next step will replace all the images in the directory with the processed ones. So make sure that you have a copy of them in some other directory if you want to keep the originals.
- Run _magick_manga_ditherN_resize.bat to resize and dither the images.
- Assuming you have 7-Zip installed, run _batch_archive.bat to pack all the processed images into a CBZ archive.
!!! ADVANCED
You can make KOReader turn pages from Left to Right, so that swipes and tap zones are swapped. To enable this, add the following lines:
["/storage/emulated/0/Books/manga"] = {
["inverse_reading_order"] = true,
["kopt_zoom_direction"] = 0,
},
to this file:
/koreader/settings/directory_defaults.luawhere /storage/emulated/0/Books/manga is the absolute path to the directory containing your mangas. After this change, when you open a file from the mentioned directory, your swipes and tap zones will be swapped.
You will see the file browser interface when you run KOReader for the first time. It is one of the two main interfaces of KOReader. You will do all your file and folder operations here. You can access it from the reading screen by:
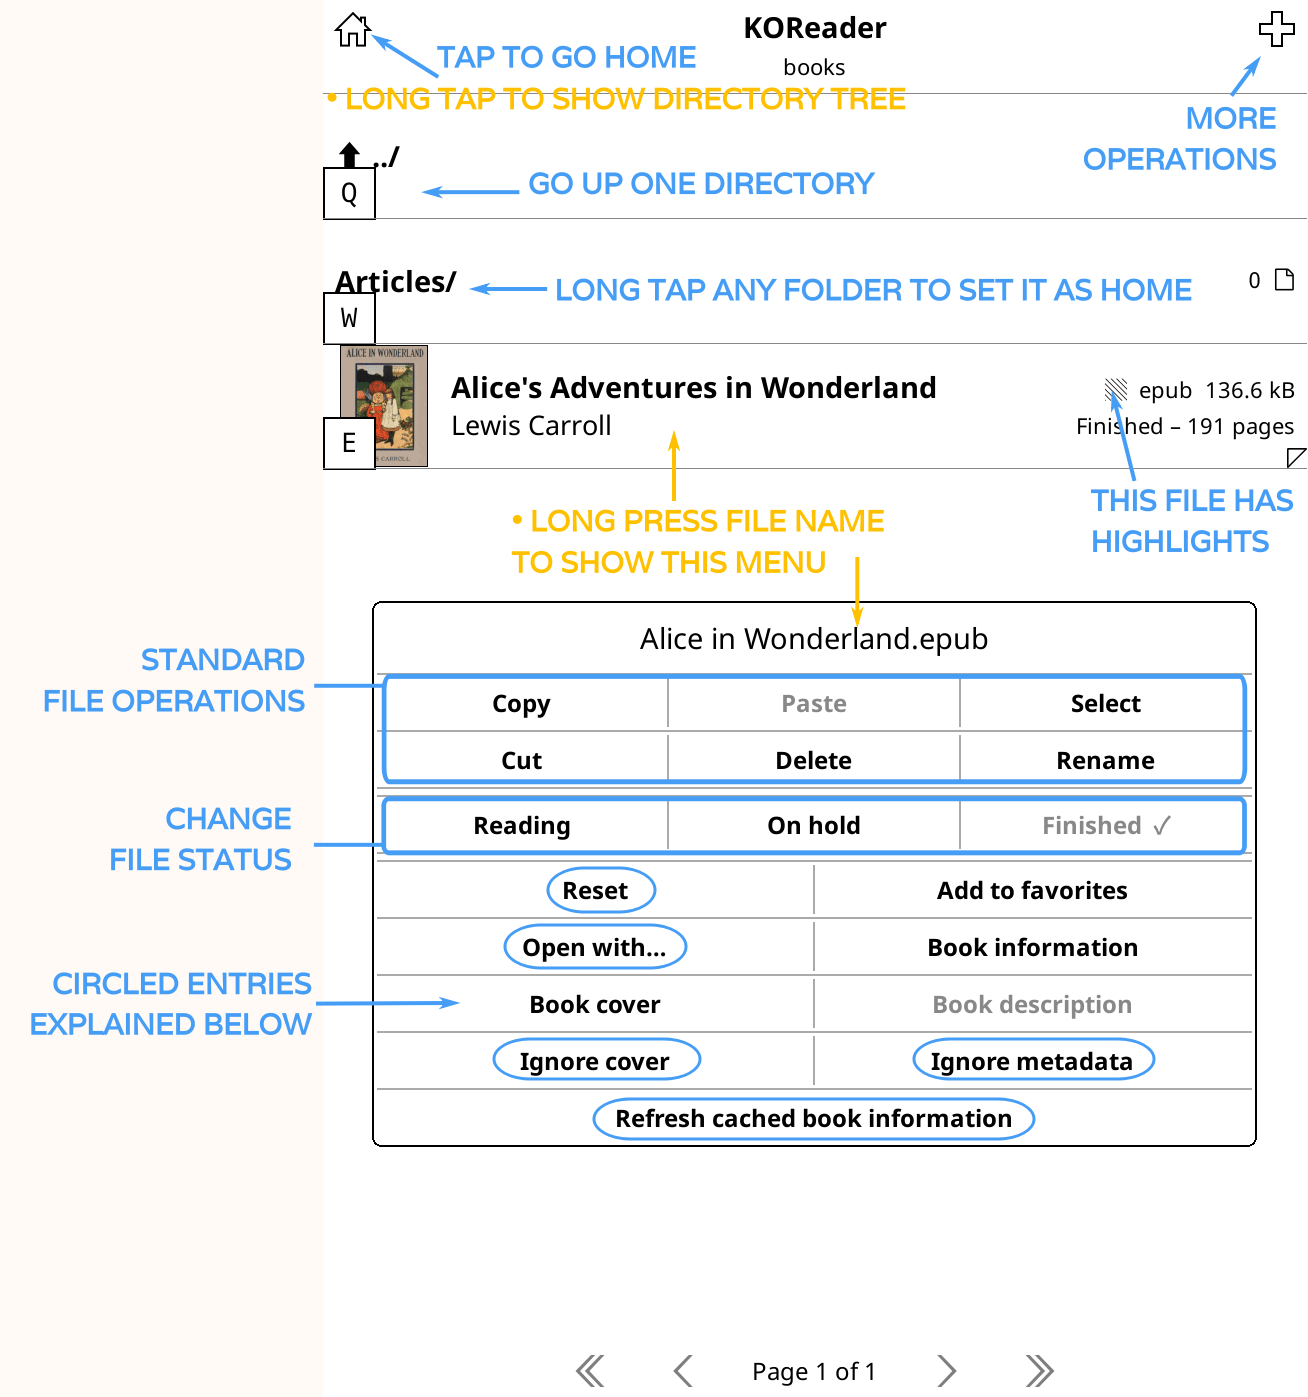
By default, file browser shows your HOME folder, which is your main library folder. You can change this by long-pressing on any folder. You can change file browsers many options like how books are displayed or sorted via the TOP MENU by swiping down from the top part of the screen.
Circled items in the image are explained below:
RESET: This option allows you to reset some properties of your document like reading progress, bookmarks, custom cover image etc. which you can choose in a following dialog.
WARNING Be very careful when using the reset dialog and double check which items are marked, otherwise you can reset everything related to your book accidentally.
OPEN WITH: KOReader has different engines for rendering different file types. In some cases you can open a file in a different engine to get some other features. See Viewing archive files and Viewing image files sections just below.
IGNORE COVER: If for some reason you want to disable the cover for this book (it may have wrong cover or cover is not very readable on the e-ink screen) you can select this.
IGNORE METADATA: If your book metadata is not correct, name field may show useless information. Select this option to show the file name instead of metadata.
REFRESH CACHED BOOK INFORMATION: KOReader caches a book's metadata and book cover when you add it to your library. If you make some changes to the book after copying to your device, this information might need to be updated. If you see wrong cover or metadata, you can refresh the book information with this menu item.
File browser allows you to perform some operations (like copying, moving, deleting, exporting highlights) on many files at the same time. For this procedure, first you have to select the files. Currently there are three different ways of selecting files for bulk operations in the file browser:
- In the first method, long press on a file name and choose Select from the popup dialog. This will activate the Selection mode. Now you can tap on other files to add them to the selection. When you finish selecting your files, tap on the checkmark icon at the top right corner of your screen. You can choose what to do with these files from the dialog. Or exit the selection mode from the same dialog.
- In the second method, press the + (plus) icon at the top right corner and choose Select files from the dialog. This will activate the Selection mode and rest is the same as the first method above.
- In the third method, you can choose your files based on a File search. This is useful if you need to perform an operation on many files distributed in different folders. For example you want to move all files in your collection authored by Tolkien, to a new folder. Steps for this action will be:
- From the Top menu press on the Search tab (with the magnifier icon) and choose File search.
- Check Include subfolders option if you want to search inside the folders too. You can check Also search in book metadata if you want KOReader to look in book's metadata. Otherwise KOReader will only look at the file names for the word you entered.
- You can start the search from your library Home folder or your Current folder by pressing on the respective button.
- After search is finished, you will see a file list (if your search term is found of course). Now you can tap on the Hamburger icon at the top left corner of the screen to enter the Selection mode.
- Tap on all the files you want to perform operations on and tap on the Checkmark icon at the top left corner of your screen. You will see a dialog which contains Select in file browser. Select this option.
- Now you will be back at the File browser and the files you selected in the Search dialog will also be selected here.
- Tap on the Checkmark icon at the top right corner of your screen. Now you can choose what to do with these files from the dialog.
KOReader allows you to add your favorite folders to a quickly accessible Folder shortcuts menu. For example if you have an Archive folder in your library that is under Home>Articles>Scientific>Archived, you can assign a folder shortcut to this Archived folder and access it quickly even while reading a book.
Adding a folder shortcut:
There are two ways of adding a folder to your Folder shortcuts list:
- When you are in the File Browser, tap right corner + (plus) menu button then tap Add to folder shortcuts item and enter a descriptive name for this shortcut. This will add the folder you are currently in.
- When you are in the File Browser, long-press on a folder name to open the context menu. Tap Add to folder shortcuts item and enter a descriptive name for this shortcut. This will add the folder you pressed on.
Folders which are in your Folder shortcuts list will have a star (★) in the File Browser.
You can remove a folder from the shortcuts in the same way, by long-pressing on it and selecting Remove from folder shortcuts.
Viewing your folder shortcuts:
You can open your Folder shortcuts from the File Browser or Reading screen while reading a book.
- From the File browser: Top right corner + (plus) menu then choosing Folder shortcuts or assigning a gesture.
- From the reading screen: By assigning a gesture to it.
It is under the File browser section of the Gesture manager. You can learn how to set gestures in the relevant section of this guide.
If you have books in .txt format (which is more common in Chinese and Cyrillic languages), you can try enabling the Auto-detect TXT files layout feature. In some cases it can improve the rendering and make the text more "book like". When enabled, the rendering engine will use heuristics (text wrapped under some max line length, single or double blank lines marking paragraphs, indentation or centered text considered heading...) to guess how to better render the text and will try to create a table of contents.
You can enable this feature here (which is visible only if you are reading a .txt file):
/ Style / Auto-detect TXT files layoutNote that this feature might mess up ASCII art drawings and space character based formatting. If your book has these kind of features, it might be better to use the default mode in which, the text file is rendered as is in a monospace font.
KOReader can read files stored/compressed in ZIP files. You can open ZIP, CBZ and EPUB (as they are ZIP archives too) files with the archive viewer to have a look at the contained files:
- In File Browser long-press the file name
- Tap Open with…
- Tap Archive viewer
A ZIP file can contain many types of documents like html, txt or images. KOReader can open your ZIP file properly only if you give it a hint for the type of file in the ZIP archive. If you give your file only a .zip extension, KOReader will assume that this archive contains images and try to open it like a CBZ file.
DEFAULT CASE: yourfilename.zip - Assumed to be a zip file of images (and opened by MuPDF engine)
If your zip file contains one of these types (instead of just images), please name it accordingly:
- FictionBook - yourfilename.fb2.zip
- HTML - yourfilename.htm.zip / yourfilename.html.zip
- Text log files - yourfilename.log.zip
- Markdown - yourfilename.md.zip
- Rich Text Format - yourfilename.rtf.zip
- Plain text - yourfilename.txt.zip
If the documents are not named like this, the wrong reader/format engine is likely to be used and you will see the No reader engine for this file or invalid file message. You can rename this file as explained above or long-press the filename and then choose Open with... to select the correct engine.
You can open image files with the image viewer instead of opening as a book. Files opened like this don’t show up in your history and have better scaling and rotation support.
- In File Browser long-press the file name
- Tap Open with…
- Tap Image viewer
KOReader provides two options for reading Markdown documents.
- You can open the document directly like a book by tapping on it. This mode doesn't provide formatting. So your .md file will look like as it is opened in a text editor.
- You can convert your Markdown document to HTML. This action will render a HTML file from your Markdown document with the correct formatting and a Table of Contents created from the headings.
To convert a .md file, long press on it in the File Browser and tap Convert from the popup menu. A new file with the same name but HTML extension will be created in the same directory. Be aware that conversion might take a while depending on your Markdown file and device speed.
You can also set file associations for file types which KOReader doesn’t automatically recognize. To associate a file with one of the KOReader providers, first long tap on your file in the File Browser then choose a provider engine to handle this file. You can check:
- Always use this engine for this file to associate this provider with this particular file only
- Or check Always use this engine for file type to associate this provider with all the files that has same extension as this one
- From the same dialog, you can see the associations you made by tapping on View defaults for file types
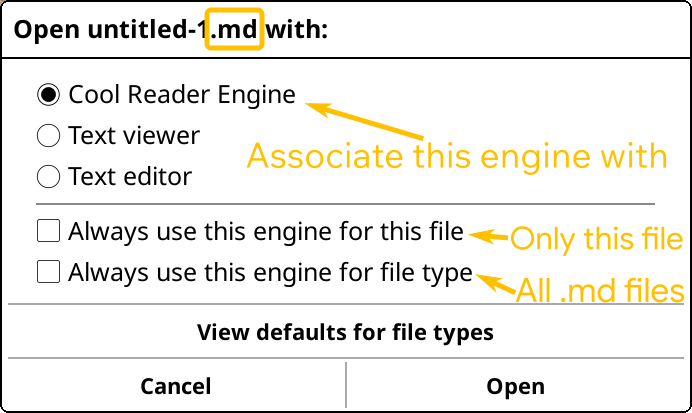
KOReader's Collections feature can help you with arranging your library more efficiently. As a very simple definition, collections are user created lists of your books. For example you can create two collections named Fiction and Non-Fiction to arrange your books accordingly. Of course you can also use folders to do this but using collections gives you more flexibility.
Some advantages of collections compared to the folder based organization:
- Adding a book to a collection doesn't move the book file. So your books can be located in different folders but they can appear in the same collection.
- One book can be in many collections, which is not possible with folders. For example you can have a Science Fiction collection and War Fiction collection. A book can be added to both of these collections at the same time.
- You can trigger profiles with collections. This will be explained below if you are not familiar with the profiles feature of KOReader. (Of course you can trigger profiles with folders too but collections doesn't require you to move your books in order to use temporary profiles for example.)
You can create collections to mirror any kind of categorization. Some example ideas:
- Genres: Fiction, non-fiction, memoir...
- Book status: Currently reading, want to read, next, did not finish...
- Series: Lord of the Rings, Harry Potter...
- Document type: Books, scientific articles, web articles...
You can create collections from the Collections dialog located here:
/ CollectionsYou can access this dialog from the reader view or from the File Browser. When you open this menu, it will show you a list of your collections. By default you will see Favorites there as a collection item which includes the books you have already added to your Favorites list.
- Adding a new collection: Use the hamburger menu located at the top left corner of this screen > New collection
- Removing a collection: Long tap on the collection name > Remove collection
- Renaming a collection: Long tap on the collection name > Rename collection
- Changing the order of your collections: Use the hamburger menu located at the top left corner of this screen > Arrange collection
There are three different places in KOReader where you can add books to your collections:
1. From the File Browser and History screen
You can add a book to your collections from the File browser or History screen. From the History screen you can add books one at a time. Long press on the book and choose Collections.... Then you can choose which collection(s) you want to add this book to.
If you are adding several books, you can do this from the File browser. For multiple books this is the procedure:
- Long press on a book
- Choose Select from the popup menu
- Select other books
- Tap the checkmark (✔️) icon at the top-right corner
- Tap Collections
For adding a single book, just long-press on it in the File browser and choose Collections from the popup menu.
2. From the Collections menu
This method allows you to add single and multiple books to your Collections. Biggest difference from the File browser method is that you can add whole folders and their subfolders to your collections at once. This is very useful if your books are already arranged in folders. For example if all your science fiction books are in a single folder, you can create a collection named Science fiction and add this folder at once.
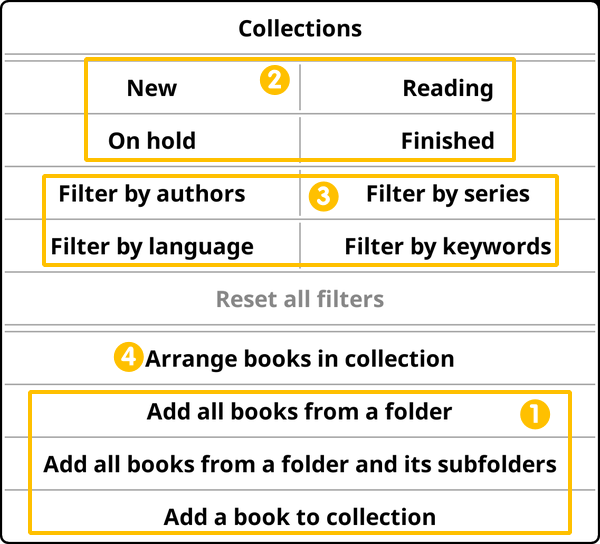
In the image above, Box 1 shows the book adding options. You can reach this menu from the collections screen's hamburger menu:
/ Collections / Your collection name / - Add all books from a folder: As its name says, this options allows you to select a folder to add all the books in it to this collection. Note that this option doesn't add the books in subfolders of the chosen folder. For example if you select your Fiction folder and you have folders named Science Fiction and War Fiction under it, they won't be added with this option.
- Add all books from a folder and its subfolders: This is the option that will add all the subfolders of your chosen folder. Be careful with this option because it will go down all the way while adding the books. So if you have many levels of nested folders, there might be too many books than you thought.
- Add a book to collection: This is the basic option that will allow you to add a single book.
You can remove a book from collections from the File browser, History screen or the Collections screen. In the File browser and History screens, long press on the book and choose Collections.... You will see a checkmark next to the collections that you added this book to. Uncheck the ones by tapping on it to remove the book from that collection. Also from the Collections screen, you can long press on a book and choose Remove from collection.
Collections can be very crowded but KOReader allows you to find your books easily by providing many filtering options. If you look at the image above, you can see the filtering options in Box 2 and Box 3. Box 2 allows you to filter by book status (new, reading, finished, on hold) and Box 3 allows you to filter by book metadata (author, series, language, keywords). And also you can combine these two groups of filters like this example: "Show me the new books in this collection which are written by Isaac Asimov (Filter by authors -> Isaac Asimov) that I haven't started yet (Filter by status -> New)."
You can update the book metadata by long-pressing on the book in File browser and choosing Book information from the menu. In the popup window you can long-press on any field to change the metadata like author or keywords. You can also use Calibre for this task, a third-party application which makes managing your book metadata much easier.
There are two types of search you can perform in collections: You can search for a phrase in the book titles and metadata or you can also search inside the book texts. You can open the search dialog from:
/ Collections / / Collections searchIf you want to perform a search in the book texts, please keep these points in mind:
- This type of search is only available if you open the collections from the file browser. It is not available from the reading screen.
- This search can be slow (around 2 seconds per book in the collection). So if you have a crowded collection, it might take a long time.
Search function depends on where you are in the collections window. If you are at the root level where you can see all your collections, search will be performed on all collections. If you want to search only in a specific collection, you have to tap and enter the collection. This is especially important if you are also searching in the book texts because it is a slow operation.
When you perform a search, results will be automatically saved as a new collection.
After creating your collections and adding books to them, you will probably want to keep them in sync with some folders. For example imagine that you created a Science Fiction collection. And you also have a SF folder in your library where you put your science fiction books. If you want to make the science fiction collection update itself when you add a new file to this folder, you can do it with connected folders feature of the collections.
With this feature you can connect one or more folders to your collection. After that, KOReader will (re)scan the folders to add or remove books from your collections in these conditions:
- When connecting a folder to a collection
- When including subfolders of a connected folder
- When showing the collection
- On program start
How to connect a folder to your collection:
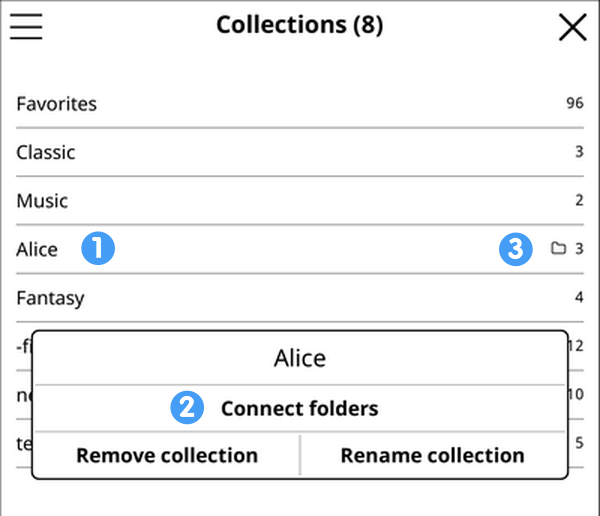
- Go to the Collections screen that is seen in the image above.
- Long-press on the collection name which you want to connect folders (1).
- Select Connect folders from the pop-up menu (2).
- List of connected folders screen will open.
- Add a folder by pressing the PLUS icon at the top left corner of that screen, which will open the Folder chooser screen.
- Repeat the last item if you want to connect more folders.
Collections with connected folders will have a folder icon as you can see from the image above (3).
You might want to include subfolders of a folder too for synchronization. In the step 4 above, when you open the List of connected folders screen, you can long-press on a folder to include/exclude subfolders from the popup menu.
How to disconnect a folder from your collection:
- Go to the Collections screen that is seen in the image above.
- Long-press on the collection name which you want to connect folders (1).
- Select Connect folders from the pop-up menu (2).
- List of connected folders screen will open.
- Long-press on the folder which you want to disconnect and choose Disconnect folder from the popup menu.
Your collections can be used with the profiles feature of KOReader. If you don't know about profiles yet, here is a description from our Profiles section:
A profile is basically a set of actions that can be triggered with a single gesture (like a macro).
As an example, imagine that when reading some type of books, you always:
- Rotate the screen to landscape orientation
- Increase the font size and contrast and
- Turn the screen light on
With the profiles plugin, you can do all these at once with a single action.
You can run a profile manually but real power of profiles can be unleashed with its auto-execute feature. Using this feature, you can trigger a profile depending on some conditions. Here is the link to the relevant section of the guide: Profile auto-execution. For now we will just explain one trigger condition here: Collections.
Basically you can create some profiles and set them to auto-execute if an opened book is in some specific collection. Some useful examples:
- You can add all your manga to a Manga collection and make a profile to switch the page turn direction to Right-To-Left and to invert page turn taps and swipes when you open a manga book from this collection.
- You can add your comic books to a collection, which can trigger a profile to decrease the screen refresh interval to every page to avoid ghosting.
- You can add your problematic PDFs to a collection, so when you open them Auto OCR or Reflow mode is activated with a profile.
KOReader can reflow PDF documents (this option can be found in the bottom menu while reading a fixed-layout document like PDF) to make them suitable for the small screens of e-readers. But for best results, you may want to convert your documents into more flexible EPUB format.
Most widely used applications for converting or optimizing your document for your mobile reading device are Calibre (EPUB, Kindle focused) and K2pdfopt (PDF focused).
Calibre can convert your documents between many formats. It also has a built-in editor that allows you to edit e-books (and fix problems) in the most popular e-book formats, EPUB and Kindle.
K2pdfopt optimizes PDF/DJVU files for mobile e-readers and smartphones. It works well on multi-column PDF/DJVU files and can re-flow text even on scanned PDF files. It can also be used as a general PDF copying/cropping/re-sizing/OCR-ing manipulation tool.
OCRmyPDF is a command line application which can add an OCR text layer to scanned PDF files (containing only images without text), allowing them to be searched or copy-pasted. It can especially be useful for reading old scanned books. It can also optimize the images for a smaller file size.
SingleFile is a browser extension for Mozilla Firefox, Google Chrome and Microsoft Edge. This extension allows saving a web page as a single .html file with all the resources (images, stylesheets, scripts) embedded.
!!! ADVANCED
KOReader stores settings and extra information related to your books in the same directory as your book file. We call this metadata and it includes:
- Visual settings for the book
- Book reading progress
- Highlights, bookmarks and notes
In a recent change, we added new ways of storing this metadata to solve certain problems related to synchronization between devices. Currently there are three different methods to store the metadata and each method has its own benefits/negatives.
You can change this setting from this menu:
/ Document / Book metadata locationWARNING We strongly advise reading the section below to understand the differences and how each method works before making any changes. Otherwise there is a risk of losing your book settings, progress and annotations.
/ Document / Book metadata location: book folderThis is the default method used on a new installation of KOReader. In this method, when you copy Alice in Wonderland.epub to your device and open it for the first time, a folder named Alice in Wonderland.sdr will be created in the same directory. This directory contains the files for your settings, annotations and book progress for this book.
Benefits
- You can manually backup and restore the settings for each book.
- When you perform directory synchronization or backups with a system like Syncthing or Dropbox, your settings will be synchronized alongside your books.
- You can rename the parent directories where your book resides, this doesn't confuse KOReader.
Negatives
- If you reorganize your library by moving/renaming the book files or their accompanying .sdr folder outside of KOReader file browser, you will lose metadata of those books without any warning.
- These .sdr folders will be visible when you browse your library directories with another file browser or from your computer, which may clutter your view.
/ Document / Book metadata location: .../koreader/docsettingsThis method is essentially same as the default one above. The difference is, in this method, all .sdr folders of your books will be under a single directory which is under the KOReader main directory structure, instead of your library directory, next to the book files.
Benefits
- Book .sdr folders will only be visible to and used by KOReader. They won't clutter your view of your library directories when you browse your library with another file browser or from your computer.
Negatives
- If you reorganize your library by moving/renaming the moving/renaming library directories, book files or their accompanying .sdr folder outside of KOReader file browser, you will lose metadata of those books without any warning.
- Since your book metadata will not be in your library folders, any synchronization or backups of your library will not include them.
/ Document / Book metadata location: .../koreader/hashdocsettingsThis method is similar to the previous one as the .sdr folders will be under an internal directory. But this method is developed to address the shortcomings of the previous method. Because, normally if you rename a book outside KOReader (with the native file manager/reader of the device or from a connected computer), its .sdr folder name will no longer match and your metadata for that book will be lost. If you are only using the KOReader File Browser for file operations, this is automatically handled so there are no repercussions.
In this HASHED method, .sdr folders are not identified by the filepath/filename of the book. Instead, a partial MD5 hash will be used to link the books to their settings. This hash is used as a unique ID for the book and it is calculated based on the contents of the book file. Also same hash is used for naming its .sdr folder.
Benefits
- Book .sdr folders will only be visible to and used by KOReader. They won't clutter your view of your library directories when you browse your library directories with another file browser or from your computer.
- You can rename, move, and copy your books with another file browser or from your computer. KOReader will still recognize the books after these operations.
- In this method, KOReader associates the same .sdr folder with all copies of the book, even if these copies are on different devices. For example if you are using Syncthing, this method enables you to sync your /hashdocsettings folder alongside your book files, across many devices that all have KOReader installed. Despite the different relative paths of those books on each device, you can still get your annotations and progress synchronized across your devices. This isn't possible with other methods.
Negatives
- Any operations that modify the file directly (such as writing highlights into PDFs or downloading from Calibre) will change the file so its MD5 ID will change (unlike renaming or moving which is safe with this method). In this case KOReader wouldn't be able to recognize the book so these books will lose their metadata.
- Calculating file IDs may slow down File browser navigation when browsing larger directories.
There are many types of gestures you can use to control KOReader. Some gestures have limitations regarding where on the screen they can be used and which directions are supported. These limitations are indicated below.

|
TAP / DOUBLE TAP Single or double tap with ONE finger WORKS: Anywhere on the screen |
 |
TAP AND HOLD Single tap and hold with ONE finger WORKS: Only on four corners |
 |
TWO FINGER TAP Single tap with TWO fingers at the same time WORKS: Only on four corners |
 |
SPREAD AND PINCH Same as zooming in and out on a phone or tablet. WORKS: Anywhere on the screen INFO This gesture may work less reliably depending on your device. If that’s the case please choose another gesture type. |
 |
ONE FINGER SWIPE Swiping motion with ONE finger WORKS: Screen edges (HORIZONTAL and VERTICAL) Anywhere except edges (DIAGONAL) |
 |
TWO FINGER SWIPE Swiping motion with TWO fingers at the same time WORKS: Anywhere on the screen |
 |
MULTISWIPE More than one swipe done after each other without lifting your finger. For example like drawing the letter U (DOWN-RIGHT-UP) WORKS: Anywhere on the screen |
Icons by Econceptive from the Noun Project |
This table shows the gestures that comes with KOReader. You can change these gestures according to your preferences via:
/ Gesture ManagerTop Left Corner > Toggle page flipping
Top Right Corner > Toggle bookmark
Opposing diagonal corners at the same time > Take screenshot
Left Side > Go -10 pages
Right Side > Go +10 pages
Short diagonal swipe > Full screen refresh
Long diagonal swipe > Take screenshot
- Back to previous location
- Go to latest bookmark
- Skim document
- Bookmarks
- Table of contents
- Show frontlight dialog
- Toggle reflow
- History
- Book status
- Go to page
- Back
- Previous chapter
- Next chapter
- Open previous document
- Favorites
This is a list of every action that you can assign to a gesture using the Gesture Manager menu. You can use the search function of your browser (generally Ctrl+F) to search for an action here. These actions can also be used in your own Quick Menu. Please check the relevant section in the guide for more info.
- File browser
- Open previous document
- History
- History search
- Favorites
- Collections
- Collections search
- Dictionary lookup
- Wikipedia lookup
- Show menu
- Menu search
- Open next file in last book folder
- Open previous file in last book folder
- Notebook file
- Screenshot
- Show ephemeris
- Calibre metadata search
- Browse all calibre tags
- Browse all calibre series
- Browse all calibre authors
- Browse all calibre titles
- Calibre wireless connect
- Calibre wireless disconnect
- Reading statistics: toggle
- Reading statistics: show progress
- Reading statistics: show time range
- Reading statistics: show calendar view
- Reading statistics: show today's timeline
- Reading statistics: synchronize
- Text editor: open last file
- Open vocabulary builder
- Wallabag retrieval
- Wallabag queue upload
- Wallabag statuses upload
- Reading progress
- Toggle SSH server
- Statistics calendar view
- Statistics today’s timeline
- Synchronize book statistics
- Exit sleep screen
- Restart KOReader
- Exit KOReader
- Toggle long-press on corners
- Enable touch input
- Disable touch input
- Toggle touch input
- Invert page turn buttons
- Rotation
- Toggle orientation
- Invert rotation
- Rotate by 90 CW
- Rotate by 90 CCW
- Toggle Fullscreen
- Show network info
- Battery statistics
- System statistics
- Terminal emulator
- Start USB storage
- Suspend
- Reboot the device
- Power off
- Toggle key repeat
- Toggle accelerometer
- Turn on Wi-Fi
- Turn off Wi-Fi
- Toggle Wi-Fi
- Show frontlight dialog
- Toggle frontlight
- Set frontlight brightness
- Increase frontlight brightness
- Decrease frontlight brightness
- Set frontlight warmth
- Increase frontlight warmth
- Decrease frontlight warmth
- Toggle night mode
- Set night mode
- Full screen refresh
- Full refresh rate (always)
- Full refresh rate (not in night mode)
- Full refresh rate (in night mode)
- Always flash on chapter boundaries
- Toggle flashing on chapter boundaries
- Never flash on chapter's 2nd page
- Toggle flashing on chapter's 2nd page
- Always flash on pages with images
- Toggle flashing on pages with images
- Auto warmth off
- Auto warmth use sun position
- Auto warmth use schedule
- Auto warmth use closer midnight
- Auto warmth use closer noon
- Auto warmth cycle through modes
- Font face
- Increase font size
- Decrease font size
- Font size
- Word spacing
- Word expansion
- Contrast
- Font weight
- Font hinting
- Font kerning
- Two columns
- L/R margins
- Sync T/B margins
- Top margin
- Bottom margin
- View mode (page-continuous)
- Render mode
- Zoom
- Line spacing
- Alt status bar
- Embedded style
- Embedded fonts
- Image scaling
- Invert images
- Set display mode
- Sort by
- Reverse sorting
- Folders and files mixed
- Show plus menu
- Toggle select mode
- Refresh content
- Folder shortcuts
- File search
- Last file search results
- Folder up
- Go to page
- Back
- Export all notes in all books in history
- OPDS catalog
- Show bottom menu
- Toggle status bar
- Toggle chapter progress bar
- Previous chapter
- Next chapter
- First page
- Last page
- Random page
- Turn pages
- Go to page
- Skim document
- Previous bookmark
- Next bookmark
- First bookmark
- Last bookmark
- Latest bookmark
- Back
- Back to previous location
- Forward to next location
- Follow nearest link
- Follow nearest internal link
- Add current location to history
- Clear location history
- Fulltext search
- Last fulltext search results
- Table of contents
- Book map
- Book map (overview)
- Page browser
- Bookmarks
- Bookmark search
- Toggle bookmark
- Book status
- Book information
- Book description
- Book cover
- Translate current page
- Invert page turn taps and swipes
- Toggle page turn direction
- Toggle custom TOC
- Toggle custom hidden flows
- Set highlight action
- Cycle highlight action
- Cycle highlight style
- Save book metadata
- Export annotations
- Export all notes in current book
- Export all notes in all books in history
- Move current book to archive
- Reading statistics: current book
- Push progress from this device
- Pull progress from other devices
- Toggle page flipping
- Toggle bookmark flipping
- Toggle reflow
- Zoom mode
- Change zoom factor
- Toggle panel zoom
- Page crop
- Margin
- Horizontal overlap
- Vertical overlap
- Fit
- Zoom to
- Number of columns/rows to split page
- Zoom factor
- Direction
- View mode
- Page gap
- Line spacing
- Alignment
- Font size
- Change font size
- Word gap
- Reflow
- Contrast
- Dewatermark
- Render quality
- Document language
- Forced OCR
- Writing direction
- Document columns
- Auto straighten
If you have a device with a keyboard like Kindle 2 and Kindle 3, including Bluetooth keyboards and emulators, you can use the keyboard keys, device buttons and shortcuts to control KOReader. Kindle 4 is supported too, which lacks a full keyboard but still has enough buttons to make it functional in this context. On these devices, KOReader will enable an extra menu named Keyboard Shortcuts which you can access here:
/ Navigation / Physical buttons / Keyboard shortcutsThis menu is very similar to the Gesture Manager interface. In this menu:
- You can see the shortcuts that are available on your device
- You can see the predefined actions for some shortcuts
- You can assign actions to the available shortcuts
All of the actions in the Gesture Manager is also available for keyboard shortcut assignment. Which means you can control nearly all the functions of KOReader with these shortcuts.
In the table below, you can see the default key and shortcut assignments:
INFO Universal screenshot key is Alt + Shift + G. It is available on all screens, modes and platforms. On Kindle 4, it is Keyboard + Menu.
INFO If you have a Kindle 4, SHIFT key in the table below is mapped to your KEYBOARD button. So Shift + (UP/DOWN/LEFT/RIGHT) shortcuts are mapped to Keyboard button + (UP/DOWN/LEFT/RIGHT) on your Kindle 4.
File browser mode | |
| Open top menu | F1 |
| Navigate to home | Home |
| Move in file list | Up / Down |
| Open selected book | Enter |
| Exit application | Esc |
Reading mode | |
| Open top menu | F1 |
| Open bottom menu | Enter |
| Back/exit application | Esc |
| Bookmarks | Shift + Left |
| Toggle bookmark | Shift + Right |
| Dictionary lookup | Ctrl + D (Alt + D on Kindles) |
| Wikipedia lookup | Ctrl + W |
| Fulltext search | Ctrl + S |
| File search lookup | Ctrl + F |
Links | |
| Select next page link | Tab |
| Select previous page link | Shift+Tab |
| Open selected page link | Enter |
Image viewer (long-press on image) | |
| Zoom in | Page Down |
| Zoom out | Page Up |
Highlighting | |
| Enter highlighting mode | H |
| Start/stop highlighting | Enter |
| Move highlight indicator | Left/Right Up/Down |
| Move indicator faster | Shift + Left/Right/Up/Down |
| Exit highlighting mode | Esc |
Navigating the book | |
| Page turn | Left-Right / Up-Down Page Up-Page Down |
| Table of contents | Shift + Up |
| Book map | Shift + Down |
| Go to the beginning | 1 |
| Go to 11% of book | 2 |
| Go to 22% of book | 3 |
| Go to 33% of book | 4 |
| Go to 44% of book | 5 |
| Go to 55% of book | 6 |
| Go to 66% of book | 7 |
| Go to 77% of book | 8 |
| Go to 88% of book | 9 |
| Go to the end | 0 |
In Skim Document dialog | |
| Go to the beginning | Q |
| Go to 11% of book | W |
| Go to 22% of book | E |
| Go to 33% of book | R |
| Go to 44% of book | T |
| Go to 55% of book | Y |
| Go to 66% of book | U |
| Go to 77% of book | I |
| Go to 88% of book | O |
| Go to the end | P |
Page zooming Only for PDF, DJVU and images | |
| Zoom to fit page | A |
| Zoom to fit page width | S |
| Zoom to fit page height | D |
| Zoom to fit content | Shift + A |
| Zoom to fit content width | Shift + S |
| Zoom to fit content height | Shift + D |
Quick Menu is a recent feature of KOReader which allows you to have a quickly accessible personalized menu as in the example image below. You can assign this menu to a gesture and access it with a single swipe. You can even have a menu longer than your screen, it is scrollable.
Basically, any action you can assign a gesture can be added to the Quick Menu. Its advantages are:
- You don’t need to memorize lots of gestures for every action.
- Some infrequent actions may not worth a gesture but it can be too much hassle to find it in the menu system. You can add this kind of rarely used actions to this menu instead.
- If you are installing KOReader for a relative or friend, you can add their favorite actions to this menu so they don’t even need to go into the menu system while using KOReader.
An example Quick Menu:
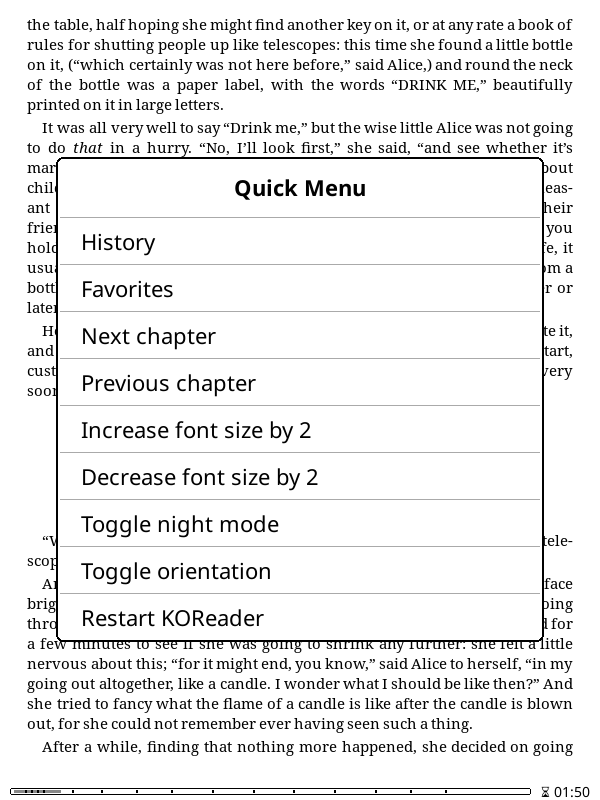
There are two methods of creating a Quick Menu: Easy and Advanced. If you need only one menu, Easy method should be enough for you. If you want to show different menus with different gestures you need to use Advanced method. Another advantage of Advanced method is easier gesture reassignment. If you want to change the gesture for your menu, you can easily move it to another gesture with the Advanced method menu. If you want to use another gesture while using the Easy method, you have to re-create your menu under the new gesture.
- Go to Gesture Manager menu via:
TOP MENU / / Taps and Gestures / Gesture Manager
- Decide a gesture for opening your menu and tap on it.
- Choose the actions you want to see in your menu from the gesture configuration menu. You can select many actions at once of course.
- After selecting all your actions, you will tell KOReader to treat this gesture as a menu. You achieve this by enabling Show as Quick Menu item on the second page as you can see in the picture below.
- You can sort your menu items with the Sort option just below it.
Now you can launch your menu with the gesture you selected. If you want to change the menu items, you can open the gesture page and add/remove items.
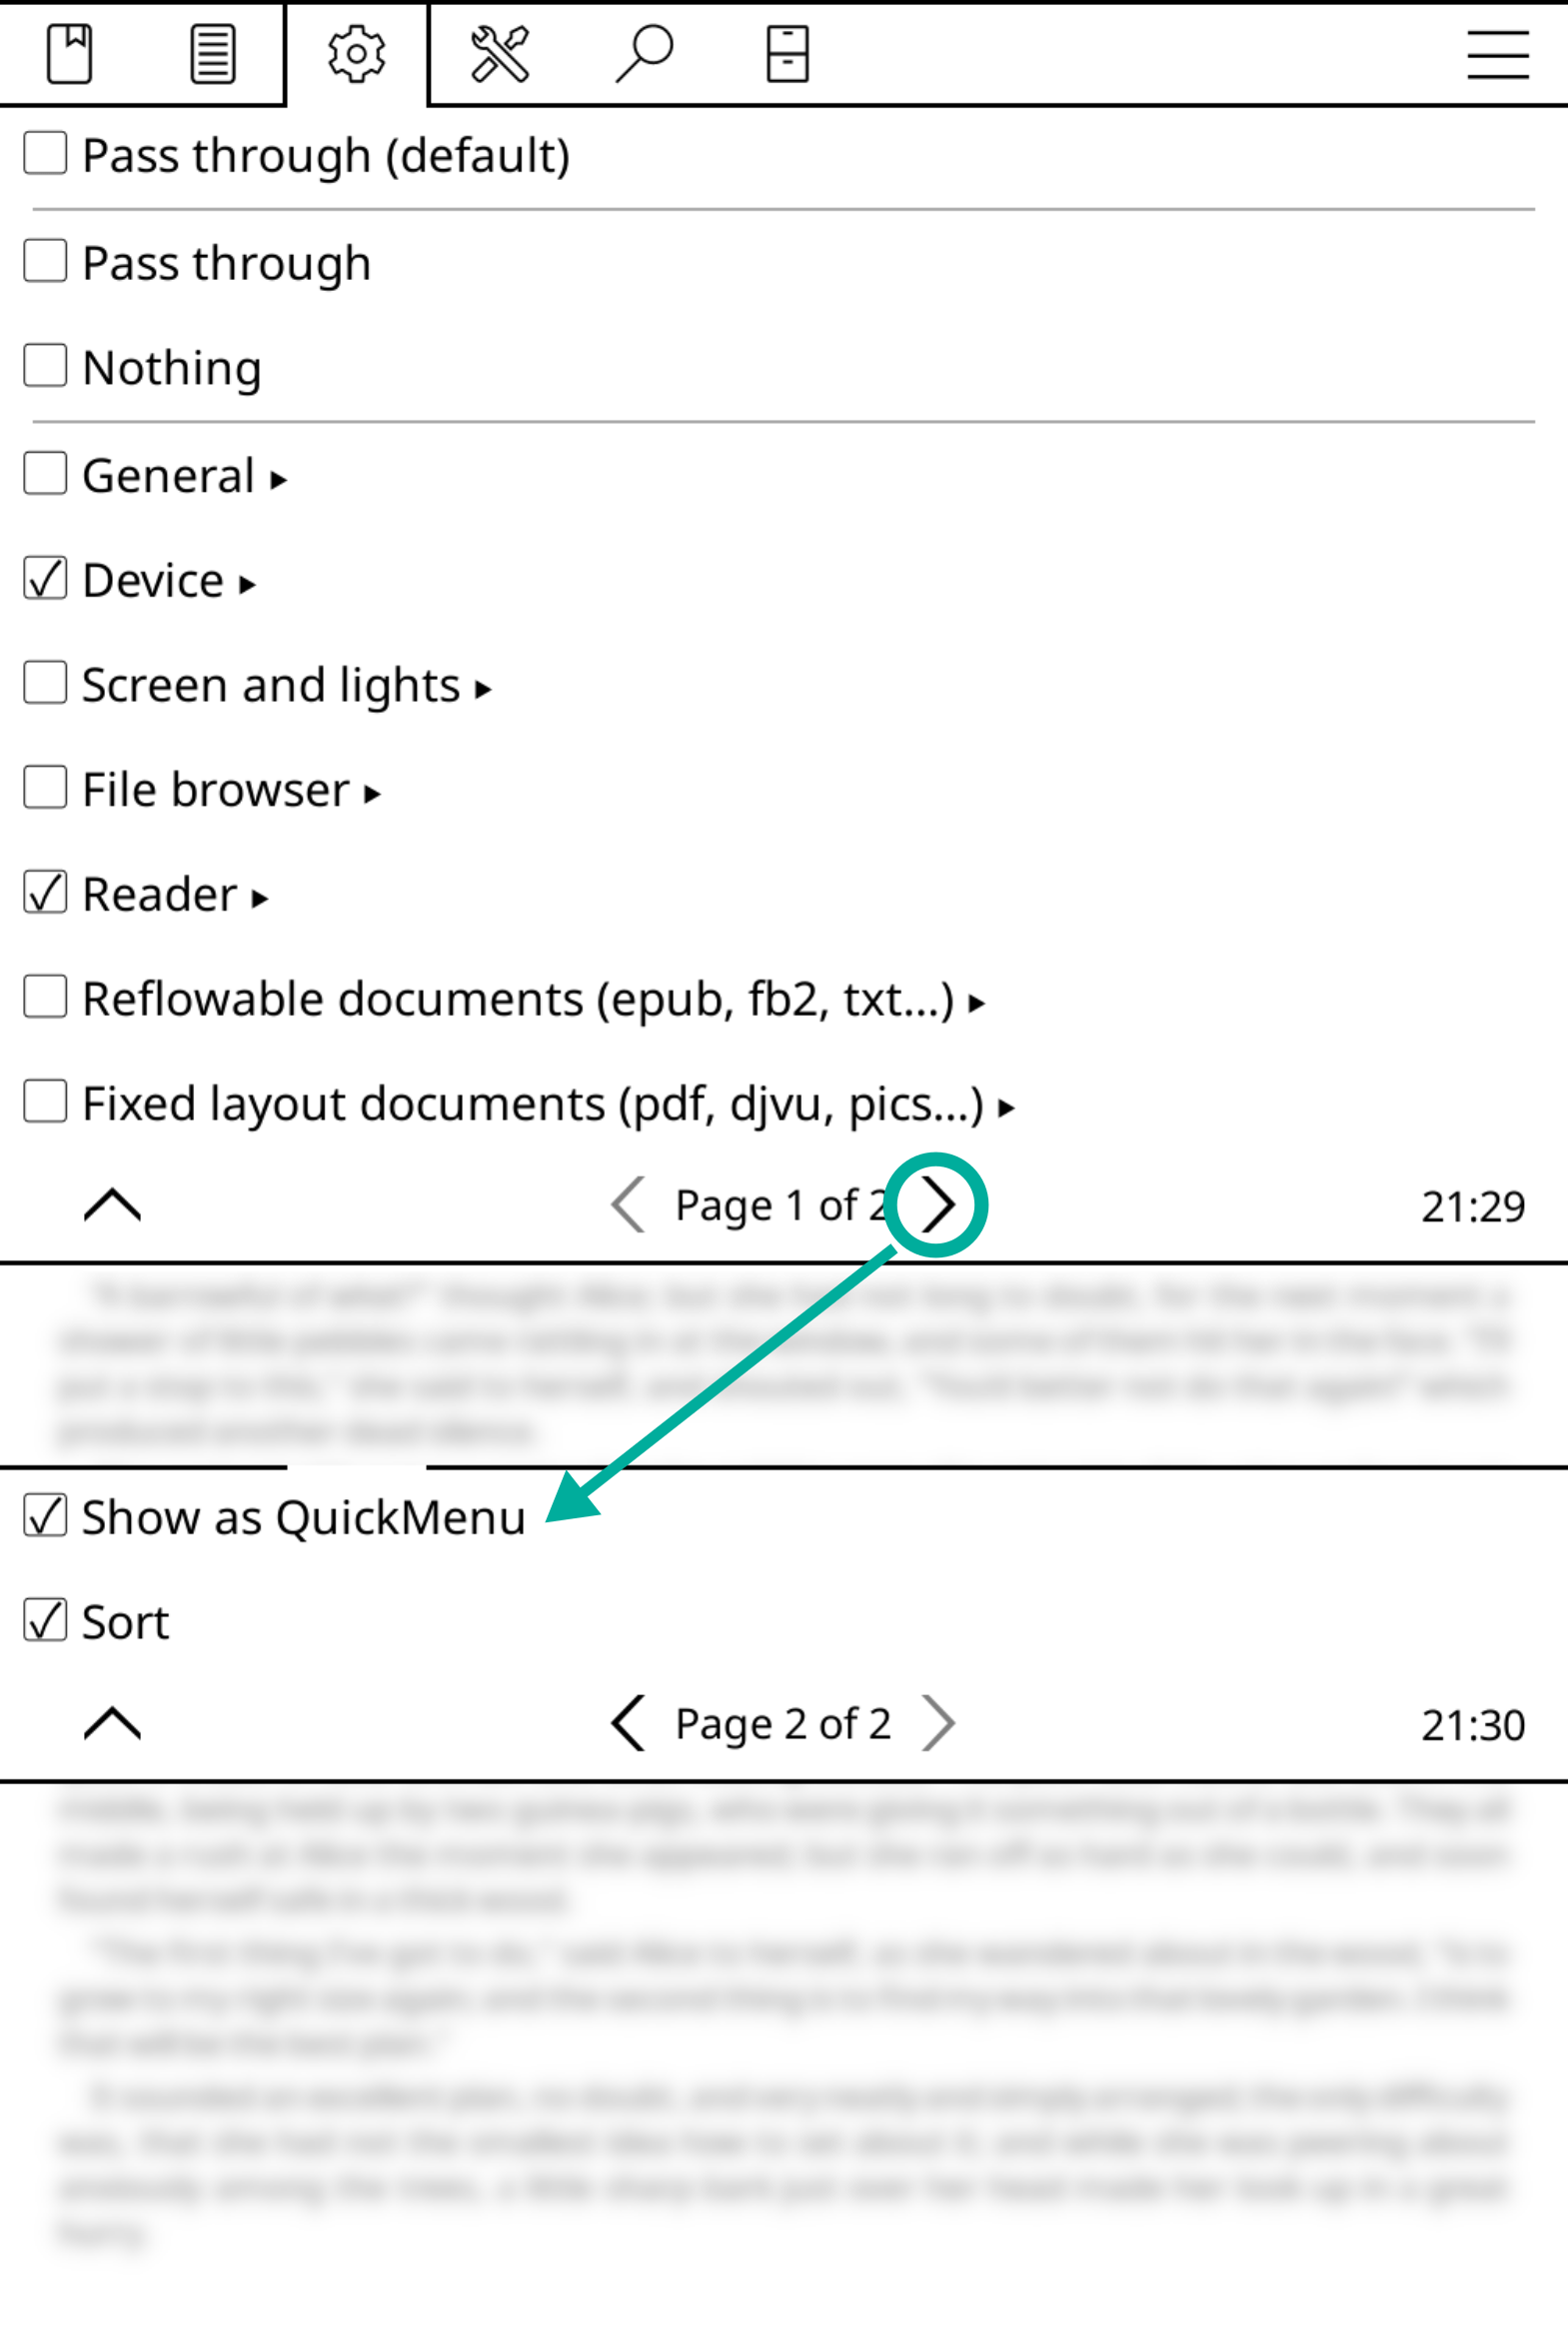
This Quick Menu is actually a Profile which appears on your screen as a menu. So first you have to learn about Profiles. If you already know how to use them, you can continue reading, otherwise jump to the Profiles heading (next section), create a Profile with some items and come back here.
Before continuing, we assume that you already created a Profile as instructed in the previous paragraph. Now we will turn our Profile into a Quick Menu.
1. Go to your newly created Profile and enable Show in action list (shown in the image below). This will make your Profile visible in the Gesture Manager. Also enable Show as Quick Menu (also in the image below) so your profile will be shown as a menu instead of being silently executed.
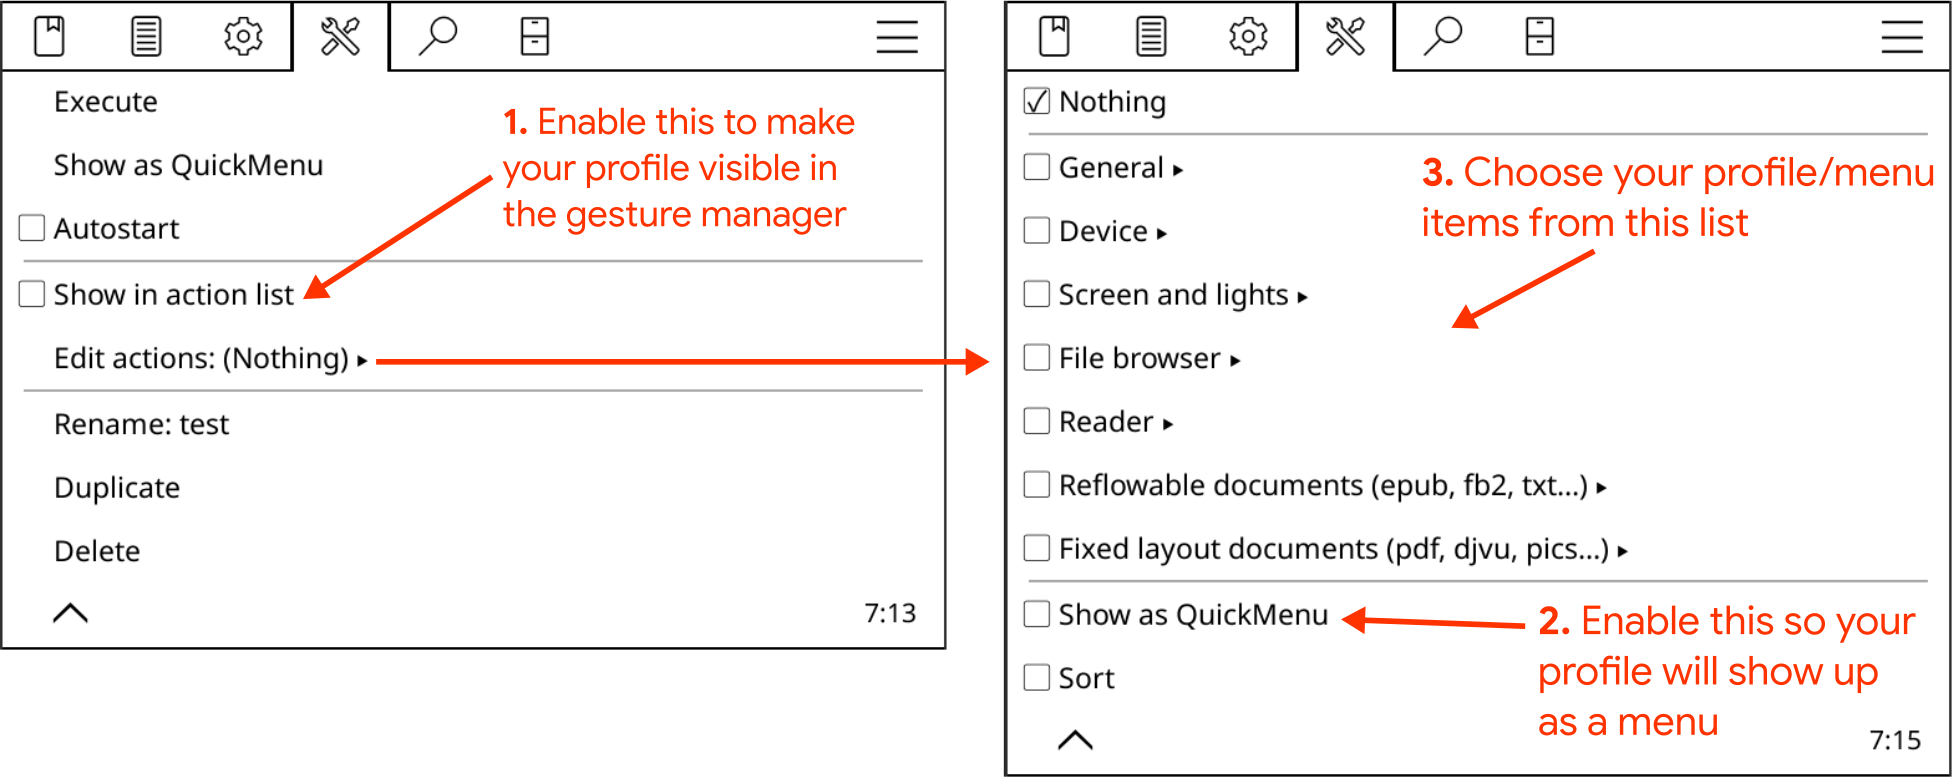
2. Now we need a way to access our menu. Go to the Gesture Manager and choose a gesture from the list to assign to our menu. Let’s say we want to tap the corner of the screen to show menu. Now tap on Tap corner then choose Bottom left. Now tap on General and go to the second page. You will find your profile as Profile x where x is the name you gave to this Profile. Tap on its checkbox to assign your profile to this gesture.
After all the steps, now you should see your menu when you tap on the bottom left corner. You can edit your menu by going to its Profile page where you can add or remove items. Also there is a Sort item there so you can change the order of your menu items.
As we said, a Quick Menu is actually a Profile. Which means you can have more than one menu. You can create another Profile and follow the same steps to create another menu if you want.
Normally after selecting an item in your Quick Menu, menu disappears from the screen. Sometimes you might want to keep the menu open after selecting an item. This allows you to adjust settings like these examples:
- Incremental changes, like brightness increase/decrease, bigger/smaller font size, previous/next pages or chapters, etc.
- Group of options that you activate in succession (but not simultaneously), like turning on wifi and after that starting the SSH server
You can enable this option from the following menu if you have a Gesture Manager based (Easy method) Quick Menu:
/ Taps and Gestures / Gesture Manager / “Your Quick Menu gesture” / Keep Quick Menu openOr from this menu, if you have a Profiles based – (Advanced method) Quick Menu:
/ Profiles / “Your Quick Menu profile” / Edit actions / Keep Quick Menu openNormally Quick Menu opens centered at the middle of the screen. If you are using your e-reader with one hand, you can activate a setting which will open your menu at the gesture position. This way, menu will be closer to your finger and easier to access. To use this feature enable this option:
/ Taps and Gestures / Gesture Manager / “Your Quick Menu gesture” / Anchor Quick Menu to gesture positionA profile is basically a collection of actions that can be triggered with a single gesture (like a macro).
As an example, imagine that when reading some type of books, you always:
- Rotate the screen to landscape orientation
- Increase the font size and contrast and
- Turn the screen light on
With the profiles plugin, you can do all these at once with a single action.
To create a profile first be sure that Profiles plugin is activated. If you don’t see it under:
/ Profilesthen you have to turn it on from:
/ More tools / Plugin managementIn Profiles menu tap New and give a descriptive name for your profile. Now you should see your new profile in the menu. Tap on it and you will see the screen on the left side. You can also Delete, Rename or Duplicate a profile from this menu.
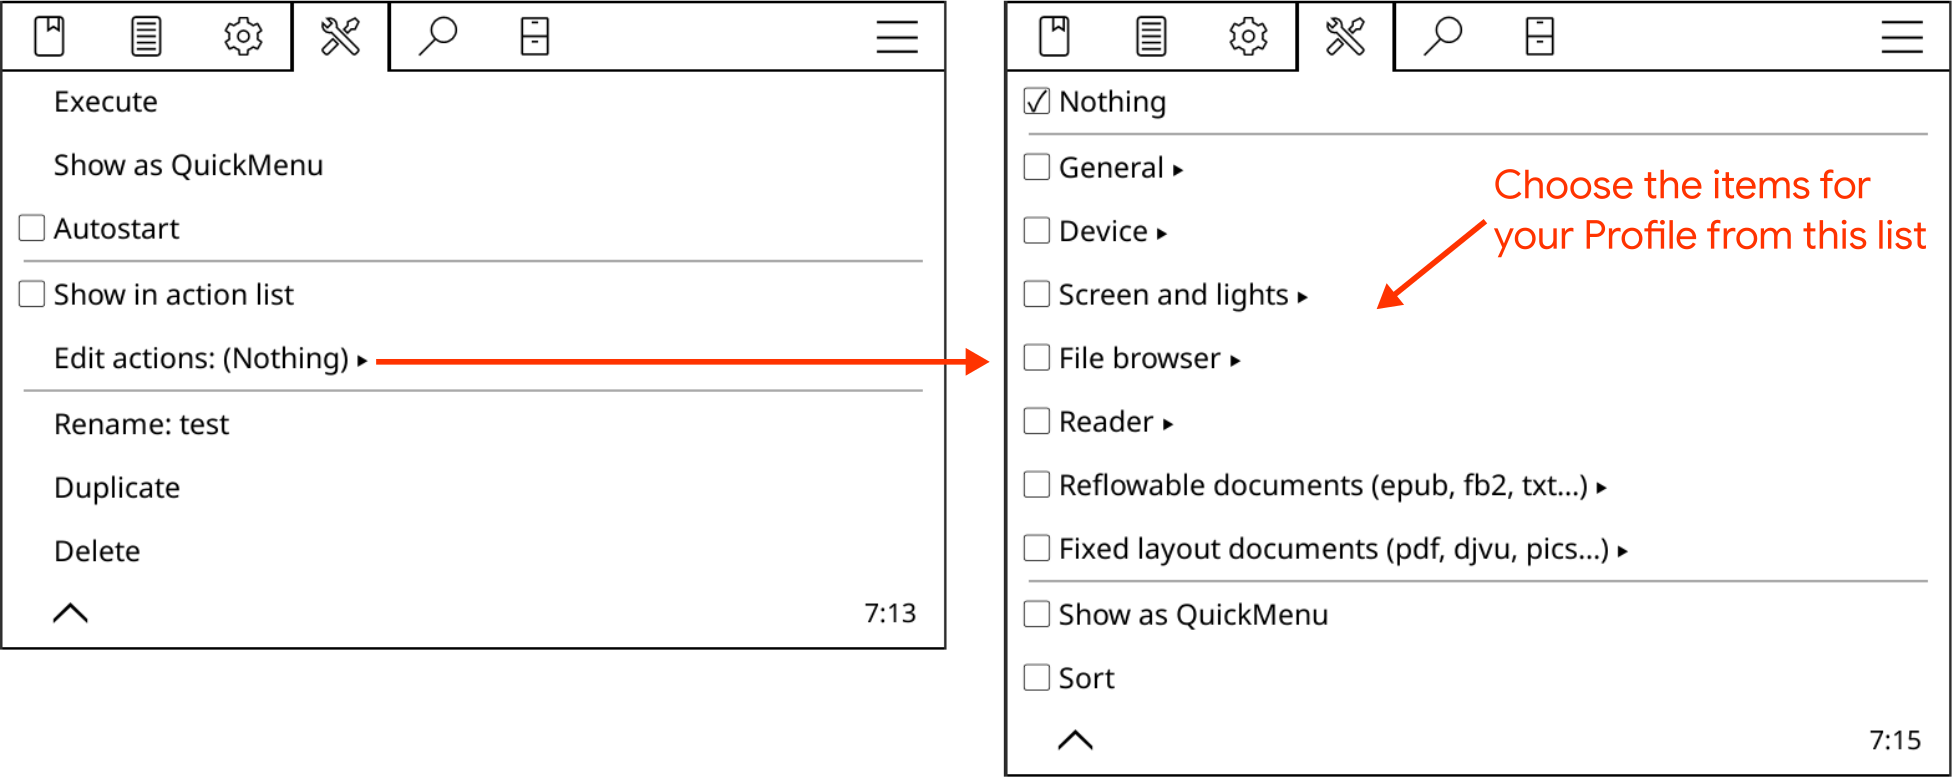
When you tap on Edit actions menu item you will see the menu on the right. This is the same menu as the gesture selection menu and there are actions in many categories. Which means you can perform any Gesture action using a Profile.
You can now select several items from all these categories. The actions you selected here will be performed when you activate this profile.
There are many ways to activate a profile:
- You can activate a profile with a long press on its name from this same Profiles menu
- You can activate a profile using a gesture. For this, you have to enable Show in action list from the profile’s menu. Now you can select it via:
TOP MENU / / Taps and gestures / Gesture manager / “ANY GESTURE” / General / Profile “Your profile name”
- You can also activate a profile automatically depending on some conditions. See the next heading to learn how to use this powerful feature.
You can run a profile manually as explained above but real power of profiles can be unleashed with its auto-execute feature. Using this feature, you can trigger a profile depending on some conditions and sub-conditions:
| Trigger | Sub-conditions |
| On KOReader start Run this profile every time KOReader starts. Note that this is only possible when KOReader is starting with the File browser or Last file. | - |
| On wake-up Run this profile every time device wakes up | - |
| On rotation Run this profile when screen rotates to the selected rotation(s). Examples: Change to double column layout when device rotates to landscape. Activate night mode when device rotates upside down. |
|
| On showing folder Run this profile when you enter this folder in file browser. You can use this trigger to change the display mode of file browser. For example when you enter a certain folder you can change the display mode from mosaic to detailed view. |
|
| On book opening
This trigger is executed when you open a book (optionally) combined with specific sub-conditions. First 4 sub-conditions are OR matching, so any one of them is enough to trigger the profile execution. |
|
| On book closing
This option is same as above but it triggers when you close a book. You can use this for example enabling/disabling reading statistics when you open certain documents to exclude them from your stats. |
|
Profile examples:
Here are some profile examples from our devs to give you ideas about using this powerful feature of KOReader. Examples also include auto-execute conditions and collections features:
- Enable two columns mode when you turn your device to landscape orientation.
- Enable night mode when you turn your device upside down.
- Add all your manga to a collection. Then create a profile which switches the page turn direction to Right-To-Left and inverts the page turn taps and swipes when you open a manga book from this collection.
- Add your comic books to a collection, which can trigger a profile to decrease the screen refresh interval to every page to avoid ghosting.
- Trigger a profile to adjust typeface, font size and set two-column mode when opening a file for the first time from the Periodicals folder.
- Add your problematic PDFs to a collection, so when you open them Auto OCR or Reflow mode is activated with a profile.
- Switch display mode (covers, detailed list etc.) of file browser when you enter certain folders.
- Toggle off reading statistics when opening a book from a Reference Books collection. Toggle statistics back on when closing the book.
- If you expose the style tweaks in the gesture manager, you can create a profile to enable or disable them based on certain conditions. For example you can trigger a "disable publisher styles AND apply my user style tweaks" profile based on the book's location/collection or by a keyword in the metadata of the book. See the style tweaks section of the guide for more info.
!!! ADVANCED
In KOReader we have a set of actions/settings and this set can be created in two ways:
- As a profile (which is explained as the Advanced Method and stored in settings/profiles.lua)
- As a list of actions assigned to a gesture (which is explained as the Easy Method and stored in settings/gestures.lua)
This set can also be executed in two different ways:
- Applying each action in the (sorted) order when triggered (as a Profile)
- Showing it as a Quick Menu
Adding/removing actions of a set and enabling/sorting Quick Menu are done via the same actions menu. The only difference is that the actions menu in the Gesture manager has two more items (Pass through), that is why Show as Quick Menu and Sort items are on the second page.
INFO You can backup and transfer your profiles to another device. Please see Backup your KOReader settings section.
Plugins are small KOReader programs that are similar to browser add-ons which extends the capabilities of the base program. KOReader has 3 categories of plugins:
Internal plugins are part of the core program.
- They are directly accessible from the KOReader plugins menu.
- They don’t need installation. You can enable them from the menu.
- They are checked by our developers so they are considered safe.
- They are automatically updated when you update KOReader.
You can enable/disable them via:
/ More tools / Plugin management!!! ADVANCED
This group contains non-official plugins which are not part of the core logic of KOReader.
- They have to be installed manually and then activated from the plugins menu.
- They should be updated manually.
- They are checked by our developers at the time they were added to our repository so they are considered safe.
You can access them from this page. Generally they are installed by downloading the plugin’s directory from the page above and copying it under koreader/plugins folder on your device. But please check the plugin’s page for other possible instructions.
!!! ADVANCED
These are plugins that are developed independently from the KOReader team.
- They have to be installed manually and then activated from the plugins menu.
- They should be updated manually.
- They are NOT checked by our developers so be aware that there might be risks using them.
Some notable examples of these external plugins with links to their GitHub pages:
- AskGPT plugin: You can ask questions to ChatGPT about parts of your book. You can also use this plugin to simplify, explain, discuss or translate text to other languages.
- Assistant: AI Helper plugin: A fork of the plugin above with more advanced features like multiple AI providers and built-in/custom prompts.
- Anki plugin: KOReader plugin enabling Anki (an open-source flashcard software) card generations for words looked up in the internal dictionary.
- Zotero plugin: This addon allows you to browse your Zotero (an open-source reference management software) collections from KOReader.
- Syncthing plugin: This addon allows you to run Syncthing peer-to-peer file synchronization program on KOReader (tested only on Kobo devices but might work on other devices according to the author). This makes it possible to sync files between your e-reader and computer/phone automatically.
Also you can click this link to open a search page on Github to discover more KOReader plugin projects.
Auto frontlight - Automatically toggles the frontlight according to ambient light level (Only available on Kindle Voyage and Oasis)
Auto warmth and night mode - Allows you to adjust frontlight warmth in devices with natural (yellow/orange) light and set Night Mode automatically according to a schedule
Auto power save - Puts the device into standby, suspend or power off after specified periods of inactivity
Autosuspend - Suspend device after chosen period of inactivity (available on all e-ink devices except android os)
Autoturn - Automatically turns the page after a set period of time
Background runner - Service to other plugins: Allows tasks to run regularly in the background.
Battery statistics - Collects and displays battery usage statistics of your device
Book shortcuts - Allows adding a book shortcut to a gesture
Calibre - You can send documents from your Calibre library directly to your KOReader devices via WiFi connection. Check our wiki page for how-to.
Cover browser - Allows cover display modes for file browser and history
Cover image - Saves the cover image of the current book as a file (available on Android/PocketBook/reMarkable devices)
Export highlights - Export highlights and notes to local files or to Joplin (a note taking application)
Flashcard trainer - Show flashcards using spaced repetition (SM2) of highlight from your library
Gestures - Provide gesture support for KOReader
HTTP Inspector - Allows you to control your device from another device over wifi - See below for more info
Japanese support - Japanese language support for KOReader that extends built-in dictionary and selection system
Keep alive - Keeps the device awake to prevent automatic WiFi disconnects
Move to archive - Moves current document to archive folder
News Downloader - Retrieves RSS and Atom news entries and saves them as HTML files. Check our wiki page for how-to.
OPDS - Allows you to download books from online catalogs
Perception expander - Allows using peripheral vision to read more quickly. Check this YouTube video to see how it works: How to Triple Your Reading Speed in 20 Minutes (Tim Ferriss)
Profiles - Allows combining multiple settings to make switchable profiles
Progress sync - Synchronize your reading progress across different KOReader devices. Check our wiki page for how-to.
QR from clipboard - Generates a QR code from clipboard content
Read timer - A countdown timer to display a message after a user defined time
Reading statistics - Calculates reading sessions statistics and reading speed for use in chapter/book remaining time estimations
SSH - Allows access to your device over SSH protocol. You can access via FTP applications or even your file manager if it supports. Check our wiki page for how-to.
System statistics - You can see your CPU/RAM/BATTERY info via this plugin under:
/ Help / System statisticsTerminal emulator - Starts a shell (command prompt) on your device that can run full terminal apps
Text editor - A basic text editor to create and edit plain text files
Time sync - Synchronizes the device time with NTP servers
Tweak document settings - Allows tweaking settings of a document before it is loaded based on external factors
Wallabag - Downloads the latest articles from a Wallabag server as individual EPUB files. Check our wiki page for more info.
!!! ADVANCED
This plugin allows you to control your device from another device over wifi. It works by running a simple HTTP server on your device which serves a page containing KOReader controls. You can access this page over your network and control your reader device. But be aware of these points when using this plugin:
- This is an experimental plugin so use this at your own risk
- This plugin is enabled by default, but the server is NOT started by default. You can start it manually or set it to auto start.
- You should run this plugin only on trusted networks, as it is highly insecure (no HTTPS, no access restriction, no authentication)
You can read an example use case for this plugin on the MobileRead forum
!!! ADVANCED
User patches are small files written in Lua language. They can change the functionality of KOReader without modifying your installation permanently. They can be written by developers, other users or you can write one yourself (if you have the necessary extensive knowledge about the KOReader internals).
You can find a current list of User patches in our wiki and in the GitHub issues list marked with the User patch available tag. You can see them by following this link.
- Create a directory named patches under koreader directory on your device (On Android this folder is located on the SD-card)
- Download and put the patch file with .lua extension in this patches directory
- Restart KOReader
When you create a patches directory as instructed, a new plugin named Patch Management becomes available in the plugins menu after restarting KOReader. With this plugin you can see the list and status of your user patches and enable/disable them. You can tap About patch manager menu item to see more info.
Execution order of a patch is determined by the first digit of the number in the patch name. For example: 2-TOC-title-patch.lua If there are several patches starting with the same digit, the execution order is the natural order (1<10<11<12<13<…<109<…<10010). If you are just downloading an already made patch you don’t need to change the file name.
Names starting with:
- 0 - Executed very early and only once after an update
- 1 - Excuted very early on every start of KOReader (but after 0 if applicable)
- 2 - Executed after UIManager is ready on every start of KOReader
- 3-7 - Reserved
- 8 - Executed before exit and before settings get saved
- 9 - Executed right before exit
If you have a problem with a user patch, you can revert to your previous configuration by removing the patch file.
If you need to switch between two documents (when comparing them for example), there is a quicker way than going through the File Browser. KOReader can open the last document with a gesture ( multiswipe). If you define a gesture’s action as Open previous document, you can switch between two documents quickly similar to the Alt+Tab feature on the desktop computers. You can find this feature under:
/ Taps and gestures / Gesture manager / “ANY GESTURE” / General / Open Previous DocumentAlso you can use the History dialog to switch between documents quickly. The history screen can be opened with the multiswipe gesture. You can also define any other gesture for this of course.
You can change your book cover from this menu:
/ Book information / / Set cover imageSome books don’t come with proper book covers. Or they may have their cover on the second page so it doesn’t show up properly. Or maybe the cover is not suitable for e-ink (too light or dark). Or you prefer to set some image from the book as cover.
In situations like this you can quickly take a screenshot and set it as the current book’s cover. Screenshot gesture is a long diagonal swipe by default. Also touching opposing diagonal corners will take a screenshot. You can use this second shortcut when viewing an image. After taking your screenshot you can select Set as book cover from the dialog.
You can remove this custom book cover here:
/ Book informationOn the book information page, long-press on the Cover image item and then select Reset custom.
You can also reset the book cover with the Reset dialog, which you can access by long-pressing the filename in the File Browser.
If your document has links and you are accidentally tapping them while turning the page or using other gestures, you can turn off Following links by tapping via this menu item:
/ Taps and Gestures / Links / Tap to follow linksAfter disabling this setting, to follow a link you have to long-tap on it and select Follow link from the popup menu. If you have the opposite problem and you want to make tapping links easier, you can enable Allow larger tap area around links from the same menu.
In reading statistics you can change the start of day used for calculations. This is useful if you are reading after midnight for example and want your reading session counted as today instead of the next day. This applies only to the Day timeline view and optionally to the Calendar view; it does not apply to any of the other statistics reports. You can set this time at:
/ Reading statistics / Settings / Daily timeline starts at...KOReader can update itself over Wi-Fi. You can trigger the check via this menu item:
/ Update / Check for updateWe don't have a direct option for this in KOReader. But there is a workaround to achieve this kind of lock screen functionality. You can set up KOReader to keep the screensaver on the screen until you enter a chosen gesture. To achieve this:
- Choose any gesture (including the complex ones with custom multiswipes) and make it your "unlock" gesture by going to:
TOP MENU / / Taps and gestures / Gesture manager / "your selected gesture" / Device / Exit screensaver
- And then enable this option:
TOP MENU / / Screen / Screensaver / Settings / Keep the screensaver on screen after wakeup / Until 'Exit screensaver' gesture
KOReader can dim your frontlight to preserve battery if your device is idle for a while. You can turn on and adjust this feature via:
/ Screen / Automatic dimmerIf you want to know how many lines or words are being shown on the current page you can see it at:
/ Book informationLi-ion batteries experience more degradation at the extreme ends of their charge levels. To minimize this degradation and extend your battery life, you can limit your minimum discharge level to 20% and maximum charge level to 80% (as in electric vehicles and some newer phones). Which means you start charging your device when the battery goes down to 20% and unplug when it reaches 80% (or 25%-75% if you are extra cautious).
KOReader can warn you by showing an alert when charge level reaches your defined limits:
/ Device Status Alerts / Battery LevelYou can see your detailed battery usage statistics via this menu item:
/ More Tools / Battery StatisticsYou can see your system information like CPU/DISK SPACE/RAM usage via this menu item:
/ Help / System statisticsIn older Kindle devices some of our users reported crashes due to limited memory. KOReader memory usage can go up if you open many files in one session. Especially PDF’s increase this amount. You can add a memory indicator to your STATUS BAR and restart KOReader if this value gets high, to avoid crashes or reboots.
/ Status Bar / KOReader memory usageAlso you can configure KOReader to restart automatically if memory usage reaches a threshold via:
/ Device / Device Status AlertsIf you can't find a solution to your problem in this guide, you can open an issue about it on the project's GitHub page or make a post in the KOReader section of the Mobileread forum. Please see the last section of this guide for details.
KOReader has two different versions:
- STABLE This version is the main one that you can find on the Releases page of the project GitHub. It is named like this: "KOReader 2024.11" which means this specific version is released on November 2024. This is generally a monthly release, but sometimes can take longer.
- NIGHTLY These versions are the daily compiled versions of KOReader with optimizations and fixes continuously added. Nightly releases are intended for a narrow group of testers and developers, so they might be less stable.
Normally if you are an average user, stable version is the one you should use. But in some specific cases you might need to use a nightly version:
- Your device is very new (a recently released Kobo model for example) and KOReader support has just been added in a recent nightly.
- There is a bug or problem specific to your device that is fixed already but not released yet. And you don't want to wait for the stable version to have this fix.
- After updating KOReader, you notice that a feature which you were using is removed. You don't want to lose this feature, so you can install a nightly version that still has this feature. Of course you can also go back to the previous stable release but nightly would be newer so might have more features and fixes.
This section was just a general introduction to the topic. For detailed information and asking for help about nightly versions, you can visit the discussion page: FAQ: How to track latest nightly builds
TIP If you are using KOReader on an Android device, you can use the Work Profile feature of the Android OS to test the Nightly versions without affecting your main KOReader installation. Open source applications like Shelter and Island can help you with this.
In rare cases that you want to backup and restore your KOReader with all your settings, you can backup these folders and files under the KOReader installation directory. Then you can overwrite them after a clean installation to restore your settings:
- settings
- styletweaks
- data/cr3.ini
- defaults.persistent.lua
- history.lua
- settings.reader.lua
- settings/profiles.lua
- Files under data/dict/ and /data/tessdata/ directories (if they exist)
This might be caused by the Write highlights into PDF feature of KOReader if you enabled it. Saving PDF highlights will change your file so your synchronization will fail. If you are planning to use both features, in the Progress Sync plugin's settings, change the Document matching method to Filename instead of the default Binary matching:
/ Progress sync / Document matching methodKOReader is optimized to work fast even on the limited hardware of e-book readers. Generally thousand page books can be opened in seconds and page turning is immediate. Here we will talk about the reasons if your book feels very slow when opening, page turning or adjusting its appearance.
If the problematic book is a PDF:
- PDF file itself might be too big for your device memory.
- PDF file might contain very large image files. Even in documents with a normal text layer (which you can select and highlight) there might be another image layer embedded (generally a scan of the page). This slows down the opening and page turning because these large images has to be rescaled to fit on your screen and this process can be CPU intensive.
- PDF file might have lots of individual elements that needs precise positioning, like a magazine page with lots of images and text boxes. In this case KOReader has to calculate and draw all these elements which can take time.
- Auto straighten feature (which allows you to adjust the tilt of the page) might also slow down your reader.
- If you set your RENDER QUALITY to HIGH while REFLOW is ON, text will be more pleasing but it can be much slower (up to several seconds per page turn) than DEFAULT depending on your document.
BOTTOM MENU / / Render Quality
If the problematic book is an EPUB:
- EPUB files are basically composed of text and images with some rules to determine how these items are formatted on the screen. In ideal conditions, this is a fairly simple process so EPUB files are generally fast in KOReader. But some EPUB books add a great number of formatting rules that KOReader has to do many calculations just to show even a single sentence. This will slow down opening the book, turning the pages and changing the appearance properties like font weight or line spacing.
INFO KOReader doesn't support fixed layout EPUBs. They will open, but will render as reflowable EPUBs and probably won't look nice or readable.
- EPUB files are ZIP archives that contain HTML files. Some books can be a single HTML file while others may be composed of multiple HTML files like each chapter of the book is a separate HTML file. If your book is only a single HTML file, partial rendering can not work. So appearance changes will be slower than the divided chapter books, because for each change, KOReader still has to calculate the whole book instead of only the current chapter.
- Another rare case of slowness is when the content is wrapped in a HTML table tag. KOReader has to render/draw each cell on each page turn, so if a cell (containing many paragraphs) spans 50 pages, this will make page turning quite slow. See below for the solution.
If everything is slow:
Reasons mentioned above is generally valid if only some of your books are slow. If all of your books are slow, your problem might be device related:
- Very slow CPU or low RAM.
- Your flash memory (where your books reside) might be degrading, which is generally due to the old age of the device.
- You are running out of storage space.
- If you are using an Android based device, your Android OS might be interfering with the operation of KOReader or some background processes might be using your system resources.
SOLUTIONS:
Unfortunately, for bad PDF files there are not many solutions. Generally best solution with problematic PDFs and EPUBs is trying to find a better version of it. Or if another file type is available for download, like EPUB instead of PDF (or reverse) you can try that format.
Following solutions are for EPUB files and they might require advanced knowledge:
- You can set Embedded Styles to OFF in the bottom menu to see if ignoring all the document stylesheets makes it faster (of course, you'll probably lose any nice formatting, but you'll know what is the culprit).
- If you have HTML and CSS knowledge, you can inspect the HTML and the CSS files directly from KOReader and judge their quality or unnecessary complexity by yourself. To do this, you can long-press on some text and choose View HTML in the popup menu.
- If you have the “content wrapped in a table” problem as mentioned above in the problems section, you can add this table, tr, td { display:block; } book-specific style tweak to:
TOP MENU / / Style tweaks / Book-specific tweak
- Calibre’s e-book editor can check EPUB files for problems and has tools to fix some of the problems.
You can download Calibre from here.
You can see the instructions for the Check book tool of Calibre here.
- EPUBCheck application can check the validity of the EPUB files and detect many types of errors. You can read an example issue, where the problem is detected with EPUBCheck here.
You can download the command line version from here.
Or download a graphical user interface version from here.
Opening an issue:
If you are opening an issue about this problem, it is important for us to inspect the problematic file. You can share the file directly by dragging and dropping it on your GitHub message after compressing it as a ZIP file. If your book is an EPUB and you don’t want to share the file due to copyright or privacy issues, there is a plugin for Calibre named ScrambleEbook which you can access the download and instructions from this Mobileread forum page.
This plugin will read an un-DRM'd ebook file (EPUB/KEPUB/AZW3) and create a copy of the book with its text replaced with random characters. You can share this scrambled version with us in your issue thread. Text of the book will not be readable and there won’t be any copyright violation but we can still use this file for diagnostic purposes.
You can see this procedure in a real issue involving a very problematic EPUB file here.
Those small numbers are called Reference Page Numbers. In short, they are the real page numbers from the printed version of your book. For more information please click here Reading Screen to go to the relevant section.
Probably you tapped on the STATUS BAR touch zone at the bottom of the screen. You can bring it back by tapping the same zone.
This can happen in cases like shaking hands or device touch screen problems. If you have this problem, you can try to increase the Tap interval. By increasing this interval, you tell KOReader to ignore quick taps at the same location.
/ Taps and Gestures / Gesture intervals / Tap intervalIf your two consecutive taps are separated by a distance, this would not apply. So you can still quickly browse pages by tapping quickly alternatively with two fingers.
In Android devices KOReader can’t write to the external storage due to Android system restrictions. If you want to change your screenshot saving location, be careful to choose your device’s internal storage.
Even if KOReader is set to full refresh after every page, you may still see some ghosting/residue after turning pages. This is a limitation of e-ink screen technology and can be observed on the latest generation devices, especially while reading mixed content (text+images) documents. As a workaround, you can refresh one more time manually after turning the page to get rid of these artifacts if they bother you (short diagonal swipe gesture by default).
Sleep covers generally use a magnet embedded in the cover which enables wake up and sleep events via triggering a sensor in your device. This sensor can sometimes be mentioned as a Hall sensor or Hall effect sensor. In some cases like misaligned or weak magnets, this triggering can be problematic. If you are having problems with your device waking up because of your cover, you can disable this feature via this menu:
/ Device / Ignore all sleep cover eventsIf you get miscentered titles, headings or separators, or unexpected text indentation, try switching the style for your document. epub.css to html5.css. This kind of problems happen because some publishers assume their books will only be read on web browser engine based readers, so they don't bother "resetting" the styles.
/ Style- Default HTML/EPUB (epub.css) is our book-oriented stylesheet, with text-align: justify, text-indent on P. It is better for unstyled books, and might make styled books more readable.
- You can try switching to HTML5 (html5.css) if your book has indentation problems as mentioned above. This style provides a base stylesheet like web browsers do when rendering: text-align: left, no text-indent on P, spacing between P. But it doesn’t look pretty when publishers haven’t done any styling.
KOReader keeps a cache of your book covers to be able to show them quicker. In normal conditions this cache doesn’t get too big. If you remove lots of books or rename directories, you may want to clean up your book cover cache database to reclaim some space. You can do it from this menu:
/ Settings / Mosaic and detailed list settings / Book info cache managementWhen you are reading a PDF/DJVU document, KOReader keeps a cache of the last page you have read. So when you reopen the book, it will be faster. But this cache can grow big if you are using KOReader for a long time and reading many PDF/DJVU documents. These cache files are kept under your KOReader installation directory under the cache folder. To clear this cache and reclaim the space you can go to:
/ More tools / Developer options / Clear cachesKOReader uses GitHub as its project base. You can report problems or suggestions on our GitHub page. You just need a GitHub account which is free. Click this link to open our GitHub Issues page.
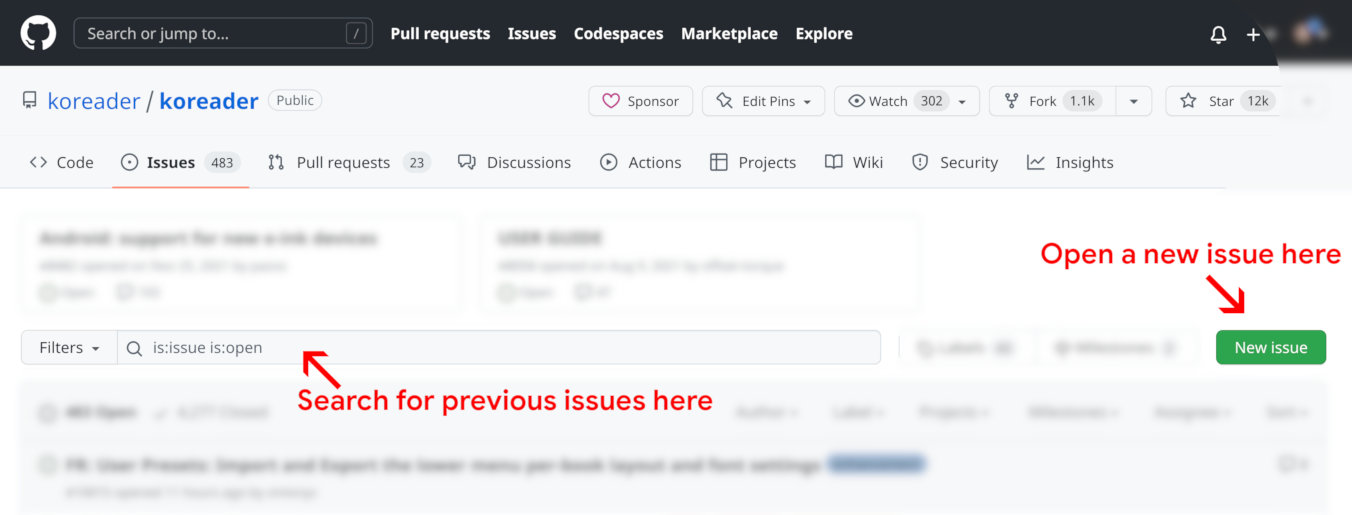
On the Issues page click the New Issue button. But before doing that, we suggest using the search bar to see if there is already an existing issue about the same topic. You can also check other opened issues to have an idea about the process.
When you click the New Issue button you will be presented with two options:

Click the appropriate one and follow the instructions on the page to report your problem or suggestion.
If you are reporting a bug, verbose debug logs are very helpful to determine the problem. You can enable them via:
/ Help / Report a bug / Enable verbose loggingYou can also find the version number of your KOReader and your device type from the same dialog for reporting.
If you have a suggestion or question related to this User Guide you can write to the GitHub discussion thread
Find other KOReader users on MobileRead forums |
Reach us at Gitter chat |
Support the project via Liberapay |