
Estás leyendo la versión en Español de la Guía de Usuario de KOReader. También hay voluntarios traduciendo esta guía a otros idiomas. Como puedes ver en el estado general de traducción más abajo, hay muchas traducciones en proceso. Solo enlazamos a los idiomas con más del 50 % traducido por motivos de usabilidad.
Más del 80% traducido
Para ver todos los idiomas a las que está siendo traducida actualmente y contribuir en el esfuerzo de traducir la guía de usuario, por favor visita la página de traducción de Weblate de nuestro proyecto.
Estado general de la traducción de la guía de usuario

Esta guía está diseñada principalmente para pantallas en color. Si la estás leyendo por primera vez, recomendamos que lo hagas en un ordenador, tablet o móvil. Ver los elementos de la interfaz de usuario marcados en color te resultará más fácil mientras aprendes a usar KOReader. Naturalmente, puedes leerla en tu dispositivo de tinta electrónica, pero la experiencia no será la óptima.
Puedes usar la función de búsqueda de tu navegador para encontrar un tema o palabra específicos (generalmente con Ctrl + F). Si tienes alguna sugerencia o pregunta relacionada con la guía del usuario, puedes escribir en este hilo de discusión en Github.
Partes del texto de esta guía están codificadas por colores según tus categorías:
PARTES DE KOREADER (AZUL) |
Barra de estado, Mapa del libro… |
RUTAS DEL MENÚ (VERDE) |
MENÚ SUPERIOR /  / Estilo de subrayado / Estilo de subrayado |
APPS EXTERNAS (PURPURA) |
Calibre, Readwise, KoHighlights... |
También disponemos de diferentes recuadros a lo largo de la guía para informar y alertarte:
KOReader está desarrollado con el apoyo de voluntarios de todo el mundo. Tu también puedes ser parte del proyecto:
- Eliminando errores e implementando características nuevas
- Traduciendo el programa a tu idioma o mejorando las traducciones existentes
- Ayuda a otros con tus conocimientos en los foros o en las secciones de discusiones y problemas de Github
Revisa la sección Contacto para los enlaces.
Última actualización de la guía: 2025-03-25
- ¿QUÉ PUEDES HACER EN KOREADER?
- INFORMACIÓN DE USO BÁSICA
- CONOCE LA INTERFAZ DE USUARIO
- NAVEGAR POR EL LIBRO
- PERSONALIZAR LA APARIENCIA DEL TEXTO
A pesar de tu aspecto minimalista, KOReader es una aplicación potente y personalizable. Esta sección es similar a un índice orientado a cómo hacer las cosas, así que si eres un usuario nuevo, este es el mejor sitio para comenzar. Aquí puedes informarte sobre las capacidades de KOReader y aprender a manejarlas siguiendo estos enlaces para ir a la sección mencionada.
- USB en dispositivos que lo soporten
- Nube (Dropbox/FTP/Webdav) con tus correspondientes cuentas
- KOReader puede actuar como servidor SSH por lo que puedes usar cualquier aplicación SFTP o explorador de archivos para transferir archivos directamente
- Con el complemento Calibre puedes enviar libros vía wifi desde la biblioteca de Calibre al dispositivo KOReader
- Con el complemento Descargador de Noticias puedes descargar noticias RSS y Atom como archivos HTML a tu dispositivo
- Con el complemento Wallabag puedes recuperar artículos de tu cuenta Wallabag (un servicio de "leer más tarde" similar a Pocket)
- Cambia las fuentes (incluyendo las tuyas propias), su tamaño, contraste, negrita, interlineado, espacio entre palabras, expansión entre palabras, alineamiento del texto, espacio entre líneas, disposición de columnas, márgenes...
- Usa el potente modificador de estilos o escribe el tuyo propio para cambiar la forma precisa en que se renderizan los libros.
- Invierte los colores de la pantalla manual o automáticamente para el modo nocturno
- Ajuste automático de la temperatura del color de la luz frontal
- Subraya texto con diferentes estilos y colores, coloca marcadores
- Modo de toque doble para subrayados académicos/más largos
- Añade notas usando un teclado personalizado que incluye modificadores diacríticos
- Toma capturas de pantalla
- Sigue tus estadísticas de lectura, rango temporal y vista de calendario
- Exporta tus notas y subrayados en formato markdown, HTML, JSON o formato Kindle
- Sincroniza con servicios online como Joplin, Readwise, Memos, Flomo y XMNote
- Explorador de archivos potente con el que puedes copiar, renombrar, crear y borrar ficheros y carpetas y realizar operaciones masivas
- Configura tu biblioteca a tu gusto con muchas vistas detalladas y de mosaico
- Añade tus libros a Favoritos para un acceso rápido o crea tus propias Colecciones con tu orden y filtrado
- Widget de ojear para saltar rápidamente entre páginas, capítulos, marcadores
- Mapa del libro único para tener una vista general del libro que incluye todas tus notas y subrayados
- Explorador de páginas para desplazarte por las páginas como fotogramas de una película
- Navegador de marcadores para revisar con facilidad tus notas y subrayados
- Crea un índice alternativo de forma manual o automática si no te gusta el del libro
- Oculta o excluye ciertas partes del libro como Apéndices, Índices, Referencias, etc. para un recuento más preciso de páginas
- Un potente sistema de gestos con más de 200 acciones te permite controlar cualquier aspecto de KOReader con un toque o deslizamiento
- Si dispones de un teclado (interno, cableado o por bluetooth) puedes asignar atajos a estas acciones
- O crea tus propios menús con tus acciones favoritas mediante el Menú rápido y accede con un toque o deslizamiento
- Crea Perfiles para controlar cualquier aspecto de KOReader y automatizar acciones
- Busca en el documento escribiendo el texto o mediante selección (incluidas expresiones regulares)
- Busca en los marcadores, subrayados y notas
- Busca un texto en Wikipedia o en los diccionarios instalados y tradúcelo con un toque largo
- Traduce de una vez una página completa a uno de los más de 130 idiomas
- Con el potente sistema de complementos incluso puedes comentar el texto con ChatGPT (tras instalar el complemento)
- KOReader puede actualizarse solo
- Enciende o apaga la luz de la pantalla después de un intervalo establecido
- Configura el intervalos de refresco de páginas para diferentes condiciones de lectura
- Configura tu propio salvapantallas con multitud de opciones como imágenes aleatorias, cubiertas de libros, lectura, progreso, etc.
- Configura alarmas de límite de carga de la batería para evitar la sobrecarga/sobredescarga
- Configura una alerta de uso de memoria (es útil para dispositivos con poca memoria) y opcionalmente reinicia KOReader al alcanzar el límite.
- Recorta los márgenes de forma automática o manual
- Ajusta el texto del documento para extraerlo y facilitar la lectura en pantallas pequeñas
- Aplica OCR a documentos sin capas de texto, como libros antiguos escaneados
- Varios tipos de zoom y direcciones de flujo de página para leer con facilidad documentos multicolumna como artículos científicos.
- Auto endereza documentos inclinados, como libros antiguos escaneados
- Guarda tus subrayados directamente en los PDFs lo que permite visualizarlos sin KOReader
- Herramienta especial Zoom a viñeta para la lectura de mangas
- Refresco de pantalla ajustable para un balance perfecto entre ghosting y rapidez
- Añade tus propios ajustes de estilo CSS para libros
- Parches de usuario del sistema que permiten cambiar el funcionamiento básico de KOReader
- Crea un código QR desde el portapapeles para compartir texto y enlaces a otros dispositivos
- Muestra el código HTML de un EPUB
- Crea y edita archivos de texto en el dispositivo
- Usa el emulador de terminal y ejecuta comandos en el dispositivo
- Muestra tus estadísticas de memoria, uso de batería y CPU
KOReader soporta archivos PDF, EPUB, DJVU, MOBI, CBZ, CBT, DOCX, RTF, HTML, TXT, XPS, FB2, PDB, CHM y MD. También puede abrir archivos ZIP y mostrar imágenes.
Hay muchas maneras de transferir documentos a tu dispositivo. Ten en cuenta que podría ser necesario reiniciar KOReader para indexar los documentos transferidos (o recargar el directorio si dispone de un Pocketbook/Android).
Además de poder transferir archivos como lo harías con un lector integrado, hay otras opciones disponibles dependiendo de tu dispositivo:
- Modo USB de almacenamiento masivo en KOReader Este modo está disponible para KOBO y algunos dispositivos CERVANTES.
- Almacenamiento en nube (Dropbox/FTP/Webdav): Para usar esta función debes añadir las cuentas del servidor de almacenamiento de la nube mostrado más abajo. El proceso se explica mediante los botones info en el menú mientras añades las cuentas:
MENÚ SUPERIOR (en el Navegador de Archivos) /
 / Nube
 - Acceso SSH/SFTP: KOReader puede hacer de servidor SSH al que puedes acceder desde un ordenador y transferir archivos (disponible en Kobo, Kindle y Cervantes). Puedes usar cualquier aplicación SFTP (como Filezilla) o acceder mediante el explorador de archivos si tu sistema lo soporta. Revisa nuestra wiki para más información y además revisa el recuadro más abajo.
- Calibre: Con el complemento de Calibre puedes transferir documentos desde tu biblioteca Calibre directamente al dispositivo KOReader mediante una conexión wifi. Revisa nuestra wiki para más información.
- Descargador de noticias: Con este complemento puedes descargar entradas de noticias RSS y Atom como archivos HTML. Revisa nuestra wiki para más información.
- Wallabag: Con este plugin puedes recuperar artículos desde Wallabag, un servicio de "leer más tarde" basado en servidor similar a Pocket. Revisa nuestra wiki para más información.
AVISO Ten cuidado si decides usar SSH sin contraseña, ya que dejas un acceso abierto a tu dispositivo. De todos modos, si usas una red wifi local y activas la wifi de tu dispositivo por períodos cortos, el riesgo es insignificante.
Los siguientes métodos están disponibles para acceder a tus libros:
- Navegador de Archivos - La sección dedicada está aquí: Uso del Navegador de Archivos
- Favoritos - Una lista a la que puedes añadir tus libros con un toque largo desde el Navegador de Archivos
- Historial - Lista de libros que has abierto
- Colecciones - Lista personalizada de libros que has creado La sección dedicada está aquí: Colecciones
Puedes modificar el aspecto de estas pantallas desde:
 / Modo de pantalla
Si quieres cambiar cuántos elementos son visibles en estas pantallas, mira aquí:
/ Ajustes / Configuración de lista en mosaico y de la lista detalladaPuedes asignar gestos para cualquera de estos diálogos. Por ejemplo, mientras lees un libro, puedes acceder al Historial o a Favoritos mediante gestos, y abrir otro libro sin pasar por el Navegador de Archivos.
Puedes buscar un libro en la pantalla del Historial por nombre de archivo o por metadatos del libro desde el menú hamburguesa en la parte superior izquierda.
También puedes configurar KOReader para que se inicie en la pantalla de Favoritos o con el Historial, en lugar de hacerlo desde el Navegador de archivos mediante:
/ Empieza con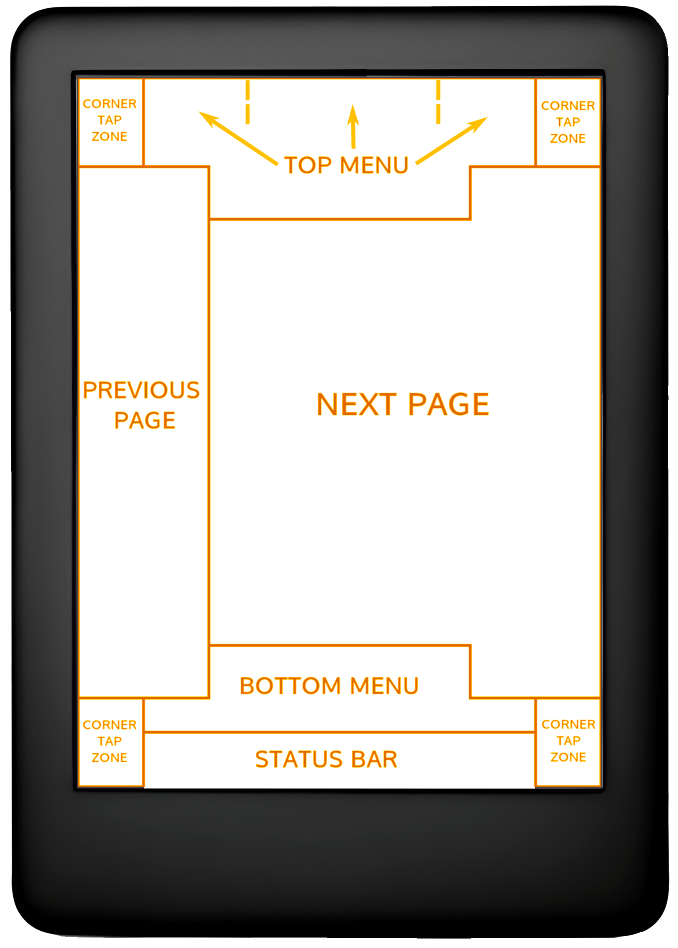
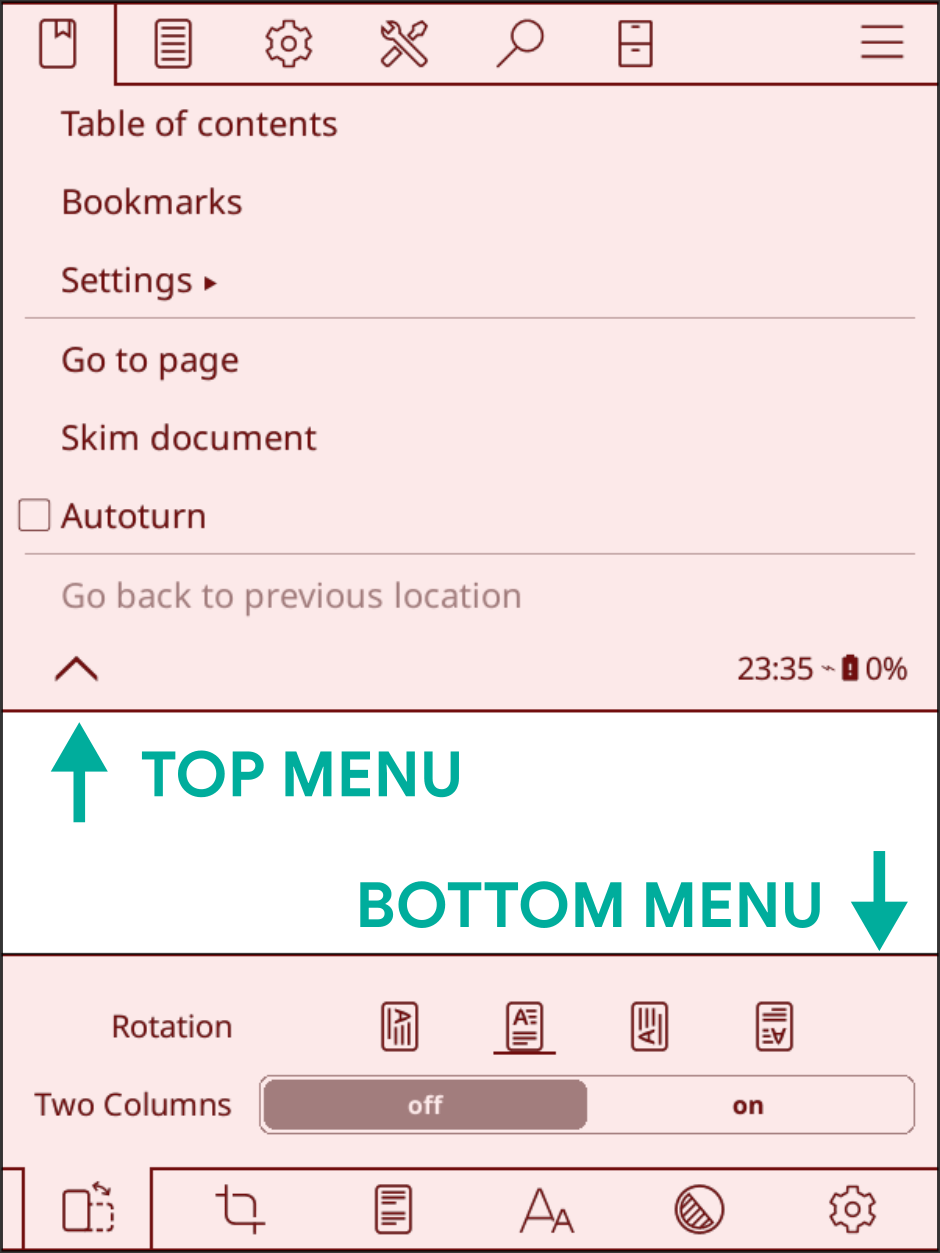
En la imágen superior puedes ver la posición de las zonas de toque por defecto de KOReader. Debes tocar en las zonas indicadas para mostrar el menú superior o el menú inferior. También puedes hacer un deslizamiento hacia abajo desde la zona superior para mostrar el menú superior. En dispositivos sin pantalla táctil puedes abrir el menú inferior presionando el botón que corresponde a la acción ENTER/OK.
Si quieres que el menú superior abra los dos menús al mismo tiempo, puedes configurar que la zona del menú superior abra el menú superior e inferior al mismo tiempo desde este menú:
 / Toques y Gestos / Activar Menú
Las zonas de toque de las esquinas pueden ser usadas para muchos tipos de gestos incluyendo TOQUE, TOQUE DOBLE , TOQUE CON DOS DEDOS y TOQUE LARGO.
Las zonas de PÁGINA ANTERIOR y SIGUIENTE PÁGINA pueden ser usadas al mismo tiempo para gestos de TOQUE DOBLE.
La zona de la Barra de estado puede ser tocada para alternar entre los elementos de la Barra de estado si solo un elemento es visible. Si todos los elementos son visibles, al tocarlos se mostrará u ocultará la Barra de estado.
- Cambiar la letra*:MENÚ SUPERIOR / / Fuente
- Hacer la letra más grandeMENÚ INFERIOR /

- Aumentar el nivel de negritaMENÚ INFERIOR /

- Invertir los colores en pantalla (blanco a negro)MENÚ SUPERIOR / / Modo Nocturno
También puedes cambiar otras opciones de formato desde el MENÚ INFERIOR para ajustar con precisión la apariencia del texto. Estos son solo consejos rápidos para que comiences. Tenemos una sección completa dedicada a PERSONALIZAR LA APARIENCIA DEL TEXTO
Puedes controlar la luz de tu pantalla a través de este menú. Si tienes iluminación cálida (LED blancos normales + naranjas) puedes controlarlos por separado desde este diálogo. También puedes definir un gesto para este diálogo:
/ Luz FrontalPuedes elegir una imagen de cubierta o una imágen personalizada mediante este menú:
/ Pantalla / Tiempo de inactividad de la pantallaPuedes utilizar archivos JPG/PNG como salvapantallas (las imágenes en escala de grises con tramado adecuado tienen mejor aspecto). Transfiere los archivos desde el ordenador a cualquier carpeta del dispositivo. Y selecciona esta carpeta como carpeta de salvapantallas a través de este menú:
/ Pantalla / Tiempo de inactividad de la pantalla / AjustesPor favor, consulta esta publicación del foro de Mobileread para obtener información avanzada sobre la preparación de imágenes para salvapantallas.
Si estás buscando información sobre atajos de teclado, haz clic aquí para ir a la sección. Este encabezado sólo explica el uso del teclado.
- Toca fuera del campo de entrada para cerrar el teclado, toca el campo de entrada para mostrar el teclado de nuevo
- Desliza hacia arriba las teclas para la versión en mayúsculas de esa letra (o minúsculas si ya estás en modo mayúsculas)
- Puedes cambiar el aspecto del teclado:
MENÚ SUPERIOR / / Dispositivo / Teclado / Configuración del formato específico del teclado
- Puedes seleccionar más de una distribución:
MENÚ SUPERIOR / / Dispositivo / Teclado / Distribución del teclado
- Puedes cambiar entre los diseños seleccionados tocando el icono
 en el teclado
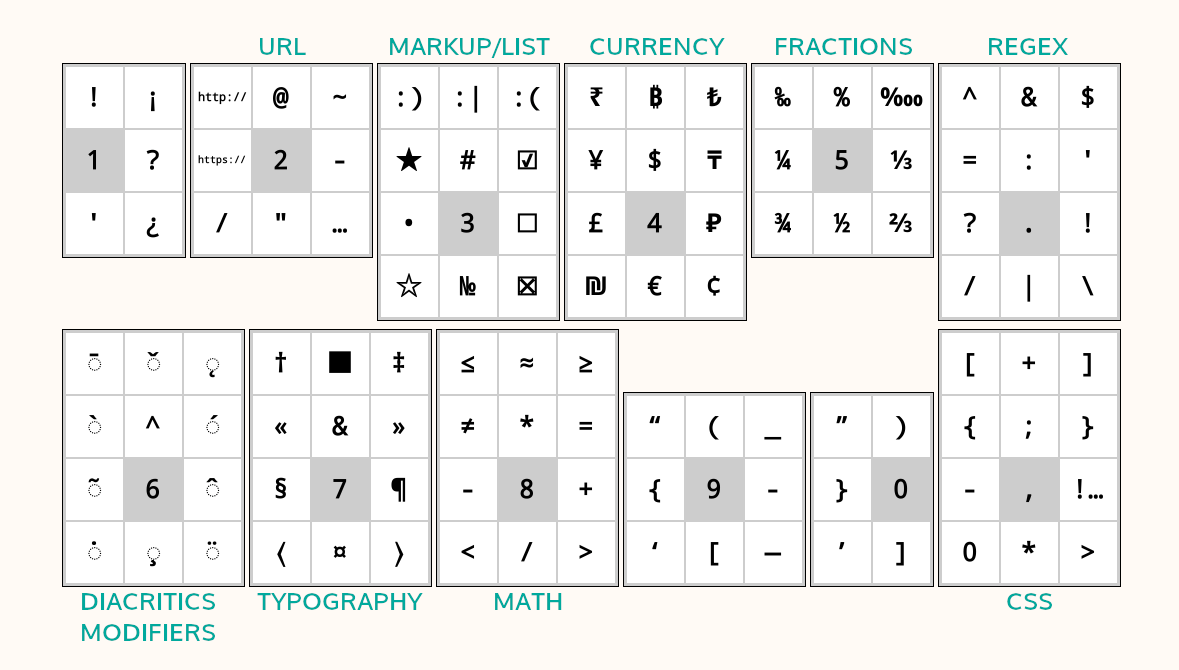
El teclado de Koreader permite ingresar caracteres adicionales cuando tocas y mantienes presionada una tecla. Los caracteres adicionales más frecuentemente utilizados se muestran a continuación. Puedes hacer toque largo en la tecla del cuadro gris para obtener los caracteres circundantes:
Además de la ventana emergente del toque largo, también puedes ingresar estos caracteres adicionales deslizando el dedo sobre una tecla. En el ejemplo siguiente, puedes deslizar hacia arriba sobre la tecla a para ingresar una A mayúscula o deslizar en otras direcciones para ingresar los caracteres mostrados. Ten en cuenta que el ejemplo mostrado incluye la ventana emergente completa con fines demostrativos. No necesitas abrir esta ventana emergente, puedes deslizar directamente sobre las teclas. Una vez acostumbrado a las ubicaciones de los caracteres adicionales, puedes ingresarlos mucho más rápido de esta manera.
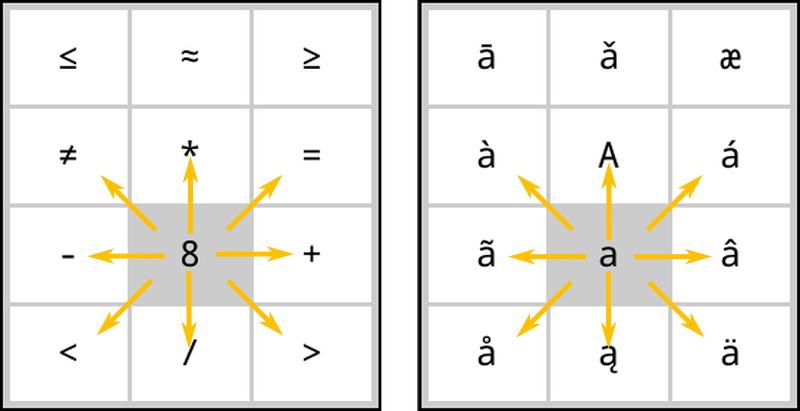
Si esta característica interfiere con tu uso, puedes desactivarla desmarcando:
/ Dispositivo / Teclado / Deslizar el dedo para introducir carácteres adicionalesAdemás hay algunos atajos para facilitar la manipulación de texto. Puedes hacer toque largo en estas teclas para acciones adicionales:
- Flecha izquierda - Mueve el cursor al comienzo de la línea
- Flecha derecha - Mueve el cursor al final de la línea
También la tecla retroceso se comporta de forma diferente cuando realizas gestos de deslizamiento sobre ella:
- Toque: Elimina un caracter
- Toque largo: Elimina la línea completa
- Desplazamiento izquierda: Elimina la parte de la palabra a la izquierda del cursor
- Deslizamiento arriba: Elimina la palabra completa
Para más información puedes consultar la página wiki relacionada.
KOReader también integra el teclado de trazos chinos para ingresar caracteres chinos simplificados y tradicionales. Puedes encontrar más información en nuestra wiki.
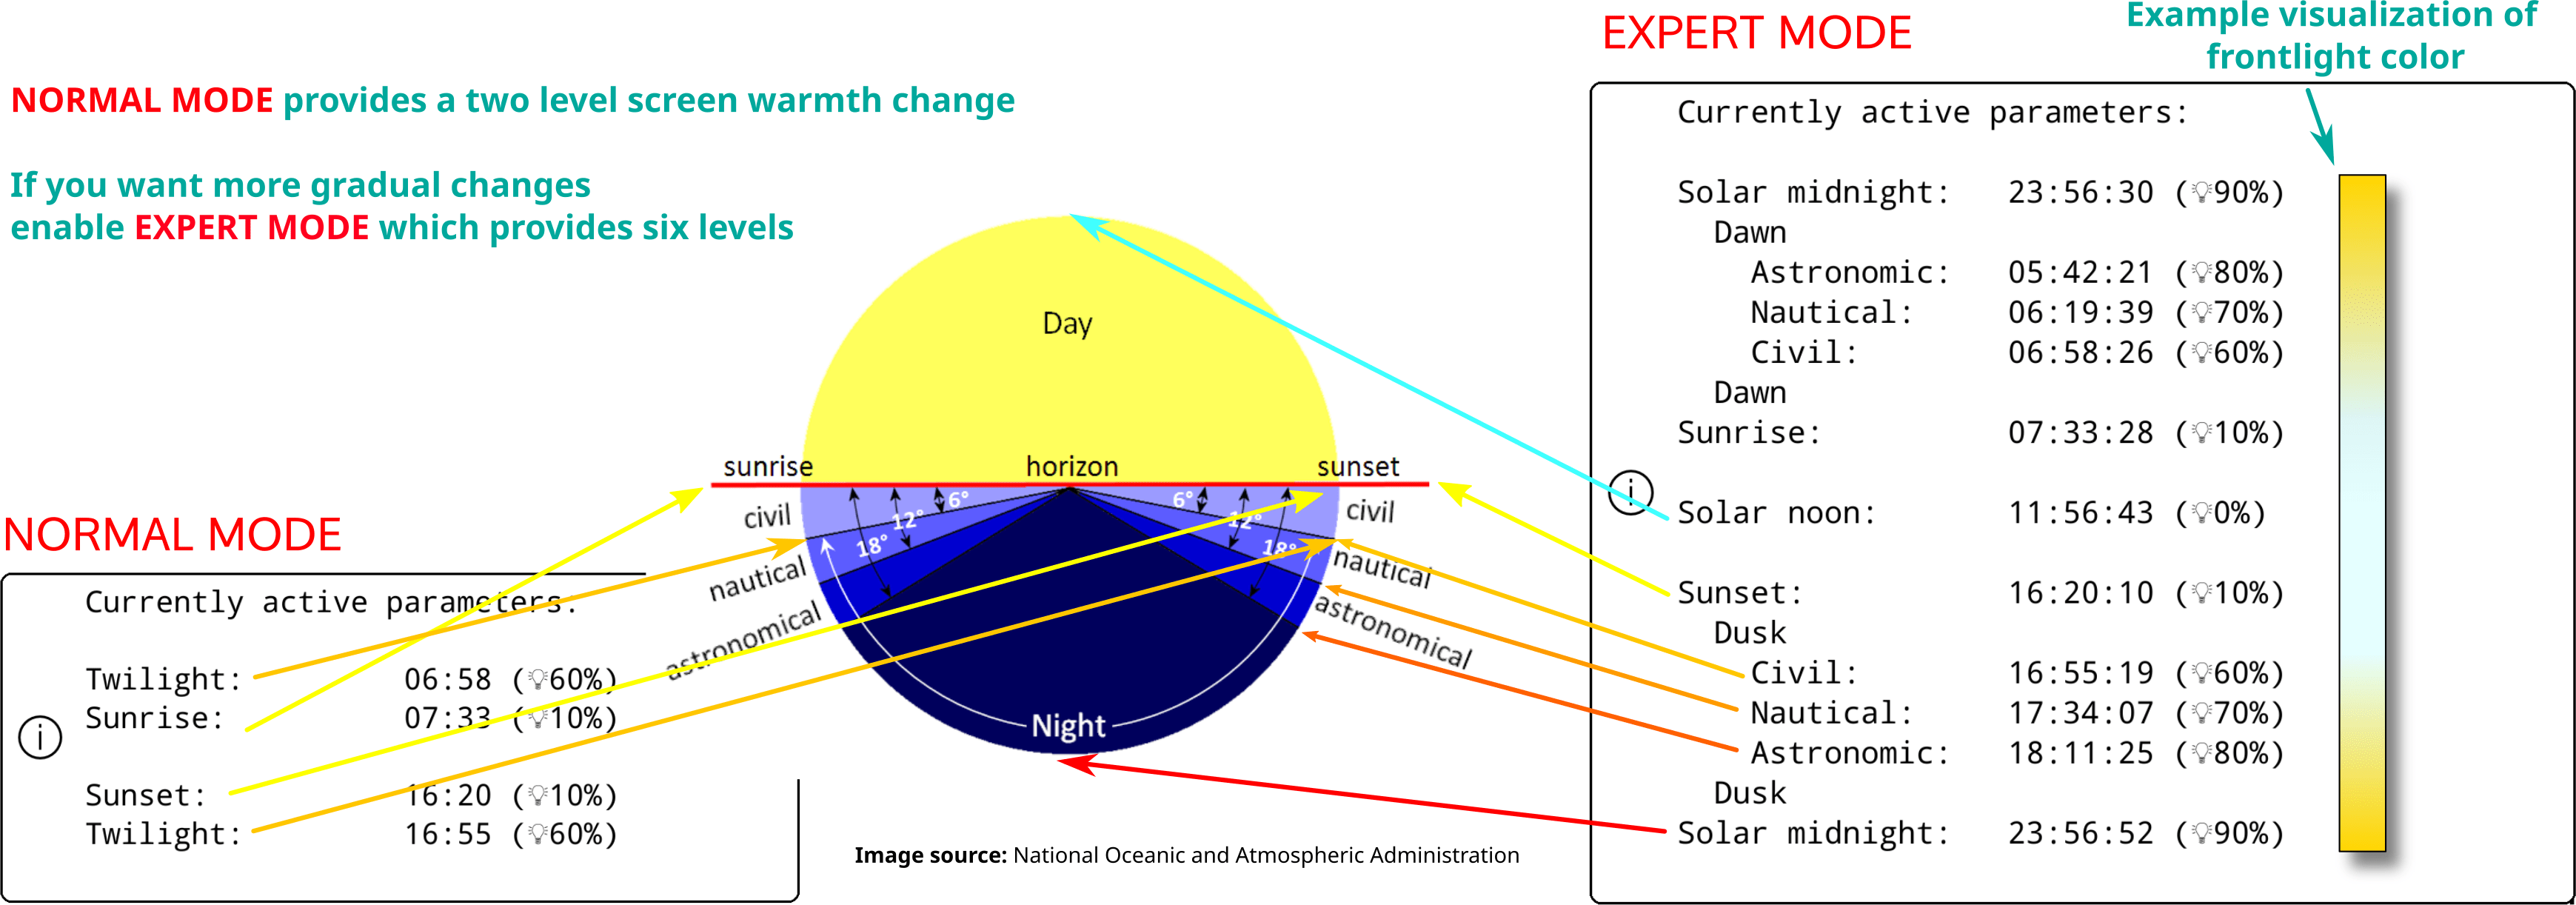
Este complemento te permite ajustar la calidez de la luz frontal en dispositivos con luz natural (amarilla/naranja) y establecer el modo nocturno (colores de pantalla invertidos – texto blanco sobre fondo negro) automáticamente según un horario. Puede controlar ambos o puedes elegir el modo solo control de calidez o solo control de modo nocturno, para que puedas ajustar el otro manualmente.
Este complemento viene habilitado por defecto cuando instalas KOReader. Si por alguna razón no está en el menú, puedes activarlo aquí:
/ Más herramientas / Temperatura Automática y Modo NocturnoPuedes ajustar automáticamente la calidez de la luz frontal de la pantalla de dos formas diferentes:
Horario fijo: En este modo, la calidez de la luz frontal cambia según el horario diario que has proporcionado. Este modo es estático, no tiene en cuenta la duración del día. El horario permanece igual durante todo el año.
Posición del sol: Esta opción calcula la posición del sol en tu ubicación según las coordenadas y la altitud que has proporcionado. La calidez de la luz frontal se ajusta gradualmente según los cálculos de la posición del sol. Este modo es dinámico. A medida que cambia la duración del día durante el año, el plugin ajusta el horario en consecuencia.
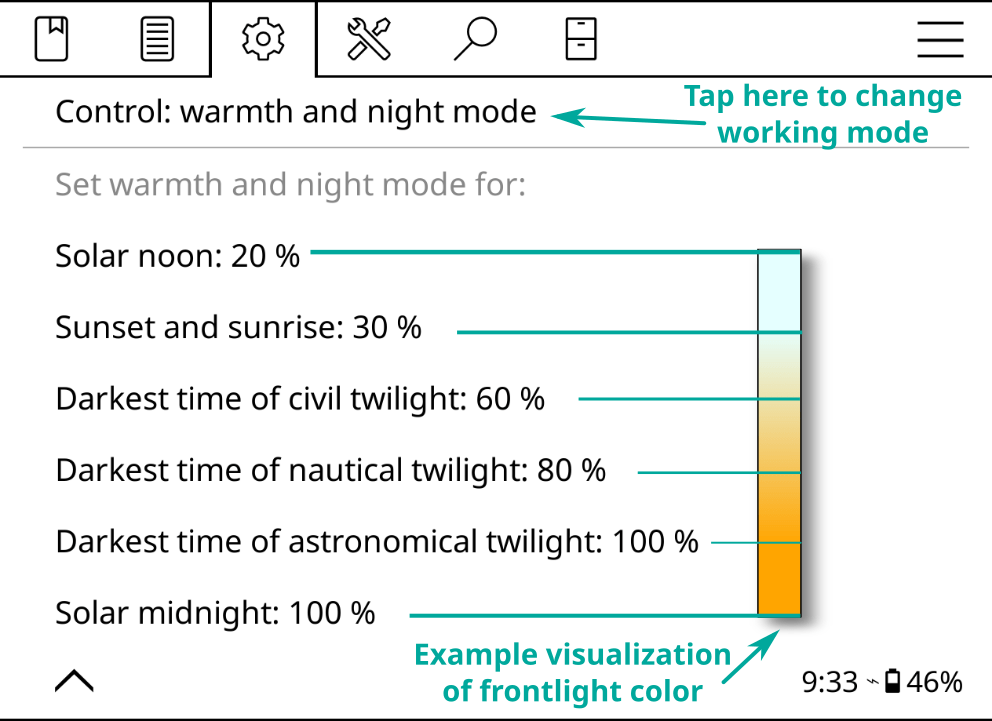
Antes de nada echa un vistazo a la imagen para familiarizarte con los términos usados en el plugin:
- Ir al menu del plugin: MENÚ SUPERIOR / / Pantalla / Temperatura Automática y Modo Nocturno
- Toca el elemento de menú y después toca Según el horario fijo
- Vuelve al menú anterior y toca el elemento del menú Configuración del horario fijo
- Configura tu horario de transición de temperatura aquí, ajustando los tiempos para los distintos elementos. Consulta la imagen de arriba para una explicación sobre estos.
- Ir al menu del plugin:
MENÚ SUPERIOR / / Pantalla / Temperatura Automática y Modo Nocturno
- Toca el elemento de menú Activar y luego toca Según la posición del sol
- Vuelve al menú anterior y toca en Configuración de ubicación. Configura correctamente tus coordenadas (necesarias) y altitud (opcional) y asigna un nombre a tu ubicación.
- Vuelve al menú anterior y toca en Configuración de temperatura del color y modo nocturno
- Configura tu horario de transición de temperatura aquí, ajustando los tiempos para los distintos elementos. Consulta la imagen de arriba para una explicación sobre estos.
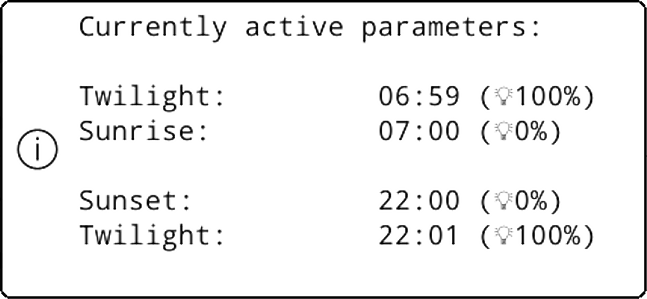
Puedes ver el horario actual a través de la opción Parámetros actualmente activos.
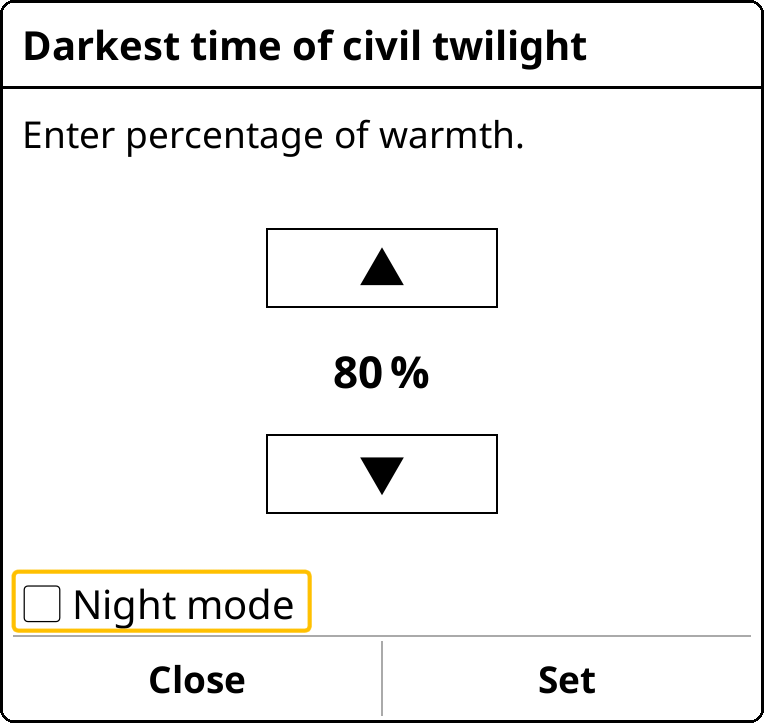
Al configurar los porcentajes de calidez de la luz para diferentes intervalos, también puedes establecer estos intervalos como Modo Nocturno para además inviertir los colores de la pantalla. Puedes activar esta función si luz frontal mínima sigue siendo demasiado brillante o si prefieres tener un fondo de página oscuro, . Para activarlo, en el diálogo siguiente toca la casilla Modo Nocturno y después Establecer.
Cuando lo hagas aparecerá un icono de luna en el menú junto al intervalo. Para desactivar el modo nocturno, simplemente desactiva la casilla Modo Nocturno en ese intervalo.
Esta función enciende la luz frontal al atardecer y la apaga al amanecer según los Parámetros actualmente activos del plugin. Puedes anular este cambio activando o desactivando manualmente la luz frontal. En el próximo amanecer/atardecer, Temperatura del color volverá a tomar el control si fuese necesario. Puedes activarla seleccionando Iluminación apagada en horario diurno del plugin.
Si deseas que la calidez de la iluminación cambie rápidamente en lugar de ser gradual:
- Configura el modo en Horario fijo siguiendo las instrucciones anteriores
- Y ajusta la configuración similar a la imagen inferior:
Como puedes ver en la configuración anterior, hay sólo una diferencia de un minuto entre la transición día-noche. Así que la calidez de la pantalla va de 0 a 100 (o viceversa) en sólo un minuto. Puedes aumentar este intervalo de tiempo para hacer que la duración de la transición sea más larga.
KOReader tiene una interfaz de usuario simple, principalmente en blanco y negro, porque los gradientes y los diferentes tonos de gris pueden causar parpadeo y sombras en la pantalla de tinta electrónica, lo que degrada la experiencia de lectura.
KOReader tiene dos interfaces principales: pantalla de lectura y Navegador de Archivos. Explicaremos la pantalla de lectura aquí. El Navegador de Archivos se explica en esta sección de la guía.
La PANTALLA DE LECTURA tiene dos menús:
- El MENÚ SUPERIOR incluye elementos de menú relacionados con el uso general de KOReader. Aquí podrás acceder a tus libros, preferencias de KOReader, complementos, etc.
- El MENÚ INFERIOR se enfoca a opciones para formato de documento como el grosor/tamaño de la letra, espaciado entre líneas, etc. Mientras ajustas la apariencia del texto, interactúas principalmente con el MENÚ INFERIOR.
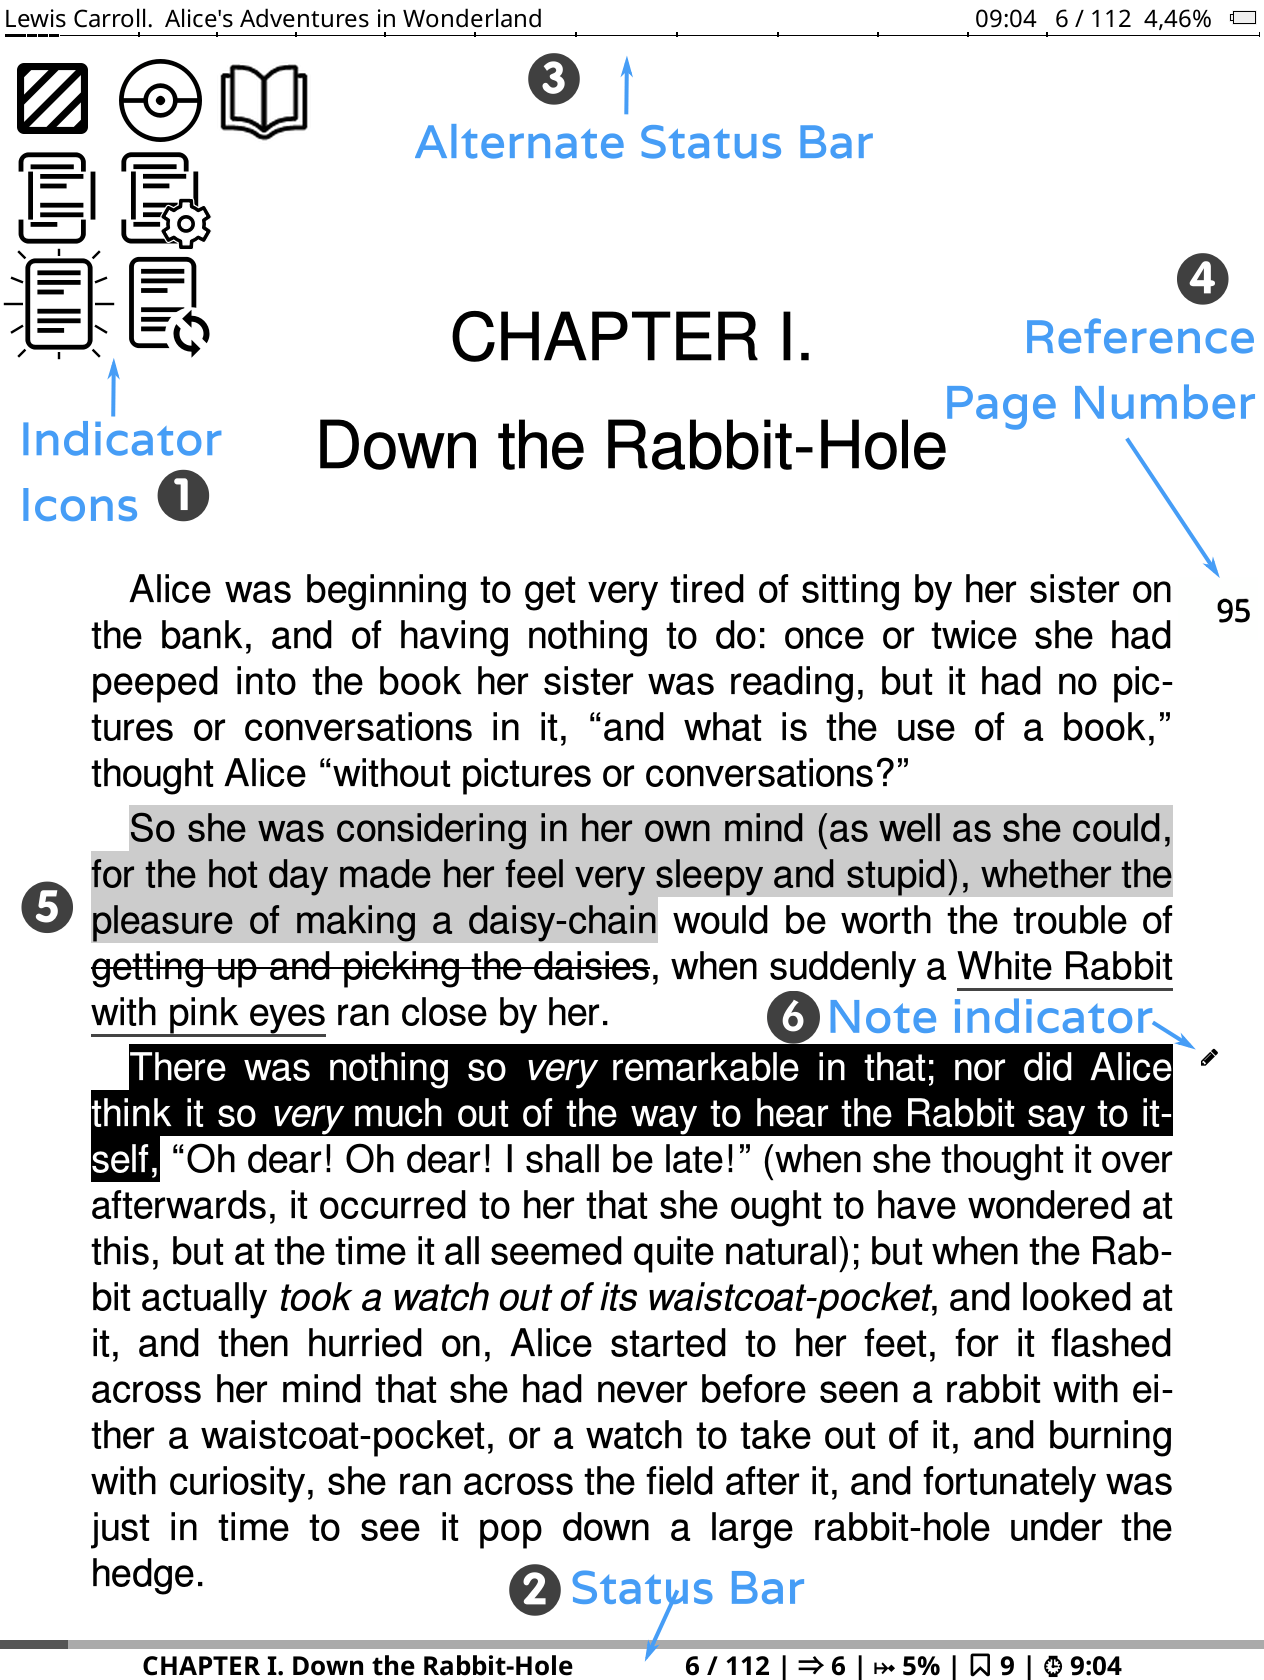
La imagen superior muestra los elementos que puedes ver en la pantalla de lectura mientras lees un libro:
- Iconos indicadores: Estos iconos informan sobre ciertos procesos y estados en curso. Los verás en la esquina superior izquierda de la pantalla durante ciertas operaciones. Normalmente son más pequeños, pero los mostramos grandes para mayor claridad. El siguiente encabezado explica estos iconos indicadores en detalle: Iconos indicadores
- Barra de estado: Esta es un área altamente configurable donde puedes ver diversa información sobre el libro y KOReader. Haz clic aquí para ir a la sección: Barra de estado
- Barra de estado alternativa: Además de la Barra de estado predeterminada, tenemos una Barra de estado alternativa que aparece en la parte superior de la página si la habilitas. Haz clic aquí para más detalles: Barra de estado
- Numeración de páginas de la edición impresa: Si el editor del libro ha incluido los números de página de la versión impresa del libro, los verás de esta manera. Haz clic aquí para obtener más información: Numeración de páginas y numeración de páginas de la edición impresa
- Tipos de subrayados: Aquí puedes ver los diferentes tipos de subrayados. También puedes hacer subrayados de colores si tu dispositivo tiene la pantalla adecuada. Haz clic aquí para ir a la sección: Marcadores, Subrayados y Notas
- Marcador de notas: El icono de marcador de nota aparece cuando agregas una nota a un subrayado. Tenemos diferentes tipos de marcadores de nota. Haz clic aquí para obtener más información: Marcadores, Subrayados y Notas
KOReader dispone de algunos iconos para informarte acerca de ciertos estados y procesos en marcha, como puedes observar en la anterior imagen. Se muestran en la esquina superior izquierda de la pantalla durante ciertas operaciones.
   
|
Iconos de renderización parcial Este grupo de iconos pertenece al procedimiento de renderización y probablemente los veas con más frecuencia. Aparecen cuando cambias los ajustes en el menú inferior. Esta función te permite previsualizar la apariencia de los ajustes de texto mucho más rápido al renderizar solo el capítulo actual en lugar de todo el libro. También agiliza la rotación de la pantalla. Esta función está ACTIVADA por defecto. Si fuese necesario puede desactivarse globalmente (toque largo) o por libro (un toque) desde: MENÚ SUPERIOR
/ Documento / Activar renderización parcialDespués de confirmar los cambios, el libro completo tiene que ser renderizado, siendo un proceso de varios pasos. Estos iconos muestran la fase de renderización tal como se explica: |
|
En esta fase el documento es renderizado parcialmente. El recuento de páginas, información a pié de página y otros datos son imprecisos. Puedes ver los cambios y en consecuencia afinar los ajustes. También puedes pasar de página e ir a enlaces. |
|
Está en proceso la renderización completa en segundo plano. Puedes pasar de página, ir a enlaces y modificar ajustes. |
|
La renderización completa ha finalizado, pero aún no se ha aplicado porque KOReader está esperando a estar en reposo para recargar el resto del libro (reposo = no interactuar con el dispositivo). Puedes pasar de página, ir a enlaces y modificar ajustes. |
|
|
Tras un período de reposo, KOReader está recargando el documento completo. En esta fase KOReader está bloqueado para prevenir interacciones. |
 |
Icono de subrayado Este icono aparece cuando estás en el Modo seleccionar y subrayar. KOReader tiene un modo de subrayado adicional que te permite iniciar un subrayado y pasar páginas para crear subrayados largos que pueden abarcar varias páginas. Puedes leer más en la sección Marcadores, Subrayados y Notas de esta guía. Cuando inicias un subrayado en este modo, este icono se muestra en la esquina para recordarte que todavía estás en el modo de subrayado. Desaparece cuando terminas tu subrayado seleccionando el final del pasaje o cuando cancelas el subrayado (toca de nuevo en el comienzo de tu subrayado o en el mismo icono de subrayado). |
 |
Icono de bola de Pokémon Este icono aparece cuando tocas durante mucho tiempo en una palabra (intencional o accidentalmente). KOReader tiene un menú de toque largo y un menú adicional de toque muy largo cuando mantienes el dedo durante más de 3 segundos. Este icono significa que has activado el menú de toque muy largo. |
 |
Icono del modo de volteo Este icono aparece cuando tocas la esquina superior izquierda si:
Este modo muestra temporalmente la página completa sin recortar y escalada para ajustarse a la pantalla. También puedes girar las páginas en este modo. Para salir toca este icono. |
Naturalmente, tipos de documentos como epub, mobi, html no tienen números de página fijos porque son documentos ajustables. Esto significa que se pueden ajustar según el tamaño de la pantalla y la orientación del dispositivo (a diferencia de los archivos pdf o djvu que tienen un tamaño de página fijo).
Si aumentas el tamaño de la letra de un documento ajustable, el número de páginas también aumentará porque cabrá menos texto por página. A veces puede causar problemas porque un subrayado en la página 38 podría estar en la página 42 después del ajuste de la letra.
KOReader admite la función de Numeración de páginas de la edición impresa que permite a los editores incrustar números de página de libros impresos directamente en la versión ebook. Cuando habilitas esta función KOReader no calcula los números de página por sí mismo. En su lugar muestra los números de página incrustados del editor. Esto significa que el número de página que ves en la Barra de estado coincide con la versión impresa del libro.
Beneficios de la numeración de páginas de la edición impresa:
- La numeración de páginas de la edición impresa habilita las citas precisas ajustándose al número de página encontrado en la versión impresa.
- La numeración de páginas de la edición impresa puede ayudar en la navegación, especialmente para lectores que están familiarizados con la versión impresa del libro. Pueden ayudarte a encontrar pasajes o citas específicas más fácilmente en la versión digital.
- Dado que los libros digitales se pueden leer en varios dispositivos y plataformas, cada uno con su propio tamaño de fuente y configuración de pantalla, los números de página mostrados pueden variar significativamente. La numeración de páginas de la edición impresa proporcionan un punto de referencia consistente al leer a la vez el mismo libro en dispositivos diferentes como un e-reader y un teléfono.
Puedes habilitar esta característica desde:
 / Numeracón de páginas de la edición impresa / Usar numeración de páginas de la edición impresa
Si también activas la opción Mostrar numeración de páginas de la edición impresa en el margen del mismo menú, los números de página se mostrarán junto al texto en letra pequeña.
Ten en cuenta que este menú sólo aparece si hay números de página de la edición impresa incrustados en el libro.
KOReader tiene dos barras de estado, una Barra de estado inferior que está habilitada por defecto. Y una Barra de estado alternativa que aparece en la parte superior si la habilitas. Esta Barra de estado alternativa solo está disponible en documentos ajustables (epub, html, docx, rtf, txt…).
La barra de estado inferior es la más nueva y se mantiene activamente. La barra de estado alternativa es un vestigio de versiones anteriores de KOReader, por lo que no estamos agregando nuevas características. Pero todavía puedes habilitar la barra de estado alternativa si la encuentras útil. Puedes habilitarla desde:
/ Barra de estado alternativaPuedes configurar la barra de estado alternativa desde este menú:
/ Barra de estado / Barra de estado alternativaLas instrucciones en el resto de la sección son para la barra de estado inferior.
Puedes configurar la barra de estado inferior desde este menú. No dudes en explorar el submenú AJUSTES para personalizar la barra de estado a tu gusto.
/ Barra de estadoHay muchos elementos que puedes mostrar en la barra de estado, pero por defecto sólo se muestra uno a la vez y tienes que tocar la barra de estado para cambiar entre ellos. Si deseas mostrar todos los elementos a la vez, puedes habilitarlo desde aquí:
/ Barra de estado / Configurar elementos / Mostrar todos los elementos seleccionados a la vezSi has habilitado la opción anterior, no podrás ocultar la barra de estado tocándola. Si deseas ocultarla, deberías asignar un gesto aquí para alternar la barra de estado:
Ordenando los elementos de la barra de estado:
/ Barra de estado / Configurar elementos / Ordena elementos en la barra de estadoHay un elemento especial en la barra de estado llamado Texto personalizado. Este elemento puede mostrar el texto seleccionado en la barra de estado. También puedes usar esta función para crear un separador entre los elementos de la barra de estado como se muestra en el siguiente ejemplo:

- Primero habilita esta opción con un toque corto desde este menú
MENÚ SUPERIOR / / Barra de estado / Texto personalizado: ‘KOReader’
- Después dale un toque largo para abrir los ajustes. Introduce un carácter "espacio" en la primera casilla e introduce el número de repeticiones en la segunda casilla, lo que determinará el ancho del separador.
Puedes elegir otro caracter como separador. También puedes mover este elemento como otros elementos de la barra de estado para cambiar tu orden y ajustar tus grupos.
La barra de progreso en la barra de estado normalmente muestra tu progreso para todo el libro, pero también puede mostrar en tu lugar el progreso para el capítulo actual. Puede ser útil si un libro tiene muchos capítulos cortos, en cuyo caso puede resultar difícil ver el progreso en el capítulo actual, por lo que la barra de estado del capítulo puede resultar más informativa. Puedes habilitar la función desde este menú:
/ Barra de estado / Barra de progreso / Mostrar la barra de progreso del capítulo en su lugarTambién puedes asignar un gesto para cambiar entre las barras de progreso normal y la de capítulo. Puedes encontrar esta acción en:
Aquí solo daremos una visión general de los elementos en la estructura del menú superior para familiarizarte con estos. La información detallada está disponible en las secciones relacionadas de esta guía.

- NAVEGACIÓN: Este menú contiene elementos que te permiten navegar por el libro que estás leyendo actualmente. Índice, marcadores, mapa del libro...
- CONFIGURACIÓN DE TIPOGRAFÍA: Este menú contiene elementos que te permiten cambiar la apariencia de tu libro. Ajustes de letra, ajustes de estilo...
- AJUSTES: Este menú contiene ajustes para KOReader y tu dispositivo. Tinta electrónica, luz, ajustes de gestos...
- HERRAMIENTAS: Este menú contiene plugins que pueden ampliar las funcionalidades de KOReader.
 BUSCAR: Este menú contiene elementos relacionados con la búsqueda y las consultas. Búsqueda de texto, diccionario, traducción, Wikipedia...
- Navegador de Archivos: Este botón abre el Navegador de Archivos que es la interfaz para administrar tu biblioteca.
 PRINCIPAL: Este menú contiene herramientas para acceder a tus libros, como historial, favoritos, colecciones. También se encuentran aquí información del libro, actualización y salida.
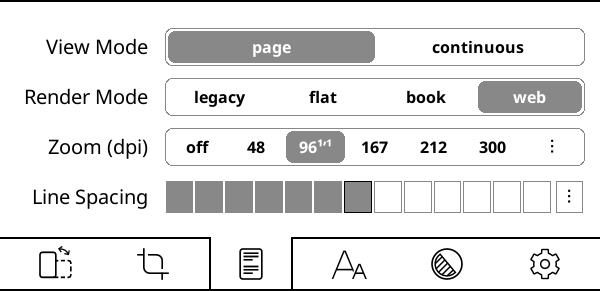
Modo de visualización: Si cambias a modo continuo, puedes desplazarte por el documento como si fuera una página web. Este modo es más adecuado para tipos de pantallas que no son de tinta electrónica (LCD, OLED). En el modo continuo, pierdes los márgenes superior e inferior, por lo que el texto puede ser cortado en la primera y última línea de la pantalla. Para solucionar este problema puedes habilitar la Superposición de páginas:
/ Superposición de páginasModo de renderizado: Esta opción determina la forma en la que KOReader renderiza el documento. La predeterminada es WEB y por lo general no necesitas cambiarla. Cuando un libro (o página web guardada) es muy complicado (anchuras o márgenes especificados, márgenes negativos, flotantes, etc.), el diseño se ve mal o la pantalla se desborda, puedes probar con otros modos de renderizado.
Zoom (dpi): esta configuración puede entenderse como un factor general de zoom para el documento (excepto el tamaño de letra). A 96 dpi (que es la configuración predeterminada), las imágenes del documento se renderizan en tus dimensiones originales. Básicamente usarás esta configuración si quieres hacer las imágenes más grandes sin hacer la letra más grande.
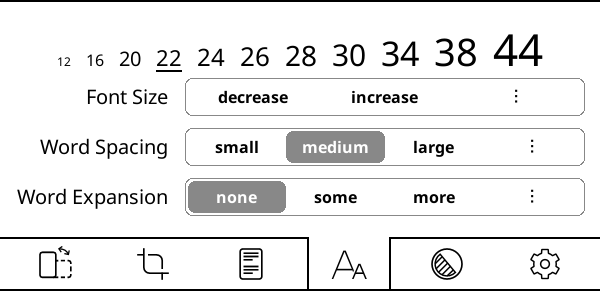
Espaciado entre palabras y expansión de palabras son ajustes relacionados y determinan cómo se verá el texto cuando esté justificado. Cuando justificas el texto, se añade espacio entre palabras para que ambos bordes de cada línea queden alineados con los dos márgenes. Dado que el número de palabras por línea no es siempre igual, en la alineación justificada el texto tiene que comprimirse o expandirse para rellenar la línea.
Espaciado entre palabras: cuánto se pueden comprimir los caracteres de espacio en una línea de texto para que quepan más palabras. Esta configuración no afecta a las palabras y sólo cambia el espacio entre ellas.
Expansión de palabras: Si tienes demasiado espacio en blanco en una línea, cuánto de ese espacio puede distribuirse dentro de las palabras expandiéndolas. Esta configuración afecta la apariencia de las palabras. Si no quieres que tus palabras se expandan ajusta el valor a ninguna.
Puedes experimentar con diferentes ajustes hasta que el texto te resulte agradable, y luego establecerlos como valores predeterminados mediante tus respectivos cuadros de diálogo.
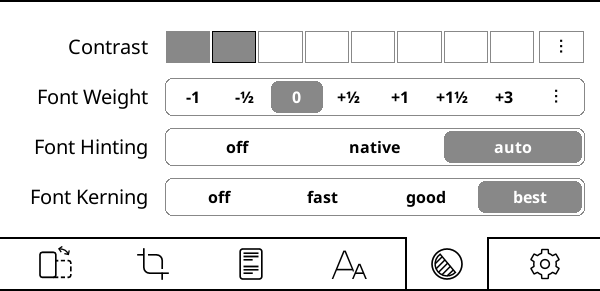
Contraste y grosor de letra son dos opciones que puedes usar para hacer el texto más grueso (o más claro). Puedes lograr la misma apariencia con cualquiera de estas opciones pero para conseguirlo usan métodos diferentes. Por supuesto puedes usar ambas al mismo tiempo.
Las diferencias entre ellas pueden resumirse así:
+ No cambia el ancho de la letra, la longitud del libro permanece igual
+ No necesita volver a renderizar el documento, más rápido
- Puede verse mal en pantallas LCD o de baja resolución (dpi)
+Usará fuentes ponderadas si las tiene instaladas
+ Se ve mejor en pantallas LCD o con pocos PPP
- Tiene que volver a renderizar las fuentes, más lento
La optimización de letra adapta tu texto para la máxima legibilidad según la rejilla de píxeles de lu pantalla. native usa las instrucciones internas de optimización de la letra, auto usa el algoritmo de optimización de FreeType. auto es una opción más segura porque los archivos de letra que tengas instaladas pueden tener instrucciones de optimización problemáticas. Además, auto maneja mejor el texto CJK. Puedes probar diferentes ajustes para ver cuál es el mejor en tu dispositivo.
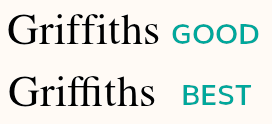
El interletraje de letra ajusta el espaciado entre letras para lograr un resultado visualmente agradable. Por defecto está la opción mejor, que puede ser más lenta al abrir archivos (dependiendo de tu dispositivo), pero tiene mejor soporte para ligaduras (ver imagen abajo como ejemplo), glifos árabes unidos y algunos otros alfabetos. Si tu dispositivo es lento, puedes probar bueno que es más rápida y aún podría verse correcta con texto latino occidental.
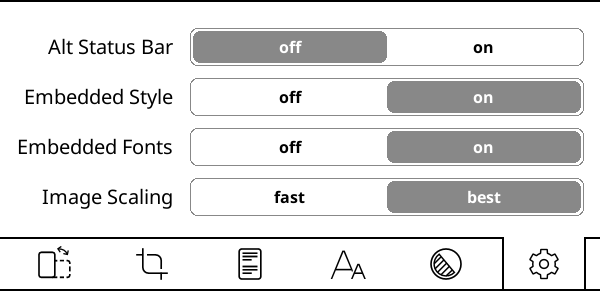
Barra de estado alternativa activa una barra de estado alternativa que está disponible solo en documentos ajustables (EPUB, HTML, DOCX, RTF, TXT…). Tras activarla aquí, puedes configurar la barra de estado alternativa a través de:
/ Barra de estado / Barra de estado alternativaEstilo incrustado y fuentes incrustadas determinan si se usarán (o ignorarán) el estilo del editor y las fuentes incrustadas del documento para presentar el documento. Aceptan los valores on/off. Puedes lograr ajustes más precisos para tu documento a través de:
/ Ajustes de estiloEscalado de imágenes determina como se presentan las imágenes de tu documento. Best es la que mejor se ve, pero es la más lenta.
La interfaz de usuario y las opciones de KOReader pueden variar en función del tipo de archivo que abra. Existen dos categorías principales de documentos:
- Documentos con diseño fijo (pdf, djvu, archivos de imagen...)
- Documentos Ajustables (epub, html, docx, rtf, txt…).
KOReader tiene muchas funciones, por lo que tu sistema de menús refleja esta complejidad. Contamos con una función de búsqueda en el menú para encontrar rápidamente los elementos del menú. Si recuerda el nombre de un elemento del menú, pero no recuerda dónde se encuentra, puede utilizar esta función:
/ Ayuda / Búsqueda en el menúTambién puede asignar esta función a un gesto o añadirla a tu Menú rápido para un acceso más rápido.
En el menú inferior, si mantiene presionado el nombre de una opción, podrá ver su explicación. |
|
Puede cambiar el idioma de la interfaz a través de: MENÚ SUPERIOR /
/ Idioma |
|
Si desea cambiar el tamaño de la interfaz de usuario, existe un ajuste de DPI para eso: MENÚ SUPERIOR /
/ Pantalla / DPI de pantallaPuede elegir un valor del menú o seleccionar DPI personalizado para introducir un valor y realizar un mejor ajuste: Cuanto mayor sean los DPI, mayor será la interfaz. Tenga en cuenta que también hay un ajuste Zoom (DPI) en la barra inferior. Este ajuste solo está relacionado con los documentos. Encontrará la explicación en la siguiente sección. |
Si tocas y mantienes presionado una opción o elemento del menú (grosor de letra, interlineado, etc.), puedes establecer tu valor como POR DEFECTO. El nuevo valor solo se aplicará a los libros que se abran a partir de ahora. Los libros abiertos anteriormente conservarán tus ajustes. Puedes identificar los valores por defecto como una estrella (★) en el menú o como un borde oscuro alrededor de los indicadores, como puedes ver abajo: 

|
Puedes cerrar los diálogos a pantalla completa (Historial, Índice, Estadísticas de lectura etc.) deslizando hacia abajo. (Excepto la ventana de Marcadores. Puedes usar cualquier multi gesto de deslizamientos para cerrar ésta) |
Puedes tomar una captura de pantalla haciendo un deslizamiento diagonal largo con el dedo. También tocar las esquinas diagonales opuestas hará una captura de pantalla. Puedes usar este segundo gesto por ejemplo, al ver una imagen. Además, si tu dispositivo tiene teclado, puedes tomar una captura de pantalla con el atajo Alt + Shift + G. |
Si quieres abrir una página aleatoria de un libro, tenemos la acción saltar a Página aleatoria que puedes asignar a cualquier gesto. Está en la categoría Lector del Configurador de gestos. |

En los diálogos que contienen botones de flecha de ajuste como el anterior, puedes hacer toque largo en los botones de flecha para cambiar el valor a incrementos mayores. Puedes cerrar este tipo de diálogo (no a pantalla completa) tocando fuera de tu ventana. Puedes mover este tipo de diálogo manteniendo pulsado el título de tu ventana y arrastrando. Puedes hacer que este tipo de diálogo sea semi transparente tocando y manteniendo el título de la ventana (cuando quieras ver el texto que está debajo mientras ajustas un valor). |
Crear nuevas carpetas - En situaciones en las que necesitas elegir una ubicación (almacenamiento en la nube, mover al plugin para archivar o plugin para exportar), KOReader muestra una pantalla que se parece a nuestro Navegador de Archivos. Si quieres crear una nueva carpeta mientras eliges:
|
KOReader admite la búsqueda en diccionario en documentos EPUB y PDF/DJVU escaneados. Para ver la definición del diccionario o la traducción, simplemente toca y mantén presionada una palabra. Al presionar y mantener una palabra aparece un diálogo donde también puedes buscar la selección en el documento para más casos en los que aparezca o consultarla en Wikipedia. |
Si quieres comprobar la fecha actual puedes tocar el reloj en el MENÚ SUPERIOR. |
KOReader tiene tres tipos de toques de desplazamiento. Puedes acceder a estos desde:
/ Toques y gestos / Desplazamiento- Desplazamiento clásico: Este modo funciona exactamente como el desplazamiento del teléfono/tableta.
- Turbo desplazamiento: Este modo permite desplazarte más rápido que el desplazamiento clásico. También puedes desplazar varias páginas sin levantar el dedo. La cantidad de desplazamiento es proporcional a la distancia que mueves el dedo después de iniciar el desplazamiento.
- Desplazamiento al levantar el dedo: este tipo de desplazamiento es más adecuado para pantallas de tinta electrónica. Porque a diferencia de otros tipos, este modo no actualiza la página continuamente mientras se desplaza. Funciona como el desplazamiento clásico pero no se muestran los pasos intermedios. Así que cuando desplazas con el dedo y sueltas, la página salta a esa posición. Es especialmente útil para reposicionar y ajustar la vista si el libro contiene imágenes o tablas y quieres verlas por completo.
Esta función actúa como el botón Atrás del navegador. Cuando vas a otra parte del libro usando el widget Vista rápida, la lista de Marcadores o el Mapa del libro, KOReader recuerda tu ubicación anterior. Es útil si por ejemplo sigues un enlace o referencia interna, volviendo con un toque al punto del que has venido. Puedes acceder a esta función desde:
/ Volver a la ubicación anteriorTambién puedes avanzar desde el mismo menú. Esta función está asignada al gesto multideslizar . Puedes asignarla a otro gesto si lo deseas (como tocar una esquina) o añadirla a tu Menú rápido.
KOReader normalmente actualiza completamente las páginas con imágenes (que se pueden observar como un destello negro). Esto se hace para eliminar los residuos y las imágenes superpuestas de la página anterior. Sin embargo, esto podría no ser necesario según tu dispositivo y preferencias personales. Puedes desactivar esta actualización automática aquí:
/ Pantalla / Configuración de tinta electrónica / Frecuencia de actualización completa / Siempre parpadear en páginas con imágenesTambién puedes desactivar el parpadeo negro de la interfaz de usuario desde aquí si te molesta:
/ Pantalla / Configuración de tinta electrónicaHay diferentes formas de moverse por un documento en KOReader y cada una tiene tus propias ventajas. Puedes usar:
- Widget Ojear
- Mapa del libro
- Explorador de páginas
El widget de Vista rápida es una herramienta de navegación muy funcional. Puedes usarla para:
- Salta a cualquier parte del libro tocando directamente la barra de progreso o introduciendo el número de página
- Navegar entre capítulos
- Navegar entre marcadores
Cómo abrir el widget de Vista rápida:
- Con un toque largo en el área de la Barra de estado en la parte inferior de la pantalla
- Desde este menú: MENÚ SUPERIOR / / Hojear el documento
- Puedes asignarle un gesto
- Puedes agregarlo a tu Menú rápido
Primero echemos un vistazo rápido al diagrama de abajo. Verás que tenemos dos widget de Vista rápida. Tienen las mismas funciones, solo que tu tamaño es diferente:
- WIDGET DE VISTA RÁPIDA A TAMAÑO COMPLETO: Este es el widget de Vista rápida predeterminado que verás al instalar KOReader. Es más grande que el widget compacto de Vista rápida, por lo que los botones son más cómodos de pulsar. Este widget se abre en el centro de la pantalla.
- WIDGET COMPACTO DE VISTA RÁPIDA: es la versión más delgada del widget de Vista rápida predeterminado. Puede ser más útil si estás haciendo subrayados. Dado que este widget es más pequeño y se abre en la parte superior o inferior de la pantalla, no obstruye la página tanto como el widget predeterminado.
Si quieres usar el widget compacto de Vista rápida, puedes hacerlo eligiendo Arriba o Abajo desde este menú:
/ Navegación / Posición del cuadro de diálogo de exploración:CONSEJO Ambos widgets de vista rápida son movibles. Puedes moverlos presionando en un área vacía del widget y arrastrando. También puedes hacer estos diálogos semi-transparente manteniendo pulsado en un área vacía del widget. Pero la semi-transparencia solo se activa en tu posición inicial. Una vez movido, una pulsación larga lo devuelve a la posición inicial.
Volviendo al diagrama puedes ver que en algunos botones hay dos descripciones en diferentes colores: azul y naranja. Esto significa que ese botón tiene dos funciones: una acción de pulsación normal y una acción de pulsación larga. Si lo pulsas normalmente, realizará la función AZUL. Si lo mantienes pulsado más tiempo, realizará la función NARANJA.
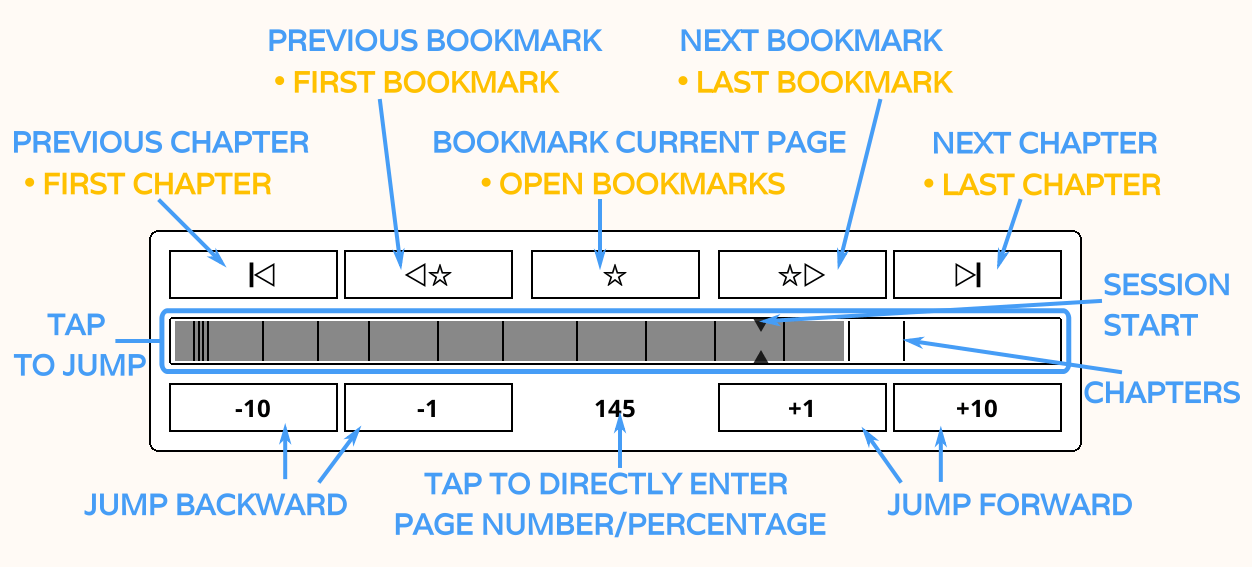
Explicaciones de los elementos numerados (acción de pulsación larga en negrita):
- Saltar al inicio del capítulo anterior / Saltar a la primera página del libro
- Saltar al marcador anterior / Saltar al primer marcador del libro
- Marcar la página actual / Abrir el diálogo de marcadores
- Saltar al siguiente marcador / Saltar al último marcador del libro
- Saltar al inicio del siguiente capítulo / Saltar a la última página del libro
- Saltar hacia atrás (-) o hacia adelante (+) esta cantidad de páginas
- Este número muestra el número de página actual. Si lo tocas, se abre un diálogo que te permite introducir un número de página o porcentaje para ir directamente. Si lo mantienes pulsado, te lleva de vuelta a la página donde abriste el widget de Vista rápida. Esto es útil, por ejemplo, si quieres consultar rápidamente otra parte del libro y volver a la lectura donde la dejaste.
- Esta es la barra de progreso. Las líneas finas son las marcas de capítulo que muestran el inicio de los capítulos. Puedes tocar la barra de progreso para saltar a esa parte del libro. Las pequeñas flechas son flechas de inicio de sesión que marcan el lugar donde empezaste a leer este libro en la sesión actual. Estas flechas se restablecen cuando cambias de libro.
- Este botón en el widget compacto de Vista rápida funciona igual que la función de pulsación larga del elemento número 7. Te lleva de vuelta a la página donde abriste el widget de Vista rápida. Esto es útil si quieres consultar rápidamente otra parte del libro y volver a la lectura donde la dejaste.
CONSEJO Si quieres abrir una página aleatoria del libro, tenemos la acción saltar a una Página aleatoria que puedes asignar a cualquier gesto. Está en la categoría Lector del Configurador de gestos.
KOReader puede mostrar los límites de capítulos en el documentos desde el WIDGET DE VISTA RÁPIDA y la BARRA DE PROGRESO.
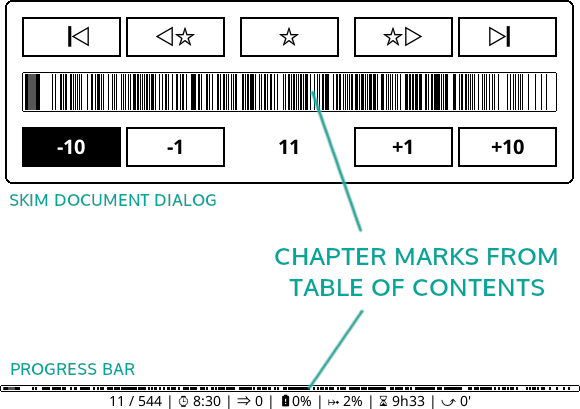
Si el documento tiene demasiados niveles de encabezado, las marcas de capítulo pueden verse abarrotadas, como en el ejemplo anterior. Puedes cambiar la profundidad de los niveles visibles de las marcas de índice mediante:
/ Configuración / Barras de progreso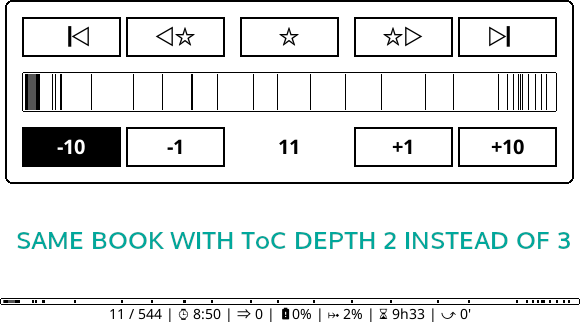
También puedes usar índice reducido para:
- títulos de capítulo (si se muestran en la Barra de estado)
- navegar por el capítulo
- tiempo de lectura y tiempo estimado restante
Estas opciones están en el mismo menú.
Si el documento no tiene un índice, puedes habilitar el ÍNDICE ALTERNATIVO. Cuando esta opción está activada, KOReader generará un índice a partir de los encabezados del documento (si están disponibles) o a partir de archivos HTML individuales en el EPUB. Mantén pulsado este elemento del menú para obtener información adicional:
/ Configuración / Tabla de contenido alternativaPuedes encontrar más información sobre las herramientas de índice disponibles en KOReader en la sección apropiada de la guía: HERRAMIENTAS DE ÍNDICE
El mapa del libro es una función potente y única de KOReader que puede ser muy útil para obtener una visión general de un libro. Por ejemplo si estás leyendo un libro de forma no lineal saltándote algunas partes para leerlas más tarde, sería difícil seguir tu progreso. El mapa del libro puede mostrarte de un vistazo qué partes del libro ya has leído.
Además puedes:
- Vea cuánto tiempo has pasado en cada página (si el plugin Estadísticas de lectura está habilitado)
- Saber qué páginas tienen marcadores, subrayados y notas
- Navegar directamente a cualquier parte del libro como el WIDGET DE VISTA RÁPIDA
Puedes acceder al mapa del libro desde el menú y también puedes asignar un gesto para acceder rápidamente:
/ Mapa del libroCuando abras el Mapa del libro por primera durante la lectura, estará en modo Vista de cuadrícula, ajustando todos los capítulos en una sola pantalla para ofrecer la mejor visión general inicial del contenido del libro. Para obtener información detallada sobre el uso toca el icono de información en la esquina superior izquierda. Puedes cerrar el Mapa del libro tocando X en la esquina superior derecha o con cualquier gesto de multideslizamiento (ARRIBA-ABAJO, IZQUIERDA-DERECHA etc.).
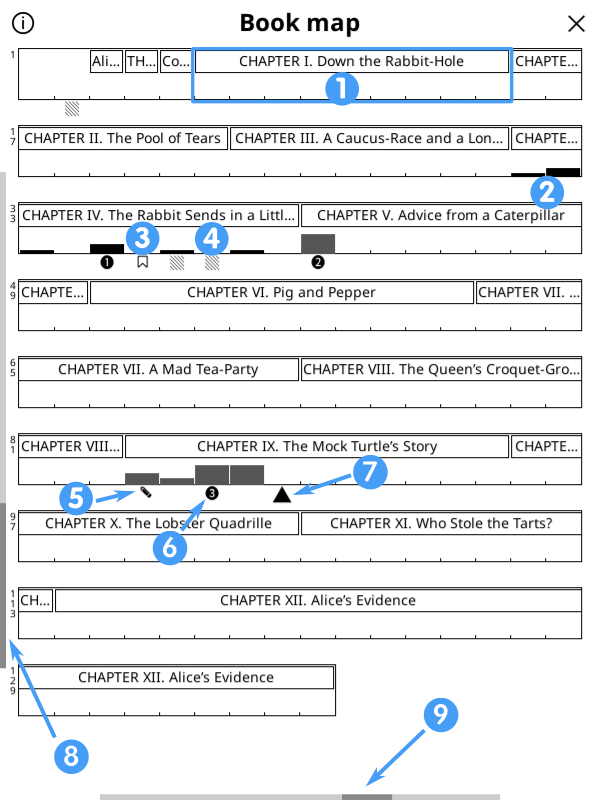
- Límites del capítulo
- Las barras negras indican las páginas leídas. Barras más altas significan más tiempo transcurrido en la página.
- El icono de marcador muestra las páginas marcadas, tal como indica tu nombre.
- El icono de cuadrado a rayas muestra las páginas con subrayados.
- El icono del lápiz muestra las páginas con notas.
- Los números en un círculo muestran tus ubicaciones anteriores. Cuando eliges Volver a posición anterior desde el menú, saltarás a esas posiciones en orden.
- El triángulo muestra la página actual.
- La barra de desplazamiento vertical muestra tu nivel actual de vista.
- La barra de desplazamiento vertical muestra el nivel actual de anchura de página.
Puedes personalizar el Mapa del libro cambiando estas opciones:
- Primero prueba deslizar IZQUIERDA y DERECHA a lo largo del borde inferior de la pantalla para cambiar la anchura de las columnas que indican las páginas y observa cómo cambia la escala del mapa.
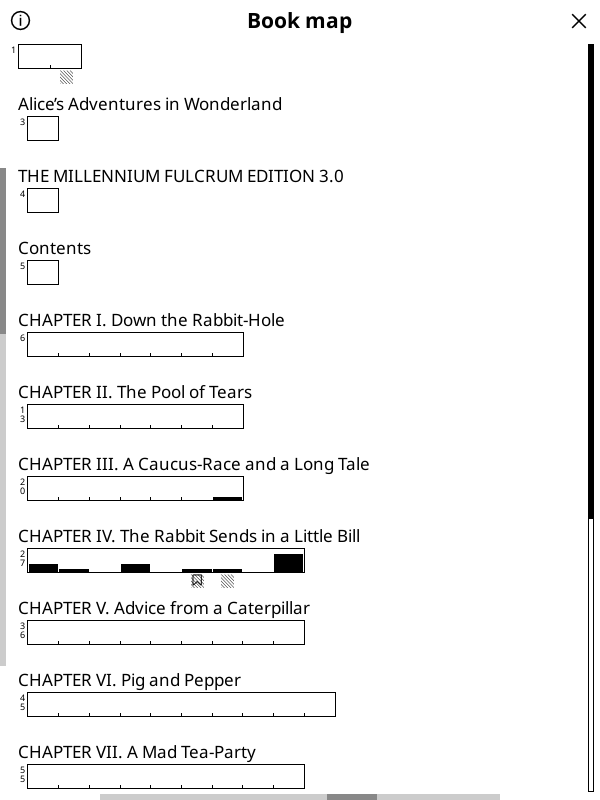
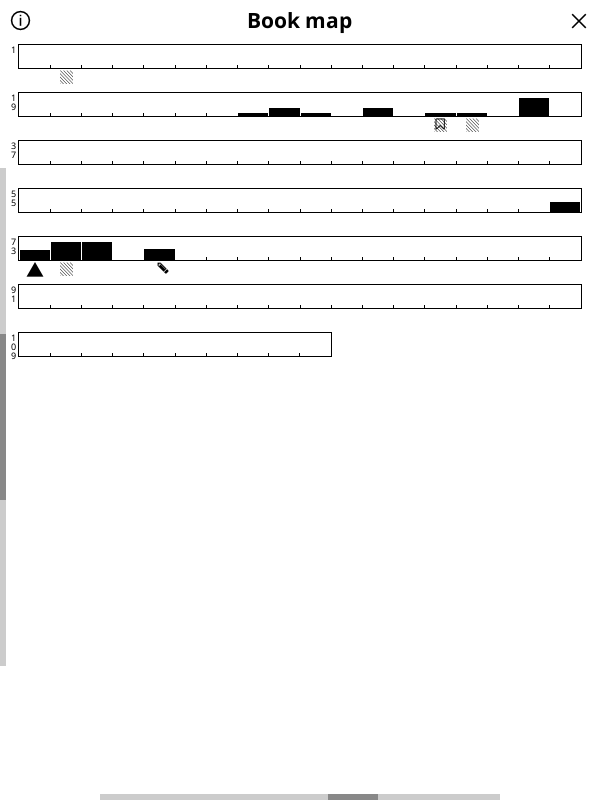
- Luego prueba deslizar ARRIBA y ABAJO a lo largo del borde izquierdo de la pantalla para cambiar la profundidad del título del capítulo y cambiar a la Vista plana. Observa los ejemplos abajo.
Además de la Vista de cuadrícula predeterminada de arriba, aquí puedes ver la Vista plana a la izquierda y la Vista de cuadrícula sin títulos de capítulo a la derecha. Fíjate en la barra de desplazamiento vertical izquierda que cambia entre vistas. Si quieres volver a la vista predeterminada puedes mantener pulsado el icono de información en la esquina superior izquierda.

Cuando tocas el icono de menú en el Mapa del libro, se muestra el menú de arriba. Las opciones del menú se explican a continuación:
- Acerca del mapa del libro: breve explicación del uso del mapa del libro y descripción de los iconos.
- Gestos disponibles: gestos que puedes usar para cambiar los ajustes del Mapa del libro en vez de usar este menú.
- Explorador de páginas al tocar: si está activado, cuando tocas una página en el Mapa del libro se abre el Explorador de páginas. Esto te muestra una vista general del área que has seleccionado. Si desactivas esta opción, un toque en el Mapa del libro te lleva directamente a esa página. Pero recuerda, dependiendo de factores como el tamaño de la pantalla, la sensibilidad táctil, la precisión del toque, etc., podrías acabar en páginas adyacentes.
- Alternar vista actual e inicial: Si has personalizado la vista del Mapa del libro, tocar esto alterna entre la vista predeterminada y la vista personalizada.
- Alternar vista en cuadrícula y plana: Cambia entre las vistas de capítulos separados o capítulos continuos.
- Niveles de capítulo: cambia la profundidad de los niveles de capítulo/subcapítulo.
- Anchura de ranura de página: hace que cada ranura de página sea más ancha o más estrecha.
- Marcadores cada 10 páginas: al aumentar este valor primero añadirá marcadores en cada 10a página, luego los hará más grandes y finalmente añadirá marcadores en cada 5a página.
El Explorador de páginas puede usarse para navegar entre páginas como en un álbum de fotos mostrando miniaturas de las páginas sobre la cuadrícula. Puedes abrir el Explorador de páginas tocando en el Mapa del libro o desde el menú. También puedes asignar un gesto para un acceso más fácil.
/ Explorador de páginas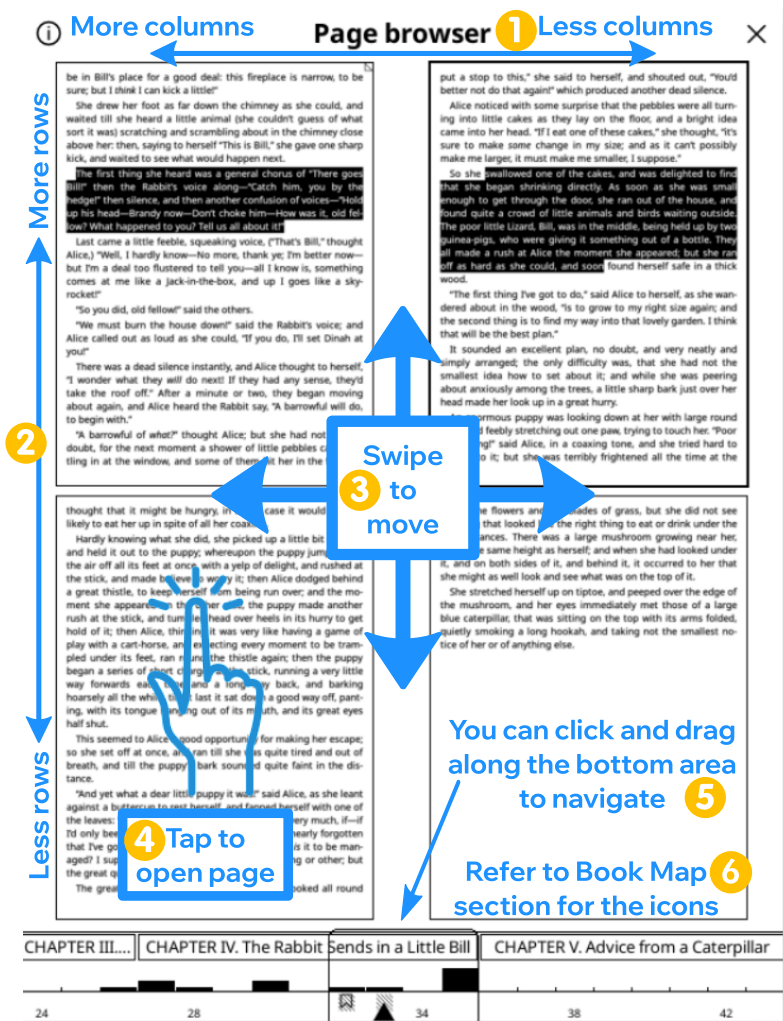
El uso del Explorador de páginas se explica a continuación. También puedes tocar el botón del menú hamburguesa en la esquina superior izquierda de la pantalla para ver las explicaciones. Mantener toque largo en el mismo botón añade/quita los títulos de capítulo de la franja inferior.
- Desliza izquierda / derecha sobre el borde superior para aumentar / disminuir el número de columnas.
- Desliza arriba / abajo sobre el borde izquierdo para aumentar / disminuir el número de filas.
- Desliza el área de páginas para mover las páginas visibles. arriba / abajo para desplazar una fila (2 páginas en el ejemplo), izquierda / derecha para desplazar una pantalla (4 páginas en el ejemplo).
- Toca cualquier página para abrir esa página en la vista de lectura.
- En la zona inferior, tocar una página centra la vista de miniaturas en esa página. Deslizar izquierda / derecha hará que la anchura salte en una franja.
- Los iconos en la zona inferior son los mismos que los usados en el Mapa del libro y se explican en esa sección.
El Mapa del libro y el Explorador de páginas tienen un Tema alternativo con un esquema de sombreado distinto que puedes activar desde tus menús hamburguesa. Este tema usa colores alternos para los encabezados de capítulo, así los límites de capítulo son más visibles en el Mapa del libro y el Explorador de páginas. Pero el uso del color gris en este tema requiere parpadeo a negro, por lo que puede resultar molesto para algunos usuarios. Puedes probar ambos y usar el que prefieras.
Algunos libros digitales pueden no tener un índice (o tabla de contenidos) correcto. Dependiendo de cómo se preparó el libro puedes encontrarte con estos problemas de índice:
- Sin índice en el libro por lo que no puedes saltar entre capítulos ni ver los tiempos de lectura restantes
- Hay un índice, pero no es muy útil porque tiene títulos de capítulo erróneos o que faltan
KOReader tiene algunas funciones que puedes usar al leer libros con un índice problemático.
Ten en cuenta que el Índice alternativa no está disponible en documentos de diseño fijo como PDF, DJVU, etc., porque requiere etiquetas HTML para crear un índice. Las funciones Índice personalizado y Secciones ocultas personalizadas están disponibles en todos los tipos de archivo.
La primera función es el Índice alternativo que puedes encontrar en:
/ Configuración / Tabla de contenido alternativaEl Índice alternativo intenta crear un índice a partir de los encabezados del libro (H1 a H6 en los archivos HTML del EPUB). Si tu libro no contiene encabezados, intentará construir un índice a partir de los fragmentos del documento (archivos HTML individuales en tu EPUB) que apuntará al comienzo de cada archivo.
Puedes elegir qué niveles de encabezado incluir (o ignorar) en tu índice desde este menú:
/ Ajustes de estilo / Otros / Sugerencias sobre Índice alternativoLa herramienta de Índice perzonalizado permite crear tu propio índice de las partes seleccionadas del libro. Este índice puede contener solo un nivel por lo que no podrás tener subcapítulos. Para crear tu propio índice habilita:
/ Configuración / Índice personalizadoUna vez que actives esta función se añadirán nuevos elementos al menú de la interfaz que te permitirán seleccionar los capítulos. Puedes añadir un capítulo al ToC desde dos sitios:
- Desde un subrayado: Mientras lees un libro selecciona un texto como si lo estuvieras subrayando o mantén presionada una palabra. En el menú emergente pulsa Añadir entrada al índice y se abrirá una ventana pidiéndote el título del capítulo. El texto seleccionado ya estará en la ventana. Modifica el título a tu gusto y presiona 'Crear'.
- Desde el Explorador de páginas: Abre el Explorador de páginas vía
/ Explorador de páginasMantén presionada la miniatura de la página que quieras que dé comienzo al capítulo y en el menú emergente seleccione Añadir entrada al índice. Se abrirá un cuadro de diálogo para el título del capítulo nuevo.
Cuando termines de crear el índice y ya no necesites los botones adicionales, puedes desactivarlos desmarcando:
/ Configuración / Configuración índice y secciones personalizado / Modo ediciónCrear este índice no altera el índice original del libro. Puedes eliminar tu Índice personalizado desde este mismo menú (en caso de que quieras crear uno nuevo). También puedes deshabilitar por completo esta herramienta de la misma manera en la que la habilitaste si quieres volver al índice original. Ten en cuenta que si deshabilitas esta herramienta después de crear un índice personalizado y vuelves al índice original, el índice personalizado no será eliminado. Aún podrás cambiar entre el original y el índice personalizado.
Algunos libros o documentos pueden contener notas largas o secciones bibliográficas como en un libro científico de 250 páginas donde al menos 50 páginas son apendices, índices o referencias. Normalmente estas páginas están incluidas en la barra de progreso y los cálculos de tiempo de lectura ya que estos son parte del libro. Pero generalmente estas secciones existen como referencia y no son leídas por completo así que podrías querer excluirlas para hacer que la cuenta de páginas restantes y tiempo estimado sean más precisas. O tal vez quieras tener un libro de antología que contenga algunas historias que ya has leido. La función Flujos ocultos personalizados de KOReader te permite excluir este tipo de partes del libro.
Echa un vistazo a la imagen para obtener una visión general del proceso. Los pasos se explican después de la imagen:
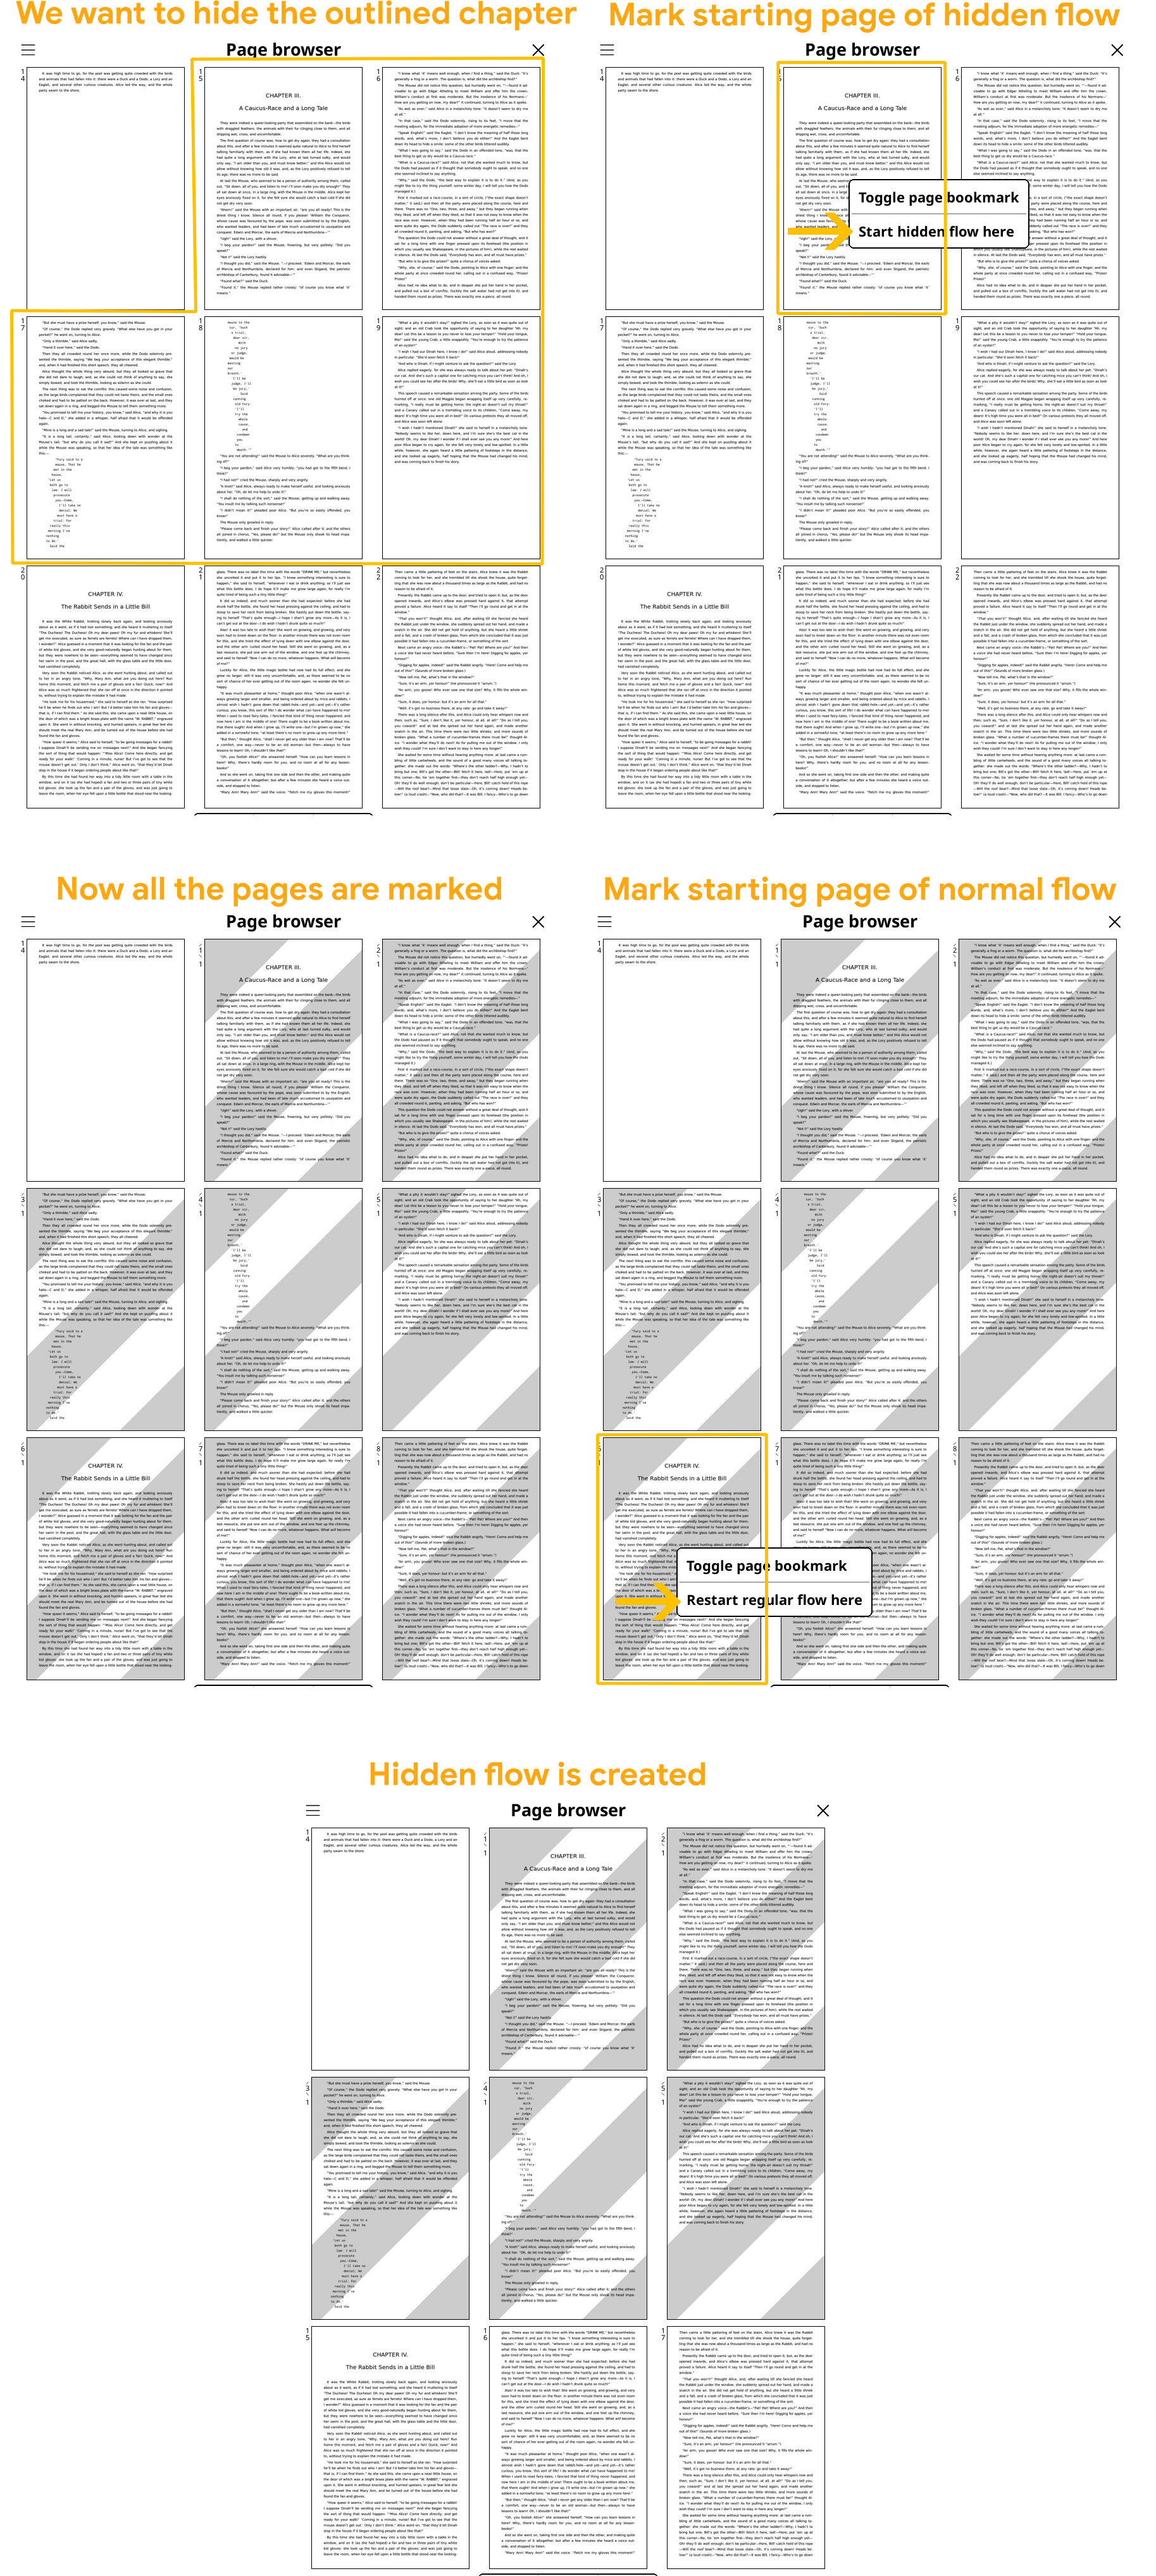
Cómo excluir una sección creando un flujo oculto:
- Ve a la primera página de la sección que quieras excluir
- Abre el Explorador de páginas via:
MENÚ SUPERIOR / / Explorador de páginas
- Mantén presionada la miniatura de la pagina que quieras que sea el inicio de la sección excluida y selecciona Iniciar sección oculta aquí del menú emergente.
- Verás que las páginas que empiezan desde tu selección tienen ahora un fondo gris rayado.
- Ahora ve a la última página de la sección excluida. Puedes navegar desde el Explorador de páginas o usando otros métodos como el Mapa del libro o el widget Vista rápida, etc.
- Una vez que estés en la última página de la sección excluida, abre nuevamente el Explorador de páginas (si aún no estás en él).
- Busca la última página de la sección oculta y mantén pulsado en página siguiente. Selecciona Reiniciar sección normal aquí del menú emergente. Verás que el fondo de las páginas restantes vuelve al color normal, lo que indica el final de la sección oculta y el inicio de la sección normal.
Trabajando con secciones ocultas:
Cuando creas una sección oculta como se describe más arriba, el comportamiento de KOReader será como si hubieras eliminado una sección, cortándola del libro en papel:
- Estas secciones ocultas se omitirán al pasar las páginas. Por ejemplo, supongamos que has creado una sección oculta para el Capítulo 10. Ahora estás en la última página del Capítulo 9. Al pasar la página verás el Capítulo 11.
- La numeración de páginas continuará como si estas secciones ocultas no existieran.
- Estas secciones ocultas no se mostrarán en la barra de progreso (pero lee la explicación a continuación) y no se tendrán en cuenta en los cálculos de tiempo de lectura. Sin embargo seguirán siendo visibles en el widget Vista rápida.
- Los enlaces directos a las páginas incluidas en las secciones ocultas seguirán funcionando. También puedes acceder a estas secciones desde el Índice, Mapa del libro, Explorador de páginas y el widget Vista rápida.
Como mencionamos anteriormente, las secciones ocultas se excluirán de la Barra de progreso. Sin embargo si accedes a una de las secciones ocultas mediante alguno de los métodos mencionados la Barra de progreso se convertirá temporalmente en la barra de progreso de esa sección. Imagina que la barra de progreso hace zoom en esa sección. Si sales de la sección pasando la página al final o usando otras herramientas de navegación, la barra de progreso volverá a mostrar el libro completo (haciendo de nuevo invisibles las secciones ocultas).
Eliminar y limpiar secciones ocultas:
Puedes eliminar secciones ocultas individuales del Explorador de páginas de la misma manera que las has creado. También puedes eliminarlas a la vez mediante:
/ Configuración / Configuración índice y secciones personalizadas / Eliminar todas las páginas marcadasA medida que creas secciones ocultas etiquetando páginas como Iniciar sección oculta o Reiniciar sección normal, algunas de las secciones creadas anteriormente podrían dejar de tener efecto. Por ejemplo, si creas Iniciar sección oculta unas páginas antes que otro Iniciar sección oculta existente, este ya no se incluye. Estas etiquetas superpuestas u obsoletas se recuerdan por motivos prácticos. Como en el ejemplo anterior, si finalizas esa segunda sección oculta antes de la sección "Iniciar sección oculta" existente, que ya no se incluye, este último se incluirá de nuevo. Puedes borrar todos estos marcadores inactivos si interfieren con las secciones personalizadas, o una vez que hayas terminado de crear las secciones ocultas y estés satisfecho con los resultados:
/ Configuración / Configuración índice y secciones personalizadas / Eliminar páginas marcadas como inactivasEn algunas aplicaciones de lectura al cambiar una configuración, por ejemplo la letra de los libros, esta cambia globalmente. Esto significa que si cambias la letra predeterminada a Verdana, todos los libros que abras a continuación incluidos los que ya estés leyendo, se mostrarán en letra Verdana.
El enfoque de KOReader es diferente. Guardamos la configuración de apariencia por libro. Esto da la flexibilidad de cambiar la configuración del libro actual sin afectar a los demás. Por ejemplo si tienes libros de fantasía, puedes cambiar la fuente a una de estilo medieval solo para estos libros. También puedes configurar algunos libros para que se abran en orientación horizontal o en modo de doble columna.
Para cambiar una configuración globalmente, mantén pulsada una opción o elemento del menú (grosor de letra, interlineado, etc.) para establecer su valor como predeterminado. Este nuevo valor solo se aplicará a los libros que abras a partir de ahora. Los libros abiertos anteriormente conservarán su configuración. Puedes identificar los valores predeterminados como una estrella (★) en el menú o como un borde negro alrededor de los indicadores como se muestra a continuación:
Por lo tanto al ajustar los valores predeterminados del documento, como el interlineado predeterminado o el contraste predeterminado, este nuevo valor se usará en los documentos que abras después del cambio. Los libros que ya estén abiertos no cambiarán.
¿Y si también quieres que cambien? Por ejemplo si cambias la letra predeterminada, probablemente ajustarás el grosor de la letra y el interlineado a valores más adecuados para la nuevaletra. Estás satisfecho con el aspecto del texto y ahora quieres que todos los libros tengan el mismo aspecto. Con esta función no necesitas cambiar manualmente los valores en todos los libros abiertos.
Puedes aplicar los cambios a los libros que ya tienes abiertos mediante:
/ Reiniciar documento a valores por defectoAl pulsar esta opción la configuración actual del libro se ajustará a la configuración predeterminada. No te preocupes ya que esto sólo cambiará la apariencia del libro. Tu posición de lectura, subrayados, notas y marcadores se conservarán.
Cuando configuras un libro a tu gusto, por ejemplo cambiando el interlineado, el contraste de la letra, etc., puedes guardar todos los cambios como valores predeterminados. Después puedes aplicar esta configuración a otros libros con la opción Reiniciar documento a valores por defecto como se ha explicado anteriormente.
Puedes guardar los cambios como predeterminados mediante:
/ Guardar como configuración por defectoEsta potente función te permite guardar todos los ajustes del MENÚ INFERIOR y el tipo de letra como un perfil. Esto significa que puedes tener diferentes grupos de ajustes para diferentes condiciones o tipos de libros que puedes aplicar a la vez, en lugar de tener que cambiarlos manualmente cada vez.
Por ejemplo puedes crear:
- Perfil de doble columna con dos columnas de texto pequeño, orientación horizontal y márgenes mínimos
- Perfil de lectura nocturna con letra sans serif más grande y mayor contraste para un texto más visible con poca luz
- Perfil de Estilos deshabilitados con estilo incrustado y letras incrustadas deshabilitadas para libros mal estructurados
Después de ajustar la configuración a tu gusto puedes crear un perfil a partir de esta a través de:
/ Perfiles / Nuevo con la configuración del documento actualDespués de crear un perfil con tu configuración, existen muchas formas para aplicarlo a otro libro:
- Puedes aplicar el perfil desde el menú Perfiles
- Puedes asignarle un gesto
- Puedes mostrarlo en el Menú rápido
Haz clic aquí para ir a la sección MENÚ RÁPIDO Y PERFILES de la guía.
KOReader admite las fuentes en los formatos TrueType (.ttf) y OpenType (.otf) más utilizados. Los archivos de fuentes con estas extensiones se pueden copiar directamente a la carpeta /koreader/fonts/ de tu dispositivo. Consulta nuestra wiki para más información.
Al iniciarse, KOReader recopila las fuentes disponibles de metadatos de fuentes/info y las clasifica por familia y grosores. Esto significa que puedes añadir diferentes grosores y variantes de una fuente y KOReader intentará usar la más adecuada. Dado que la información de la familia de fuentes se obtiene de los metadatos, los nombres de las fuentes no son importantes al copiarlas a tu dispositivo. Las fuentes instaladas estarán disponibles tras reiniciar KOReader.
Aquí tienes algunos ejemplos de fuentes que se ven bien en una pantalla de tinta electrónica. Puedes encontrar más en el sitio web de Google Fonts:
Serif:
Sans Serif:
- Varela Round
- Wix Madefor Text
- Maven Pro (Fuente de la guía del usuario que estás leyendo actualmente)
Monoespaciada:
Si planeas usar tu propia fuente monospace , probablemente ya tengas una favorita, así que no te ofrecemos ejemplos. Pero puedes encontrar y comparar muchas fuentes monospace en programmingfonts.org
/ Fuente / Configuración de fuente / Generar documento de prueba de fuenteSi tu libro incluye partes con fuentes Monospace(como en los libros de programación), el texto monoespaciado podría verse desproporcionado incluso si técnicamente tiene el mismo tamaño que el resto del libro. Esto se debe a las diferentes métricas de las fuentes. KOReader tiene una opción que permite ajustar el tamaño relativo de la fuente monoespaciada para corregir esta diferencia:
/ Fuente / Configuración de fuente / Escala de fuentes monospaceAquí puede aumentar o disminuir el tamaño de su fuente Monospace ajustando su escala como un porcentaje del tamaño predeterminado.
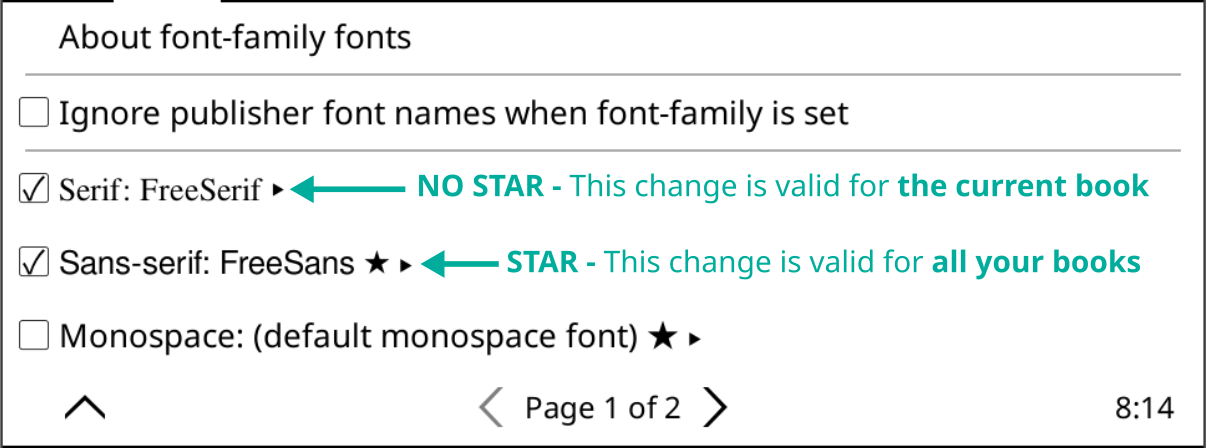
En documentos basados en HTML/CSS, como los EPUB, los libros pueden especificar el uso de fuentes por familia en lugar de un nombre de fuente específico. Estas familias pueden ser: Serif, Sans-Serif, Monospace, Cursive, Fantasy, Emoji, Fang Song y Math. Por ejemplo, en un libro, el texto normal se puede mostrar en Sans-Serif, mientras que los diálogos se muestran en Serif. KOReader normalmente usa la fuente predeterminada para todas estas familias, excepto Monospace y Math (que se determina por el estilo de los nodos de texto, por ejemplo, 'familia--de-fuentes: serif'). Si desea que estas familias se distingan, puede asignarles fuentes específicas aquí:
/ Letra / Letras de la font-familyPara cambiar la fuente de una familia para el libro actual, simplemente toque el nombre de la fuente deseada. Si desea establecerla para todos sus libros, mantenga pulsada para establecerla como predeterminada (★). Si un libro abusa de esta función de familia de fuentes hasta el punto de que su fuente predeterminada casi no se usa, puede desactivarla desmarcando la asociación.
Si cambias de letra con frecuencia (por ejemplo, monospace para libros de programación y serif para novelas), existe una solución alternativa que facilita la tarea en lugar de tener que acceder al menú cada vez. Puedes crear perfiles para tus letras y todos los ajustes relacionados, como el interlineado, el contraste, la negrita, etc., y añadirlos a un Menú rápido. De esta forma, con un solo gesto, puedes abrir el menú de selección de letras y cambiar la letra como se muestra en la imagen a continuación:
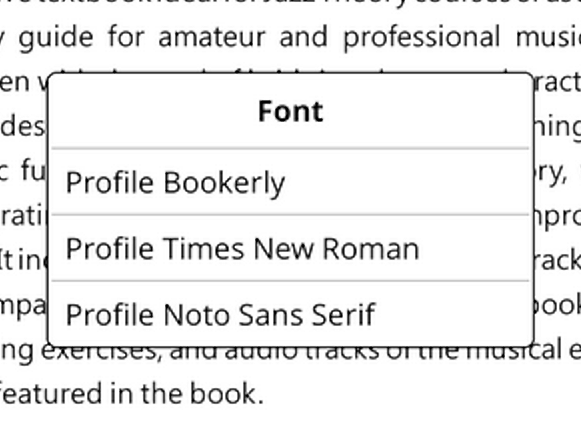
Consulta la sección MENÚ RÁPIDO Y PERFILES de esta guía para aprender cómo hacer esto.
!!! AVANZADO
La función de ajustes de estilo de KOReader te permite modificar la forma en que KOReader renderiza tu libro. No vamos a explicarte todo el CSS. Solo queremos mostrarte los conceptos básicos para que, cuando veas un ajuste de estilo, tengas al menos una idea aproximada de su función.
Un documento EPUB se describe como un archivo HTML con algunas reglas CSS. Estas reglas determinan cómo se mostrarán las diferentes partes del libro (encabezados, negrita, citas, etc.) en una aplicación de lectura. Con ajustes de estilo, puedes cambiar la visualización de tu libro añadiendo nuevas reglas o anulando las reglas de la editorial que ya están integradas.
Veamos esto en un ejemplo de ajuste de estilo:
img { anchura: 10px !importante; altura: 10px !importante }
En lenguaje sencillo, esta regla dice: "Ignore su tamaño original y haga que todas las imágenes de este libro tengan 10 píxeles de ancho y 10 píxeles de alto". Entonces, si agrega este ajuste de estilo a KOReader, todas las imágenes de su libro se mostrarán pequeñas.
Ahora vamos a explicar este ajuste elemento por elemento:
- img: este es un selector CSS que apunta a todos los elementos img (imagen) del libro.
- { width: 10px !important; height: 10px !important; } - Este es el bloque de declaración. Contiene los estilos que se aplicarán a los elementos img seleccionados.
- width: 10px !important; - Esta primera parte establece el ancho de los elementos img de destino en 10 píxeles. La declaración !important es una opción de anulación que garantiza que el valor de ancho prevalezca sobre cualquier otra declaración de ancho existente aplicada a estas imágenes.
- width: 10px !important; - Esta primera parte establece el ancho de los elementos img de destino en 10 píxeles. La declaración !important es una opción de anulación que garantiza que el valor de ancho prevalezca sobre cualquier otra declaración de ancho existente aplicada a estas imágenes.
En resumen, esta regla CSS está diseñada para establecer un ancho y alto fijos de 10 píxeles para todos los elementos img de su libro, ignorando su estilo original.
Estos son algunos ajustes de estilo útiles que puedes usar directamente o modificar a tu gusto. El siguiente apartado explica cómo usarlos en KOReader.
- Agregue una línea separadora encima de cada encabezado de un libro:
H1, H2, H3, H4 { border-top: 2px solid black; }
- Añade un poco de margen encima de los encabezados:
H1, H2, H3, H4 { margin-top: 2em !important; }
- O si el libro tiene demasiados márgenes encima de los encabezados, elimínelos:
H1, H2, H3, H4 { margin-top: 0 !important; }
- Añade un pequeño espacio entre párrafos para que el texto sea más legible:
p + p { margin-top: 0.5em !important; margin-bottom: 0.5em !important; }
- Deshabilitar todas las imágenes en un EPUB:
img { display: none !important; }
-
Haga que las imágenes sean muy pequeñas en lugar de deshabilitarlas:
img { anchura: 10px !importante; altura: 10px !importante }
-
Haga que las secciones de bloques de código en los libros de informática sean más ordenadas y legibles (Aquí puede ver un ejemplo):
pre,code { font-size: 0.6em !important; line-height: 1.8em !important; background-color: #eee !important; margin: 1em 0 !important; padding: 1em 0 !important; }
Bien, ya hemos visto qué son los ajustes de estilo. Pero ¿cómo podemos usarlos? Hay tres tipos de ajustes de estilo en KOReader:
Este encabezado es nuevo, al igual que las capturas de pantalla de arriba y abajo. ¿Algo más que añadir?
Estos ajustes están incluidos en KOReader. Son los más fáciles de usar, ya que solo hay que activarlos desde el menú. No es necesario escribir código CSS:
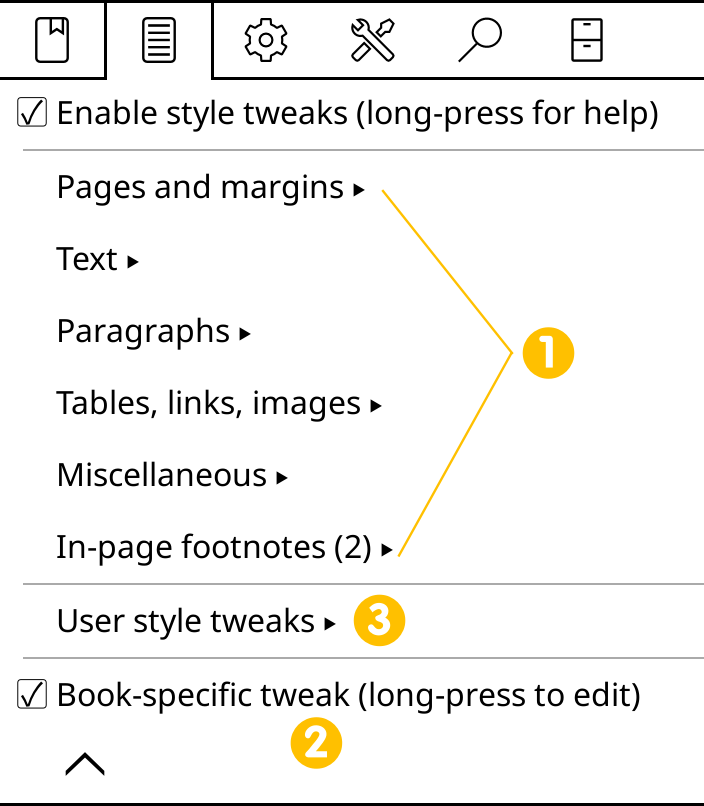
/ Ajustes de estiloSe dividen en varias categorías. Para aplicar una modificación solo al libro actual, marque la casilla. Si desea obtener más información sobre esta modificación o activarla para todos los libros, mantenga pulsado su nombre. Aparecerá un cuadro de diálogo:
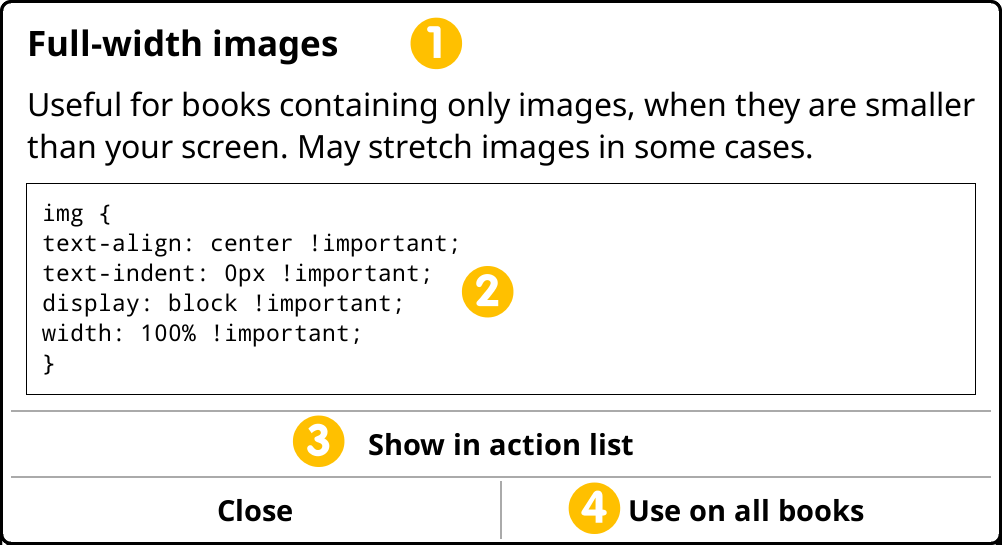
- Esta área muestra el nombre y la descripción del ajuste
- Este cuadro muestra el código CSS de la modificación. Puedes tocar esta área para copiar el código al portapapeles. Después, puedes pegarlo y modificarlo en la modificación específica de tu libro, como se explica en el siguiente apartado.
- El botón Mostrar en la lista de acciones te permite activar o desactivar este ajuste con un gesto o añadirlo a un Menú rápido. Consulta el apartado "Cómo usar los ajustes de forma eficiente" a continuación para obtener más información.
- El botón Usar en todos los libros activa esta modificación para todos tus libros. Aparecerá una estrella (★) junto a su nombre en el menú, lo que indica que esta modificación se aplicará a todos los libros. Puedes desactivarla siguiendo los mismos pasos.
Como su nombre indica, este tipo de ajuste solo está activo en el libro en el que se creó. Esta función es más útil para probar los ajustes o si necesitas corregir algo en el libro actual y sabes que no lo necesitarás en otros. Después de crear este tipo de ajuste, si decides que también lo necesitarás en otros libros (es decir, de la misma editorial), puedes convertirlo en un ajuste de estilo de usuario, como explicaremos a continuación.
Para crear un ajuste específico del libro, utiliza el editor integrado que puedes encontrar aquí:
/ Ajustes de estilo / Ajuste específico del libroCONSEJO En el editor, tenemos un menú CSS en la barra de herramientas inferior. Este menú contiene mucha sintaxis y propiedades CSS útiles. Al abrirlo, lea primero la ayuda sobre Mantener pulsado para obtener información. También puede mantener pulsados los elementos CSS de este menú para ver una descripción.
Este grupo de ajustes se diferencia de los anteriores en su forma de creación. Además, a diferencia del anterior, no se limitan a un solo libro. Se pueden aplicar globalmente a todos tus libros.
El procedimiento es más o menos el siguiente, que explicaremos en detalle:
- Crea tu archivo de ajustes de usuario
- Transfiérelo a tu dispositivo
- Habilite su ajuste desde el menú
1. Creación del archivo de ajuste del usuario:
Un ajuste de estilo de usuario es en realidad un archivo de texto normal con la extensión .css. Puedes crear este archivo:
- En tu computadora
- En su dispositivo si tiene un editor de texto (como los dispositivos basados en el sistema operativo Android)
- En el editor de texto integrado de KOReader que puedes encontrar en los complementos
Puedes copiar y pegar los ejemplos que mencionamos anteriormente en tu archivo.
2. Transferir el archivo a su dispositivo:
Después de crear los archivos que contienen las reglas CSS, guárdelos o transfiéralos a la carpeta styletweaks de su instalación de KOReader. Asigne nombres descriptivos a los archivos, ya que el nombre del archivo será el título del ajuste en el sistema de menús de KOReader. Puede usar guiones bajos "_" en los nombres de archivo; se considerarán espacios en el menú. Debe reiniciar KOReader después de transferir los archivos para que pueda cargarlos.
2. Habilitar el ajuste:
Después de reiniciar, abra un libro y vaya a este menú:
/ Ajustes de estilo / Ajustes de estilo del usuarioAhora deberías ver tu ajuste en la lista con una casilla de verificación junto a él. Márcala para aplicarlo solo al libro actual. Si quieres que este ajuste se active para todos los libros, mantén pulsado su nombre. Aparecerá un cuadro de diálogo. Toca la opción de menú Usar en todos los libros. Aparecerá una estrella (★) junto al nombre en el menú lo que indica que este ajuste se aplicará a todos los libros. Puedes desactivarlo siguiendo los mismos pasos. Consulta el ejemplo a continuación:
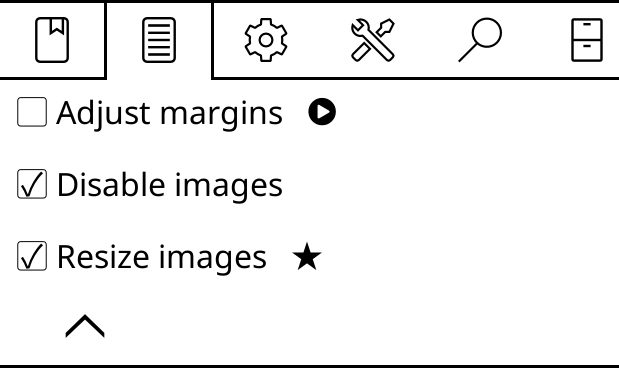
En la imagen de arriba, tengo tres archivos de ajustes de estilo en la carpeta styletweaks de mi instalación de KOReader. El primero está deshabilitado porque la casilla de verificación está vacía. El segundo está habilitado solo para este libro, ya que la casilla de verificación está marcada, pero no hay ninguna estrella. El tercero está habilitado para todos los libros (★).
Quizás notes que también hay un icono de triángulo rectángulo junto al primer ajuste. Esto significa que este ajuste se puede activar mediante gestos. Esto se explicará en el siguiente apartado.
Al crear tus ajustes de estilo de usuario, puedes crear varios archivos de ajustes, cada uno modificando alguna parte del libro, como en la imagen de ejemplo anterior. Puedes tener un archivo para los encabezados, otros para modificar párrafos, enlaces, etc. Este sistema modular te permite habilitar ajustes según tu documento.
Como dijimos anteriormente, puedes alternar los ajustes de estilo de usuario desde esta ubicación del menú:
/ Ajustes de estilo / Ajustes de estilo del usuarioTambién tenemos formas más sencillas de alternar ajustes de estilo que ir al menú cada vez.
1. Puedes asignar un gesto a un ajuste
Para hacer esto, primero tenemos que agregar nuestro ajuste de estilo de usuario a la lista de acciones de gestos:
- Ve al menú Ajustes de estilo de usuario y mantén pulsado el ajuste de estilo
- En el cuadro de diálogo, pulse el botón Mostrar en la lista de acciones
- Aparecerá un ícono de triángulo derecho junto a tu ajuste de estilo en el menú
Puedes verlo en la imagen de ejemplo anterior, junto al ajuste de estilo Ajustar márgenes. Este ajuste se ha añadido a la lista de acciones. Lo encontrarás en la categoría Administrador de gestos > Documentos Ajustables. Se encuentra al final de la lista.
2. Puedes agregar un ajuste a tu Menú rápido
Para añadir una modificación a tu Menú Rápido, primero debes añadirla a la lista de acciones, como se describe en el encabezado anterior. Después, puedes seguir las instrucciones de la sección Menú Rápido de esta guía.
Incluso puedes combinar ambos métodos y crear un Menú Rápido especial para tus ajustes de estilo y luego asignarlo a un gesto. De esta manera, con un simple gesto puedes acceder a todos tus ajustes de estilo y activarlos cuando los necesites.
Tenga en cuenta que, en algunos libros, los títulos podrían no estar en los elementos <H1> o <H2>, sino en algo como <p class="tit123">. Puede encontrar los selectores que se utilizan para una parte del texto consultando el código fuente. Para ello, seleccione el texto que rodea el elemento que le interesa y seleccione Ver HTML en el cuadro de diálogo. En el ejemplo anterior, su ajuste de estilo se vería así:
P.tit123 { border-top: 2px solid black; }
en lugar de esto:
H1 { border-top: 2px solid black; }
KOReader te ofrece opciones para interactuar con tu libro como si fuera un libro real. Aquí puedes cambiar muchos ajustes de la ventana de marcadores:
/ Configuración / MarcadoresMARCADORES:
Puedes añadir (y eliminar) un marcador pulsando la esquina superior derecha. Esto equivale a doblar la esquina de una página en un libro real y muestra un icono similar al activarlo.
SUBRAYADOS:
Puedes subrayar texto con cuatro estilos diferentes. En la imagen a continuación, puedes ver un párrafo normal seguido de diferentes estilos de subrayado: Aclarar (con fondo gris), Subrayado, Tachar e Invertir.
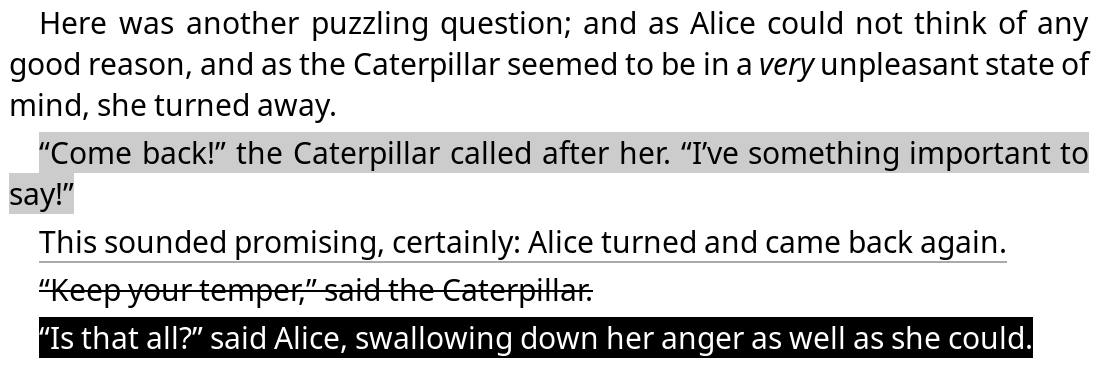
Puedes usar todos estos estilos a la vez, como si fueran marcadores para resaltar con diferentes colores. O puedes elegir tu estilo favorito y configurarlo como predeterminado desde este menú con una pulsación prolongada:
/ Estilo de subrayadoAdemás, si tienes un dispositivo con pantalla a color, puedes crear subrayados en diferentes colores:
/ Subrayados / Color de subrayado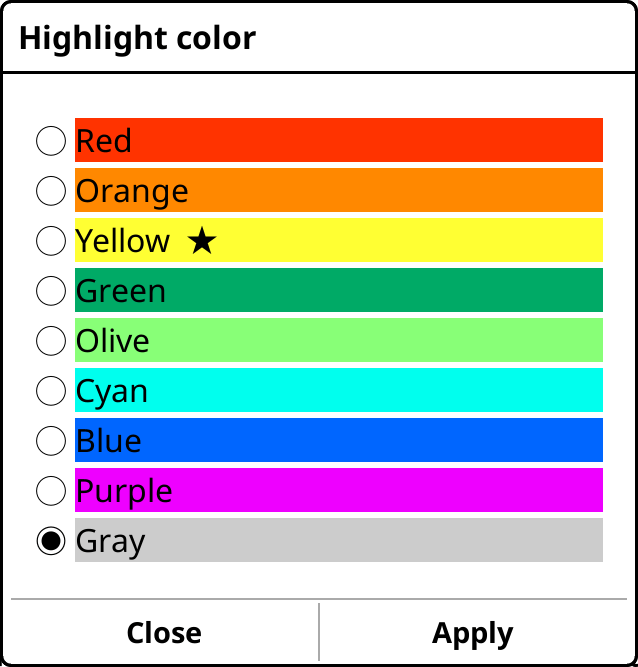
Algunos consejos para subrayar con color:
- Puede cambiar el color de un subrayado existente tocándolo y eligiendo Color en el menú emergente.
- Puedes combinar los colores con diferentes estilos de subrayado, como el subrayado y el tachado, para crear un sistema de subrayado eficaz. Por ejemplo, puedes usar el estilo tachado rojo para eliminar texto o el estilo subrayado naranja para puntos importantes, etc.
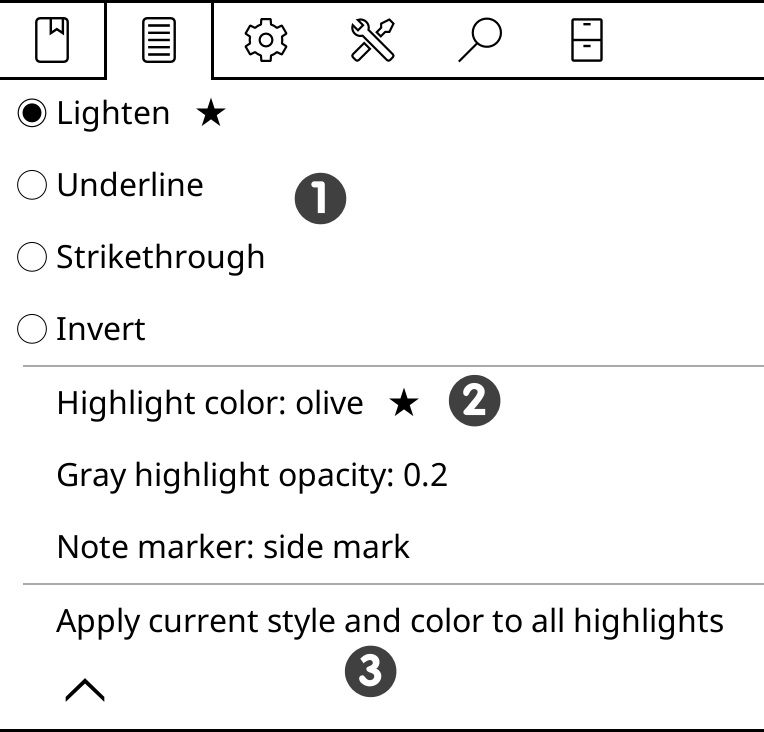
- En el menú de subrayados, puedes mantener presionado un tipo de subrayado para establecerlo como predeterminado (★)
- Después de seleccionar un color, puede mantener presionado el nombre del color en este menú para establecer ese color como predeterminado (★)
- Puedes presionar la opción Aplicar estilo y color actuales a todos los dsubrayados para que todos los subrayados del libro actual sean iguales. ¡Atención, no se puede deshacer!
NOTAS:
También puedes añadir notas a tus subrayados. Simplemente pulsa sobre un subrayado y selecciona Añadir nota en el menú emergente. También puedes elegir un Marcador de notas que muestra qué subrayados contienen una nota. Hay tres estilos: Subrayado, Línea lateral y Marca lateral (el icono del lápiz que se muestra a la derecha de la imagen de abajo):

Para habilitar esta función y elegir un estilo de Marcador de notas, vaya a:
/ Estilo de subrayado / Marcador de notasKOReader tiene dos modos de subrayado para diferentes casos:
El modo Normal es similar a seleccionar un texto con el dedo en un teléfono o tableta y es más adecuado si los subrayados son más cortos que una página.
- Mantenga presionada la palabra inicial
- Mueva su dedo hasta el final del pasaje
- Soltar el dedo
Al llegar al límite de la página KOReader pasará la página para que puedas continuar subrayando (solo en documentos EPUB/HTML). Puedes desactivar esta función desde:
/ Toques y gestos / Pulsación prolongada sobre el texto / Desplazamiento automático cuando la selección llega a una esquinaEl modo Seleccionar y subrayar es más adecuado para subrayar pasajes largos que traspasan los límites de la página. También podría funcionar mejor si tienes problemas de sensibilidad en la pantalla táctil o de control motor en las manos, ya que en este modo de subrayado no necesitas arrastrar el dedo por la pantalla.
/ Toques y gestos / Pulsación prolongada sobre texto / Diccionario al seleccionar una sola palabraCómo subrayar:
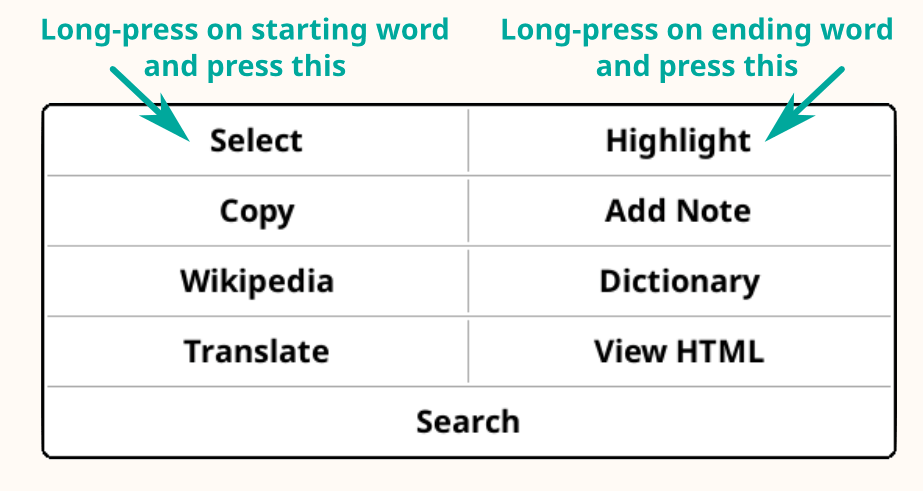
- Mantenga presionada (o arrastre si la búsqueda en el diccionario está habilitada como se describe arriba) la palabra inicial y aparecerá un menú emergente.
- Pulsa Seleccionar para entrar en el modo de subrayado. En este modo, verás un indicador en la esquina superior izquierda de la pantalla (puedes pulsarlo para obtener más información). Puedes cancelar el subrayado pulsando de nuevo el principio del subrayado. Puedes pasar de página con toques o deslizamientos y navegar libremente por el documento (Índice, Ojear, etc.) en este modo.
- Mantén presionada (o arrastre si la búsqueda en el diccionario está habilitada como se describe arriba) la última palabra que deseas resaltar, el menú aparecerá nuevamente.
- Toca Subrayar esta vez para terminar de subrayar el pasaje.
Este cuadro de diálogo normalmente se abre en el centro de la pantalla. Si deseas que se abra más cerca de la ubicación subrayada, puede cambiar la opción centrar a posición del gesto (ubicada en la segunda página de este menú):
/ Toques y gestos / Mantener pulsado el texto / Subrayar la posición del diálogo / Toques y gestos / Mantener pulsado el texto / Seleccionar y subrayar / Estilo de subrayadoAl surbayar KOReader intenta incluir los signos de puntuación correspondientes alrededor de la selección. Por ejemplo, si subrayas desde la primera hasta la última palabra de una oración, KOReader incluirá automáticamente los signos de puntuación de ambos extremos de la oración en el subrayado.
Pero si empiezas a subrayar desde la mitad de una frase, el punto final no se incluirá ya que KOReader asume que quieres destacar solo una parte. Por lo tanto si quieres que los signos de puntuación se añadan al texto destacado, asegúrate de seleccionar la frase completa. También puedes añadir estos signos más tarde manteniendo pulsado el botón de Editar texto subrayado.
Al tocar un texto ya subrayado (sin nota), verás este menú emergente. Los elementos Eliminar y Añadir nota están visibles. Los elementos de la fila inferior se usan para ampliar o reducir el subrayado.
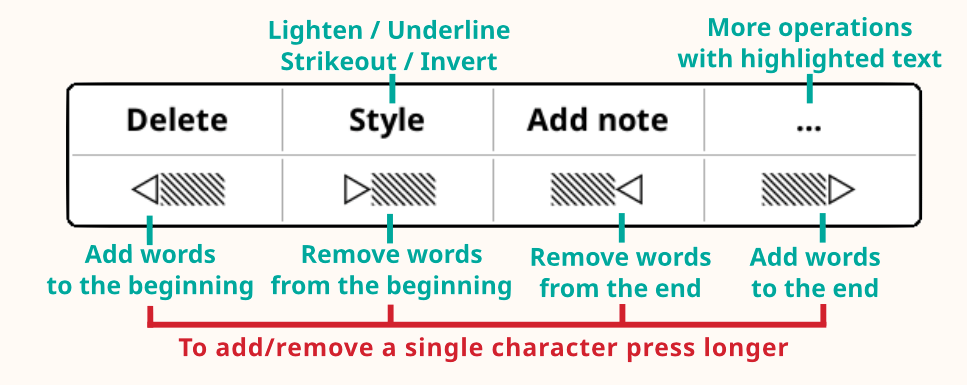
Al pulsar sobre un texto ya subrayado con una nota, verás este menú emergente. Pulsa Editar subrayado para abrir el menú superior, donde podrás editar tanto el subrayado como la nota que contiene:
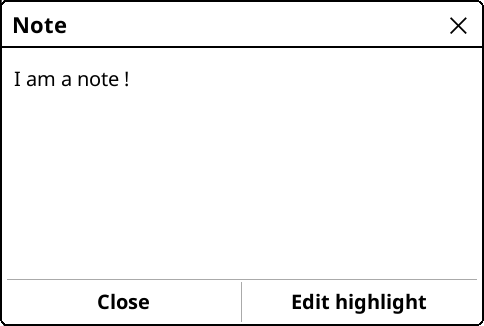
En la página de Marcadores puedes filtrar la vista para ver solo un tipo de marcador presionando el ícono de menú ( ). También puedes filtrar por estilo de subrayado:
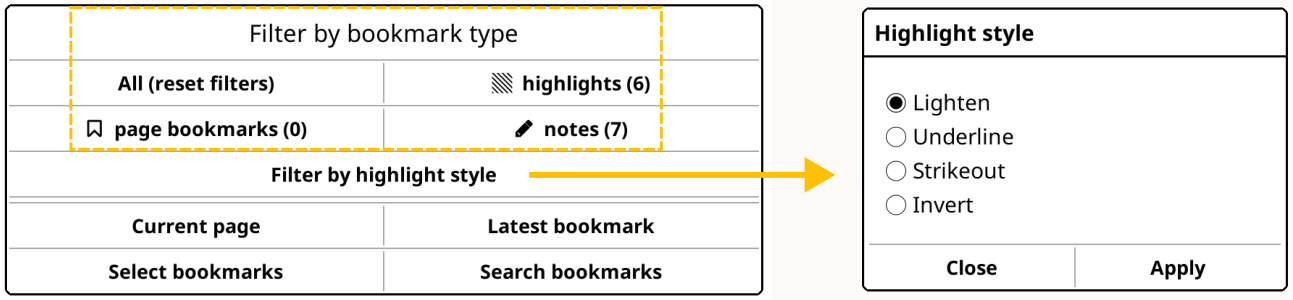
Además de añadir una nota, KOReader también permite editar el texto descttacado que se muestra en la lista de Marcadores. En algunas situaciones, esto puede ser más útil que añadir una nota a un subrayado. Por ejemplo, imagina que estás revisando un texto. ¿Quieres subrayar una frase que contiene muchas fechas y una de ellas es incorrecta? Para añadir una nota que indique este error, debes especificar en la nota cuál es la incorrecta. Sin embargo, si editas el texto de un texto subrayado, puedes escribir directamente "(esta fecha debe revisarse)" junto a la fecha problemática.
Ten en cuenta que esta edición no modifica el contenido del libro ni el pasaje subrayado en la página. Seguirás viendo la misma frase subrayada en el lector. La edición será visible en la lista de marcadores. Y más tarde cuando exportes tus subrayados, el texto editado será el que se exporte.
Para editar un texto subrayado puedes:
- Toca lo destacado
- Toque Detalles en el menú emergente
- Toque Editar texto en el cuadro de diálogo de detalles
También puedes hacerlo desde la ventana Marcadores:
- Vaya a la lista de marcadores mediante el menú o un gesto
- Mantén presionado el subrayado que deseas editar
- Presione Editar texto en el menú
- Cambie el texto en el cuadro de diálogo y presione el botón Guardar
Si deseas revertir un texto editado al subrayado original, sigue los pasos anteriores y en el paso 3, en lugar de Editar texto, presiona el botón Restablecer texto.
Normalmente al abrir la lista de Marcadores sólo se muestra el contenido de los subrayados. Si has agregado una nota a un subrayado, sólo verás un ícono de lápiz en la lista de Marcadores. Puedes mantener presionado un elemento de esta lista para mostrar (y editar) la nota agregada. Si también quieres ver el texto de la nota en tu Lista de Marcadores, puedes configurarlo desde aquí:
/ Configuración / Marcadores / Mostrar en elementosPuedes elegir mostrar:
- Solo subrayar texto (predeterminado)
- Ambos subrayar el texto y la nota
- Notifíca si hay uno, de lo contrario subraya el texto
/ Configuración / Marcadores / Líneas máximas por marcadorTras terminar un libro, puedes moverlo a una carpeta específica para archivarlo o procesarlo. Activa el complemento Mover a carpeta para archivar y define el directorio de destino en la configuración del complemento (Establecer carpeta de archivo). Después puedes mover un libro a la carpeta de archivo usando:
- Menú del complemento Mover al archivo
- Con un gesto o
- Con una entrada de Menú rápido
KOReader ofrece diferentes formas de exportar tus subrayados y notas desde el dispositivo lector:
Este complemento versátil puede exportar tus subrayados a archivos locales o servicios en línea.
Exportación Local
Puedes exportar tus subrayados a tu dispositivo en estos formatos de archivo:
- Texto (.txt)
- HTML (.html)
- Reducción (.md)
- Notas de Kindle (.txt)
- JSON (.json)
Puede elegir sus formatos de exportación preferidos:
/ Exportar subrayados / Elegir formatos y serviciosPuedes ver la ubicación de exportación (y también cambiarla si lo deseas):
/ Exportar subrayados / Elegir carpeta de exportaciónServicios en línea
También puede exportar a estos servicios a través de la red:
- Joplin - una aplicación para tomar notas
- Readwise - una aplicación de marcadores y subrayados en línea
- Memos: un centro de notas de código abierto autoalojado
- Flomo - un servicio de toma de notas en línea
- XMNote: un organizador de marcadores de Android en chino
Puede encontrar instrucciones de configuración detalladas para estos servicios en nuestra página wiki relacionada.
Después de seleccionar sus formatos, puede exportar las notas del libro actual o de todos los libros de su biblioteca desde el mismo menú del complemento.
Si desea exportar solo algunos de los libros de su biblioteca, puede hacerlo desde el Explorador de archivos:
- Seleccionar varios libros en el Explorador de archivos
- Toque el botón de menú (que se muestra como una marca de verificación) en la esquina superior derecha
- Selecciona Exportar surbayados en el menú que se muestra
/ Exportar subrayados / Elegir estilos de subrayadoKoHighlights es un programa externo que puedes instalar en tu ordenador. Accede a las notas y subrayados de tus libros al conectar el lector. Consulta la página del proyecto en GitHub para descargarlo e instrucciones.
Calibre es un programa externo que puedes instalar en tu ordenador. Puedes importar los subrayados en tu base de datos de Calibre con el plugin KOReader Sync. Puedes instalar dicho plugin dentro de la aplicación Calibre. Consulta la página del proyecto para descargar e instrucciones.
KOReader le ofrece muchas formas de leer un documento PDF/DJVU optimizado para tamaños de página más grandes (generalmente A4 o Carta) en su dispositivo de pantalla más pequeña:
1. Puedes habilitar el Ajuste de texto
/ Ajusre de TextoEl ajuste de texto intenta extraer el texto del documento (si está disponible) y formatearlo como una sola columna. Los resultados suelen ser satisfactorios. También puedes configurarlo como predeterminado manteniendo pulsado en él.
2. Puedes habilitar la función Zoom al contenido
 /
/ 
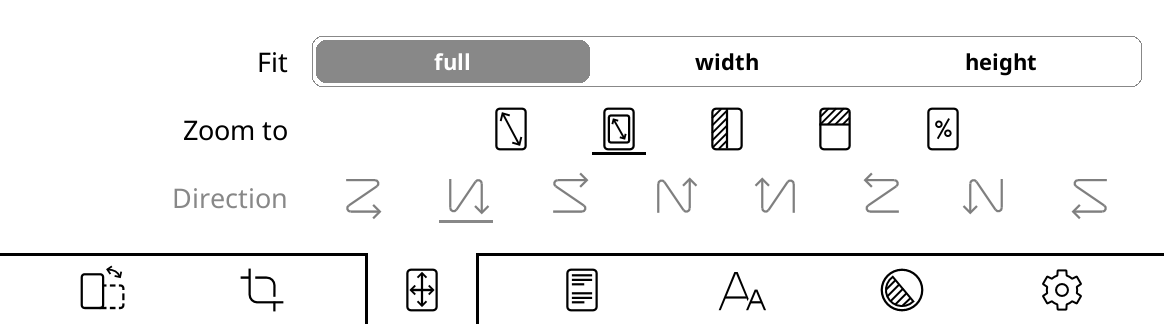
Con esta opción, KOReader intenta recortar los márgenes de su documento para que el texto parezca más grande en su pantalla. Puede configurar fit en width en el mismo menú, lo que intentará ajustar solo el ancho de la página en lugar de toda la página, para que su texto se vea más grande.
3. Puedes intentar utilizar tu dispositivo en orientación horizontal
Esto hará que la pantalla sea más ancha para que el documento parezca lo suficientemente grande para ser leído cómodamente.

4. Puede ampliar al 100 por ciento y, en su lugar, desplazarse por la pantalla para leer diferentes partes
Esto es especialmente útil con los cómics. Primero, activa el modo columna desde este elemento del menú:
/ 
Luego seleccione una dirección de flujo apropiada para su documento desde el mismo menú:

- Por ejemplo, si estás leyendo un artículo que tiene dos columnas, te desplazarás hacia abajo hasta el final de la página leyendo la columna izquierda y luego irás al lado superior derecho para continuar leyendo la columna derecha:

- O si estás leyendo un cómic, querrás ir “derecha / abajo / izquierda / derecha” en zigzag:

- Para un cómic japonés (orden de paneles de derecha a izquierda) esto podría ser al revés:

En este modo, también puedes ajustar la Superposición horizontal/vertical y el Número de columnas desde el mismo menú para que el texto se ajuste mejor a la pantalla. Siéntase libre de experimentar estas configuraciones.
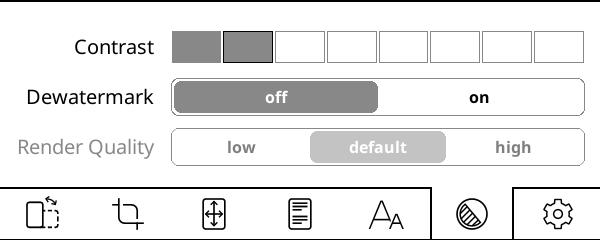
El ajuste Contraste ajusta los niveles de negro en el documento. Tenga en cuenta que el mismo valor de contraste se aplica tanto al texto como a las imágenes. Si lo configura demasiado alto, las imágenes podrían oscurecerse demasiado.
Dewatermark elimina las marcas de agua del documento renderizado. También se puede utilizar para eliminar fondos grises. Esta función puede convertir un documento en escala de grises o en color a blanco y negro para producir más contraste y facilitar la lectura.
Calidad de renderizado (solo activo en el modo ajuste de texto) establece la calidad del procesamiento y la salida de extracción de texto e imágenes. Alto es más agradable, pero puede ser mucho más lento (varios segundos para pasar la página) que default dependiendo de su documento. Si sus archivos PDF/DJVU son lentos, esta es la primera configuración que debe verificar.
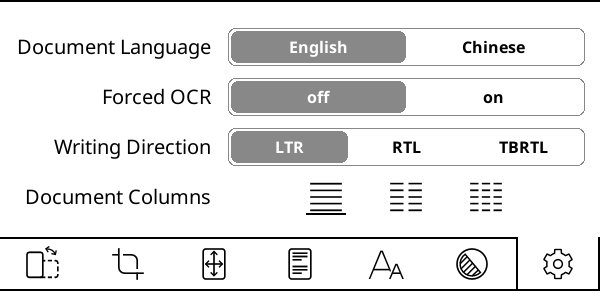
Idioma del documento establece el idioma que utilizará el motor de OCR.
OCR forzado como su nombre lo indica, fuerza el uso de OCR incluso si el documento tiene una capa de texto.
Dirección de escritura (solo activo en modo ajuste de texto) establece la dirección del documento original. Establezca esto en RTL para idiomas como árabe y hebreo.
Columnas del documento (solo activas en el modo ajuste de texto) establece el número de columnas de texto en el documento original.
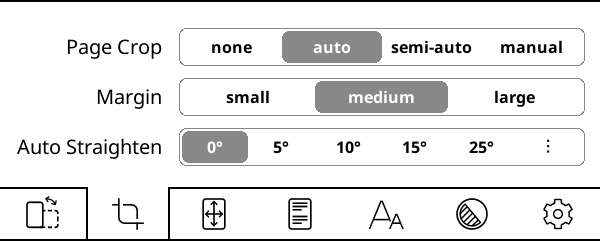
La función Enderezamiento automático puede enderezar las páginas de un documento problemático, por ejemplo, páginas de un PDF que se escanean en ángulo. Está disponible en documentos PDF, DJVU, CBZ/CBT y archivos de imagen. Para habilitarlo, elija el ángulo de inclinación máximo que KOReader intentará corregir. Si no corrige es posible que tengas que elegir un ángulo mayor. Tenga en cuenta que esta característica puede ralentizar su lectura dependiendo de varios factores.
Para guardar los subrayados, puedes usar la función Exportar subrayados de KOReader que se explica en una sección anterior.
Si estás subrayando un documento PDF, KOReader también puede guardarlos directamente en el archivo PDF. Puede resultar útil en determinadas situaciones porque con este método los subrayados pasan a formar parte del archivo PDF lo que significa que puedes verlos en otras aplicaciones o plataformas sin instalar KOReader. Por ejemplo si envías un archivo con subrayados a otro usuario, no es necesario que él instale KOReader para ver tus subrayados. Simplemente puedes enviar el archivo PDF con tus subrayados guardados, y él podrá abrir y verlos con un lector PDF compatible.
ADVERTENCIA Si estás usando el complemento Sincronizar progreso de lectura, guardar los subrayados del PDF modificará el archivo por lo que la sincronización fallará. Si planeas usar ambas funciones, en la configuración del complemento Sincronizar progreso de lectura cambia el Método de coincidencia de documentos a Nombre de archivo en lugar de la coincidencia Binaria predeterminada:
/ Sincronizar progreso de lectura / Método de coincidencia de documentos¿Qué lectores de PDF pueden mostrar los subrayados?
Los lectores de PDF generalmente dependen de algunas bibliotecas estándar para representar archivos PDF. Dos de las bibliotecas de PDF más conocidas son las bibliotecas MuPDF y Poppler. KOReader utiliza la biblioteca MuPDF, por lo que los subrayados en archivos PDF en KOReader no son actualmente visibles en lectores de PDF que usan la biblioteca Poppler. Puedes encontrar una lista de compatibilidad a continuación. ✅ significa que puedes ver los subrayados de KOReader en esta aplicación, ❌ significa que no puedes verlos. Y ⚠️ significa que la aplicación necesita algún complemento para mostrarlos. La lista está ordenada alfabéticamente dentro de categorías.
ADVERTENCIA Esta lista no está completa y es posible que no esté actualizada. Por eso le sugerimos que pruebe la compatibilidad usted mismo. Simplemente destaque en KOReader, escríbalo en el archivo PDF e intente abrir el archivo en el lector deseado para verificar si el destacado es visible.
- ✅ Navegador Chrome (todas las plataformas)
- ✅ Lector Deepin (Linux)
- ✅ Navegador Firefox (todas las plataformas)
- ✅ Ghostscript (todas las plataformas)
- ✅MuPDF (Windows/Android)
- ⚠️ Zathura (si el complemento MuPDF está habilitado)
- ❌Adobe Acrobat Reader
- ❌ Evince (Linux)
- ❌ Foxit Reader
- ❌ LibreOffice Draw (como editor)
- ❌ Moon Reader (Android)
- ❌ Okular (Linux)
- ❌ SumatraPDF (Windows)
- ❌ Xpdf (Linux)
- ❌ Xreader (Linux)
Dado que resaltar para su uso posterior puede implicar un esfuerzo significativo, si planea utilizar esta función, debe comprender cómo funciona para evitar situaciones frustrantes.
RESUMEN RÁPIDO: Si más adelante deseas eliminar o exportar los subrayados del PDF, debes copiar la carpeta .sdr asociada con tu libro cuando hagas una copia de seguridad o copies el libro en otros dispositivos. Sin esta carpeta KOReader aún puede mostrar los subrayados guardados pero no puede saber dónde están en el archivo, por lo que no podrás modificarlos. Continúa leyendo para más información.
Cómo funcionan los subrayados normales en KOReader
Cuando subrayas en KOReader, ya sea en documento EPUB o PDF, el subrayado se escribe en un archivo de configuración. Por ejemplo si estás leyendo Alicia en el país de las maravillas.epub, tendrás una carpeta llamada Alicia en el país de las maravillas.sdr en la misma carpeta que el libro. Tus subrayados se guardarán en un archivo en esta carpeta .sdr. Lo que significa que si eliminas esta carpeta.sdr que está asociada con el libro, perderás tus subrayados.
Cómo funcionan los subrayados en PDF en KOReader
La función de subrayados en PDF funciona un poco diferente a la descripción anterior. Como mencionamos antes, cuando guardas los subrayados en un PDF se escribirán directamente en el archivo PDF, lo que significa que pasarán a formar parte del archivo en sí. Es por eso que puedes enviar este PDF a otro usuario y él podrá ver los subrayados con un lector PDF compatible. No necesitará tu carpeta .sdr que contiene el registro de tus subrayados porque ahora están incrustados directamente en el archivo PDF.
Expliquemos el problema que puede surgir al utilizar esta función, con un ejemplo. Imagina que estás leyendo un libro PDF en tu e-reader con KOReader:
- Estás haciendo subrayados y la opción Guardar subrayados en PDF está habilitada, por lo que cuando subrayas, KOReader los guarda en el archivo PDF.
- Quiere continuar leyendo el libro en su teléfono con KOReader, por lo que copia este archivo PDF desde su e-reader a su teléfono (pero no copió la carpeta.sdr, solo el archivo PDF).
- Cuando abras el libro en el teléfono con KOReader, verás que tus subrayados aún están allí.
Ahora la situación en ambos dispositivos parece idéntica. Tanto el e-reader como KOReader del teléfono muestran el archivo PDF con los mismos subrayados. Pero sólo parece idéntica, en realidad hay una gran diferencia.
KOReader en el e-reader tiene conocimiento de qué subrayados del PDF fueron creados por KOReader porque tiene la carpeta .sdr. Pero KOReader en el teléfono no la tiene. Sólo tiene el archivo PDF.
La diferencia surge cuando intentas eliminar o exportar los subrayados del PDF. El e-reader puede eliminar o exportar estos subrayados del PDF. Pero el KOReader del teléfono no puede porque como dijimos, no tiene la carpeta .sdr del libro, por lo que los subrayados del libro parecen parte del libro original desde su punto de vista.
En resumen, si más adelante deseas poder eliminar o exportar los subrayados de un PDF, debes copiar la carpeta.sdr asociada con el libro cuando hagas una copia de seguridad o copies el libro en otros dispositivos.
OCR (Reconocimiento óptico de caracteres) es el proceso de extracción de texto de imágenes. En el contexto de KOReader, generalmente se utiliza para extraer texto de páginas de libros escaneadas en archivos PDF. KOReader confía en Tesseract Open Source OCR Engine para esta tarea.
Para utilizar esta función es necesario:
- Instale los datos de idioma de Tesseract en su KOReader
- Agregue los idiomas recién instalados al archivo de configuración koreader/defaults.lua (es necesario solo si su idioma no es inglés o chino)
Los cómics suelen necesitar actualizaciones de página más frecuentes que el texto puro. Para texto normal, puedes configurar el intervalo de actualización de página a valores altos sin problema. Sin embargo, las imágenes pueden dejar más residuos y causar imágenes fantasma, especialmente según el panel de tu lector electrónico.
KOReader te permite asignar cualquier gesto para cambiar a diferentes frecuencias de actualización. Por ejemplo, puedes configurar deslizar hacia arriba el borde izquierdo para que se actualice cada página al leer cómics y deslizar hacia abajo el borde izquierdo para que se actualice cada x páginas al leer libros de solo texto. Así, al abrir un cómic, puedes cambiar a una frecuencia de actualización más alta con un simple toque o deslizamiento (o viceversa).
Esta acción se enmarca en:
/ Toques y gestos / Administrador de gestos / Sección de pantalla y luces / Frecuencia de actualización de pantalla completaEsta función facilita la lectura de cómics en pantallas pequeñas. Puedes activarla mientras lees un documento PDF, DJVU, CBZ or CBT mediante:
/ Zoom del panel (manga/cómic)Cuando esta opción está activada, KOReader intenta encontrar los límites de los paneles rectangulares en la pantalla. Si mantienes presionado un panel, KOReader amplía la vista y muestra solo ese panel.
Como puedes adivinar, esta característica funciona mejor con cómics que tienen límites de panel limpios. Además, no hay paso de página en este modo para saltar al siguiente panel debido a este problema de límites. Tienes que cerrar el panel ampliado y mantener presionado el siguiente. Para hacer esto, simplemente desliza hacia abajo este panel ampliado. También puede utilizar cualquier gesto de deslizamiento múltiple (cualquier combinación de arriba, abajo, izquierda, derecha) para salir de esta vista.
El procedimiento se puede ver a continuación:
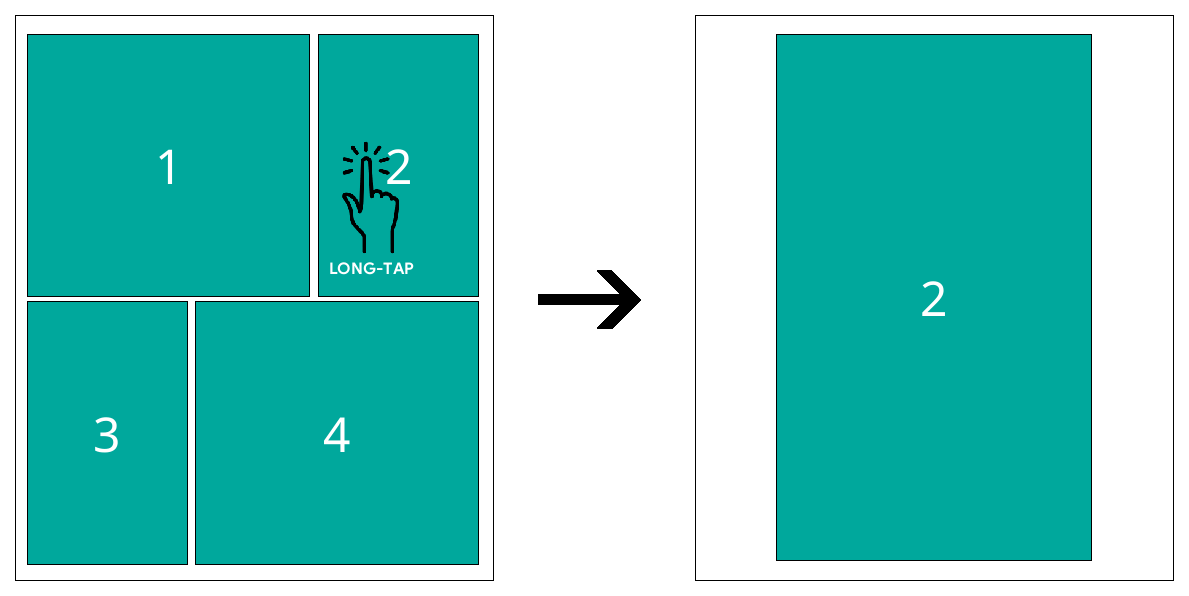
Si desea utilizar esta función con otros tipos de archivos como EPUB, FB2, HTML o archivos de imagen, debe abrir el archivo con un motor diferente: en el Explorador de archivos, mantenga presionado el nombre del archivo, toque Abrir con… y seleccione MuPDF.
Cuando llegas a la última página del libro KOReader muestra un cuadro de diálogo. En este cuadro tienes la acción Abrir siguiente archivo que abrirá el siguiente archivo del mismo directorio que el libro actual. Así puedes colocar tus series en directorios separados y leerlas una tras otra sin tener que volver al Explorador de archivos.

Al abrir el siguiente archivo, KOReader omite los archivos que haya marcado como terminados. Esta característica es útil, por ejemplo, cuando tienes una carpeta de archivos manga y ya has leído algunos de ellos. Puede marcar un archivo como terminado desde el cuadro de diálogo de final del libro que se muestra arriba. También puedes marcarlo desde el Explorador de archivos manteniendo presionado el archivo. Después de copiarlos a su dispositivo, podrá:
- Abra el Explorador de archivos en KOReader
- Mantenga presionados los que ya terminó y toque Marcar como terminado
Ahora puedes leer todos los archivos con solo tocar Abrir siguiente archivo al final del libro. KOReader omitirá los que ya haya leído.
Si te gusta leer libros manga en tu dispositivo de tinta electrónica, existen algunos consejos que pueden mejorar tu experiencia. Preparar tus propios archivos manga es la mejor solución si no estás satisfecho con el aspecto de los cómics en tu dispositivo.
Los tipos de archivos como MOBI y EPUB no son adecuados para manejar principalmente contenido de imágenes (por ejemplo, manga/cómics). La compatibilidad con MOBI en KOReader es mínima o inexistente, y las prioridades de representación de texto de EPUB pueden causar problemas al mostrar imágenes de página completa. Para obtener más detalles técnicos, visite este problema de GitHub.
Su mejor opción es crear un archivo CBZ que funciona mejor en KOReader. Un archivo con extensión .cbz es un archivo zip (sin compresión) que es una colección de imágenes. Guarda varias imágenes, normalmente archivos .png o .jpeg, organizadas en páginas del cómic. KOReader también puede abrir archivos CBT, que son similares a los archivos CBZ pero usan el formato de archivo TAR.
La forma más sencilla de convertir un manga a CBZ es obtener el manga como imágenes de varios sitios web y luego convertirlos usando Kindle Comic Converter (https://github.com/ciromattia/kcc). Hay algunas configuraciones útiles como divisiones de dos páginas con rotación automática en formato horizontal y aplicación de tramado para que los degradados renderizados con eink se dibujen suavemente sin capas irregulares.
Se pueden lograr los mejores resultados cambiando el tamaño de las imágenes exactamente al tamaño de la pantalla de su lector electrónico. Un CBZ específico de la pantalla que apunta al tamaño exacto de la pantalla del dispositivo evita el cambio de escala durante la lectura. KOReader reduce la escala de sus imágenes al tamaño de su pantalla mientras lee, pero esto no se recomienda porque KOReader agrega un paso de tramado antes de escalar y esto causa pérdida de calidad.
Pero si deseas usar tu CBZ hecho a mano en más de un dispositivo o quieres conservar la alta resolución para futuras revisiones, la mejor opción podría ser crear el CBZ para tu dispositivo con la resolución más alta. O bien elija una resolución "alta" arbitraria, posiblemente una que coincida con la letra. 300 PPP o superior (hasta 450 o incluso 600), a menos que la letra sea inferior. Si asumimos un tamaño de pantalla de 8", 1500×2000 es una buena resolución. Para imágenes más grandes deberías probarlo en tu dispositivo y ver si es compatible. Los Kindles antiguos con poca memoria pueden tener dificultades con tamaños como por ejemplo 3000×4000. Si el proceso está automatizado, podría valer la pena considerar crear dos versiones, una de menor y otra de mayor calidad (por ejemplo, de200/400 y 300/600 ppp).
/ Toques y gestos / Pasar página / Invertir paso de página, toque y deslice / botonesEl siguiente es un procedimiento de ejemplo para procesar un archivo manga:
- Descargue Kindle Comic Converter (KCC) desde https://github.com/ciromattia/kcc
- Descarga tu manga desde la fuente que elijas (es decir, HakuNeko)
- Descomprime el archivo manga. Ahora debería tener un directorio que contenga solo imágenes (o subdirectorios con imágenes, sin archivos)
- Procese este directorio con KCC. Cada directorio producirá un único archivo CBZ, por lo que si desea crear varios volúmenes a la vez, seleccione varios directorios a la vez
Algunas configuraciones útiles de KCC:
Divisor de extensión: Esta función detecta páginas dobles y le permite rotarlas o cortarlas en dos.
Mejora de escala: amplía imágenes que son más pequeñas que la resolución objetivo.
Si quieres disfrutar de tu manga de forma más inmersiva, asegúrate de seleccionar la misma resolución que la de la pantalla de tu dispositivo en KCC al crear tu archivo CBZ. También puedes ocultar la barra de progreso inferior mientras lees tu manga en KOReader. Así tendrás una vista inmersiva de tu manga a pantalla completa sin obstrucciones.
!!! AVANZADO
Después de usar KCC para crear un archivo CBZ, puedes aplicar tramado adicional a las imágenes. De esta forma, los degradados renderizados con tinta electrónica se tramarán suavemente, sin capas irregulares. Este paso producirá volúmenes de manga optimizados que se verán mejor en KOReader.
Puedes usar ImageMagick para procesar tus imágenes. ImageMagick es una potente suite de software de código abierto para mostrar, crear, convertir, modificar y editar imágenes rasterizadas. Puedes descargar ImageMagick y usarlo desde la línea de comandos para procesar varias imágenes a la vez.
- Descomprima el archivo CBZ preparado que creó con KCC,
- Descargue el siguiente archivo dither_pack.zip (ubicado en Yandex Disk) que contiene dos archivos por lotes (.BAT) y una plantilla de color GIF.
- Extraiga estos tres archivos junto a sus imágenes que serán procesadas
- Edite el archivo _magick_manga_ditherN_resize.bat y cambie la resolución a la resolución de su dispositivo (en ambos lugares en el archivo BAT).
ADVERTENCIA El siguiente paso reemplazará todas las imágenes del directorio con las procesadas. Por lo tanto, asegúrese de tener una copia en otro directorio si desea conservar las originales.
- Ejecute _magick_manga_ditherN_resize.bat para cambiar el tamaño y tramar las imágenes.
- Suponiendo que tenga instalado 7-Zip, ejecute _batch_archive.bat para empaquetar todas las imágenes procesadas en un archivo CBZ.
!!! AVANZADO
Puedes hacer que KOReader pase las páginas de Izquierda a Derecha, de modo que las zonas de deslizamiento y toque se intercambien. Para ello, añade las siguientes líneas:
["/storage/emulated/0/Books/manga"] = {
["inverse_reading_order"] = true,
["kopt_zoom_direction"] = 0,
},
a este archivo:
/koreader/settings/directory_defaults.luaDonde /storage/emulated/0/Books/manga es la ruta absoluta al directorio que contiene tus mangas. Tras este cambio, al abrir un archivo desde dicho directorio, las zonas de deslizamiento y pulsación se intercambiarán.
Verá la interfaz del explorador de archivos al ejecutar KOReader por primera vez. Es una de las dos interfaces principales de KOReader. Aquí realizará todas sus operaciones con archivos y carpetas. Puede acceder a ella desde la pantalla de lectura mediante:
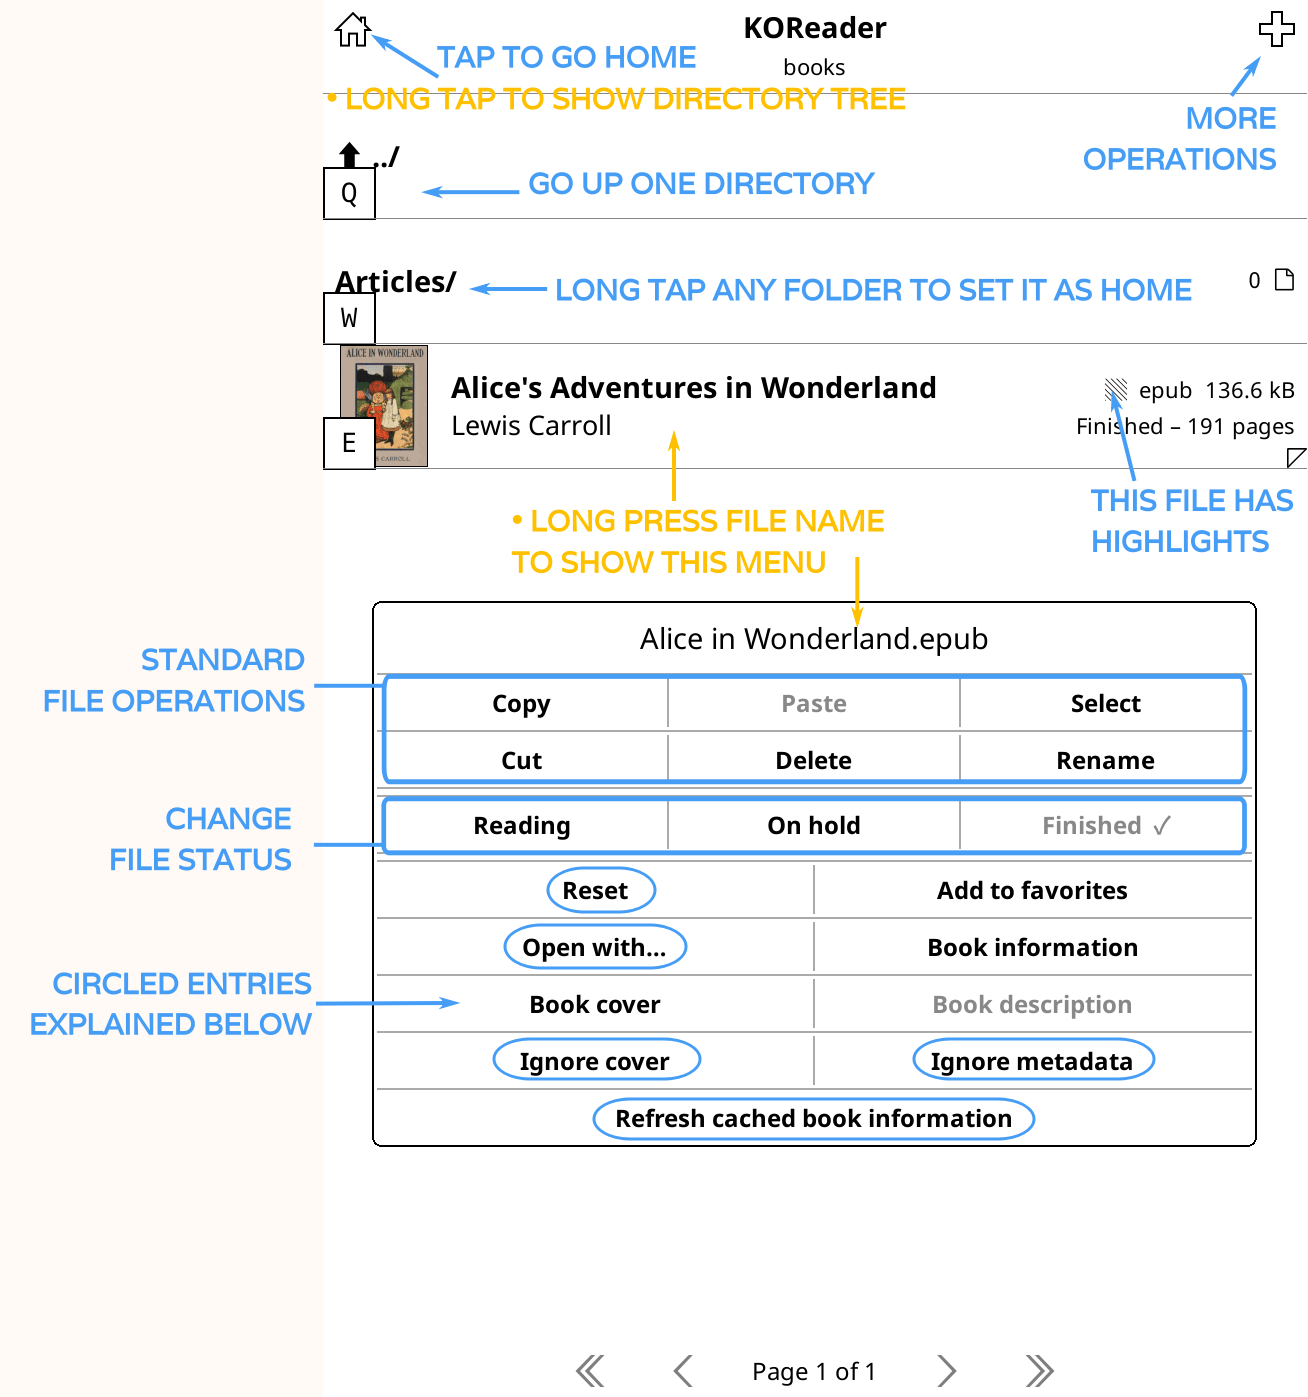
De forma predeterminada, el explorador de archivos muestra su carpeta INICIO, que es la carpeta principal de su biblioteca. Puedes cambiar esto manteniendo pulsada cualquier carpeta. Puedes cambiar las muchas opciones del explorador de archivos, como cómo se muestran u ordenan los libros, a través del MENÚ SUPERIOR deslizándote hacia abajo desde la parte superior de la pantalla.
Los elementos en círculo de la imagen se explican a continuación:
REINICIAR: permite reiniciar algunas propiedades del documento como progreso de lectura, marcadores, imagen de cubierta personalizada, etc que puedes seleccionar en el siguiente cuadro de diálogo.
ADVERTENCIA Tenga mucho cuidado al utilizar el cuadro de diálogo restablecer y verifique qué elementos están marcados; de lo contrario, puede restablecer todo lo relacionado con su libro accidentalmente.
ABRIR CON: KOReader usa diferentes motores para renderizar distintos tipos de archivos. En algunos casos puedes abrir un archivo con un motor diferente para obtener otras funciones. Consulta a continuación las secciones Ver archivos comprimidos y Ver archivos de imagen.
IGNORAR CUBIERTA: si por alguna razón deseas desactivar la cubierta del libro (puede que sea incorrecta o que sea ilegible con tinta electrónica), puedes usar esta opción.
IGNORAR METADATOS: Si los metadatos de su libro no son correctos, el campo de nombre puede mostrar información inútil. Seleccione esta opción para mostrar el nombre del archivo en lugar de los metadatos.
ACTUALIZAR INFORMACIÓN DEL LIBRO EN CACHÉ: KOReader almacena en la caché los metadatos y cubierta de un libro cuando es agregado a la biblioteca. Si después de copiar el libro al dispositivo haces cambios en este, es posible que sea necesario actualizar la información. Si ves una cubierta o metadatos incorrectos puede actualizar la información del libro mediante este elemento del menú.
El Explorador de archivos permite realizar algunas operaciones (como copiar, mover, eliminar y exportar subrayados) en varios archivos al mismo tiempo. Para eso hay que seleccionar los archivos. Actualmente hay tres formas de seleccionar archivos para operaciones masivas en el explorador de archivos:
- En el primer método, mantenga presionado el nombre de un archivo y elija Seleccionar en el cuadro de diálogo emergente. Esto activará el modo de selección. Ahora puedes tocar otros archivos para agregarlos a la selección. Cuando termine de seleccionar sus archivos, toque el icono de marca de verificación en la esquina superior derecha de su pantalla. Puede elegir qué hacer con estos archivos desde el cuadro de diálogo. O salir del modo de selección desde el mismo cuadro de diálogo.
En el segundo método, presione el icono + (más) en la esquina superior derecha y seleccione Seleccionar archivos en el cuadro de diálogo. Esto activará el Modo Selección. El resto es igual que en el primer método.
- En el tercer método, puedes seleccionar tus archivos mediante una búsqueda de archivos. Esto es útil si necesitas realizar una operación con muchos archivos distribuidos en diferentes carpetas. Por ejemplo, si quieres mover todos los archivos de tu colección de Tolkien a una nueva carpeta. Los pasos para esta acción son:
- Desde el Menú superior presione la pestaña Buscar (con el icono de lupa) y elija Búsqueda de archivos.
- Marque la opción Incluir subcarpetas si también desea buscar dentro de las carpetas. Puede marcar Buscar también en los metadatos del libro si desea que KOReader busque en los metadatos del libro. De lo contrario, KOReader solo buscará en los nombres de archivo la palabra que ingresó.
- Puede iniciar la búsqueda desde su biblioteca Carpeta de inicio o su Carpeta actual presionando el botón respectivo.
- Una vez finalizada la búsqueda, verá una lista de archivos (si se encuentra el término de búsqueda, por supuesto). Ahora puedes tocar el icono de hamburguesa en la esquina superior izquierda de la pantalla para ingresar al modo de selección.
- Toca todos los archivos en los que quieras realizar operaciones y pulsa el icono de la marca de verificación en la esquina superior izquierda de la pantalla. Verás un cuadro de diálogo con la opción Seleccionar en el explorador de archivos. Selecciona esta opción.
- Ahora volverá al Explorador de archivos y los archivos que seleccionó en el cuadro de diálogo Buscar también se seleccionarán aquí.
- Toca el icono de la marca de verificación en la esquina superior derecha de la pantalla. Ahora puedes elegir qué hacer con estos archivos desde el cuadro de diálogo.
KOReader te permite añadir tus carpetas favoritas a un menú de Atajos a carpetas de fácil acceso. Por ejemplo si tienes una carpeta Archivo en tu biblioteca en Inicio>Artículos>Científico>Archivados, puedes asignar un atajo a la carpeta Archivados y acceder a ella rápidamente, incluso mientras lees un libro.
Agregar un acceso directo a una carpeta:
Hay dos formas de agregar una carpeta a su lista de Atajos de carpetas:
- Cuando estés en el Explorador de archivos, toca el botón menú + (más) de la esquina derecha y luego el elemento Atajos a carpetas y escribe un nombre descriptivo para el atajo. Esto añadirá la carpeta en la que te encuentras..
- Cuando estés en el Explorador de archivos, mantén presionado el nombre de una carpeta para abrir el menú contextual. Toca el elemento Añadir a atajos a carpeta y escribe un nombre descriptivo para el atajo. Esto añadirá la carpeta que has presionado.
Las carpetas que están en la lista de Atajos a carpetas tendrán una estrella (★) en el Explorador de archivos.
Puedes eliminar una carpeta de los atajos de la misma manera, manteniendo presionado sobre esta y seleccionando Eliminar de atajos a carpetas.
Ver atajos a tus carpetas:
Puedes abrir tus Atajos a carpetas desde el Explorador de archivos o la Pantalla de lectura mientras lees un libro.
- Desde el Explorador de archivos: Esquina superior derecha + menú (más) y luego elije Atajos a carpetas o asigna un gesto.
- Desde la pantalla de lectura: Asignándole un gesto.
Está en la sección Explorador de archivos del Administrador de gestos. Puede aprender a configurar gestos en la sección correspondiente de esta guía.
Si tiene libros en formato .txt (que es más común en los idiomas Chino y Cirílico), puede intentar habilitar la función detección automática de diseño de archivos TXT. En algunos casos, puede mejorar la representación y hacer que el texto parezca más "un libro". Cuando está habilitado, el motor de renderizado utilizará heurísticas (texto ajustado bajo una longitud máxima de línea, líneas en blanco simples o dobles que marcan párrafos, sangría o texto centrado considerado encabezado...) para adivinar cómo renderizar mejor el texto e intentará crear una tabla de contenido.
Puede habilitar esta función aquí (que es visible solo si está leyendo un archivo .txt):
/ Estilo / Detección estructura de archivos TXTTenga en cuenta que esta característica puede estropear los dibujos artísticos ASCII y el formato basado en caracteres de espacio. Si su libro tiene este tipo de características, podría ser mejor utilizar el modo predeterminado en el que el archivo de texto se representa tal cual en una fuente monospace.
KOReader puede leer archivos almacenados/comprimidos en archivos ZIP. Puede abrir archivos ZIP, CBZ y EPUB (ya que también son archivos ZIP) con el visor de archivos para ver los archivos contenidos:
- En Explorador de archivos, mantén presionado el nombre del archivo
- Toca Abrir con…
- Toca Visor de archivos
Un archivo ZIP puede contener muchos tipos de documentos como html, txt o imágenes. KOReader puede abrir su archivo ZIP correctamente solo si le da una pista sobre el tipo de archivo en el archivo ZIP. Si le da a su archivo solo una extensión .zip, KOReader asumirá que este archivo contiene imágenes e intentará abrirlo como un archivo CBZ.
CASO PREDETERMINADO: yourfilename.zip - Se supone que es un archivo zip de imágenes (y abierto por el motor MuPDF)
Si su archivo zip contiene uno de estos tipos (en lugar de solo imágenes), asígnele el nombre correspondiente:
- FictionBook - sunombredearchivo.fb2.zip
- HTML - tunombredearchivo.htm.zip / tunombredearchivo.html.zip
- Archivos de registro de texto: sunombredearchivo.log.zip
- Reducción - sunombredearchivo.md.zip
- Formato de texto enriquecido: sunombredearchivo.rtf.zip
- Texto sin formato: sunombredearchivo.txt.zip
Si los documentos no tienen este nombre, es probable que se utilice el motor de lectura/formato incorrecto y verá el mensaje No hay motor de lectura para este archivo o archivo no válido. Puede cambiar el nombre de este archivo como se explicó anteriormente o mantener presionado el nombre del archivo y luego elegir Abrir con... para seleccionar el motor correcto.
Puede abrir archivos de imágenes con el visor de imágenes en lugar de abrirlos como un libro. Los archivos abiertos de esta manera no aparecen en su historial y tienen mejor soporte de escala y rotación.
- En Explorador de archivos, mantén presionado el nombre del archivo
- Toca Abrir con…
- Toca Visor de imágenes
KOReader ofrece dos opciones para leer documentos Markdown.
- Puede abrir el documento directamente como un libro tocándolo. Este modo no proporciona formato. Entonces su archivo .md se verá como si estuviera abierto en un editor de texto.
- Puedes convertir tu documento Markdown a HTML. Esta acción generará un archivo HTML a partir de tu documento Markdown con el formato correcto y una Tabla de Contenidos creada a partir de los encabezados.
Para convertir un archivo .md, manténgalo pulsado en el Explorador de archivos y pulsa Convertir en el menú emergente. Se creará un nuevo archivo con el mismo nombre, pero con extensión HTML, en el mismo directorio. Ten en cuenta que la conversión puede tardar un poco, dependiendo del archivo Markdown y la velocidad del dispositivo.
También puedes establecer asociaciones de archivos para tipos de archivo que KOReader no reconoce automáticamente. Para asociar un archivo con uno de los proveedores de KOReader, haz clic largo sobre tu archivo en el Explorador de archivos y luego selecciona un proveedor para gestionarlo. Puedes comprobar:
- Utilizar siempre este motor para este archivo para asociar este proveedor solo con este archivo en particular
- O marque Usar siempre este motor para el tipo de archivo para asociar este proveedor con todos los archivos que tengan la misma extensión que este
- Desde el mismo cuadro de diálogo, puede ver las asociaciones que realizó al tocar Ver valores predeterminados para tipos de archivos
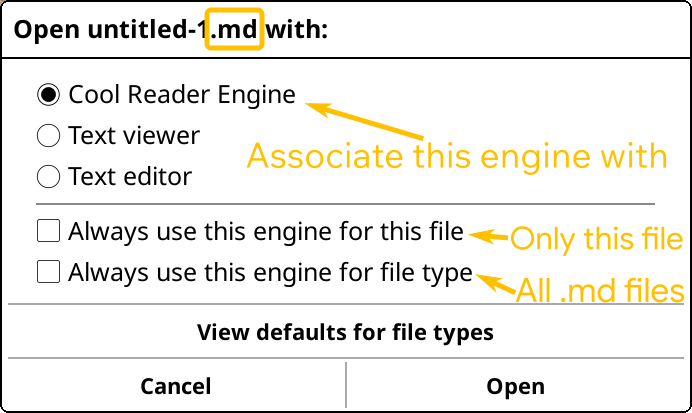
La función Colecciones de KOReader te ayuda a organizar tu biblioteca de forma más eficiente. En resumen, las colecciones son listas de tus libros creadas por el usuario. Por ejemplo, puedes crear dos colecciones llamadas Ficción y No Ficción para organizar tus libros según corresponda. Claro que también puedes usar carpetas para esto, pero usar colecciones te da más flexibilidad.
Algunas ventajas de las colecciones en comparación con la organización basada en carpetas:
- Añadir un libro a una colección no mueve el archivo del libro. Por lo tanto, tus libros pueden estar en carpetas diferentes, pero pueden aparecer en la misma colección.
- Un mismo libro puede estar en varias colecciones, algo que no es posible con las carpetas. Por ejemplo, puedes tener una colección de Ciencia Ficción y otra de Ficción Bélica. Se puede añadir un libro a ambas colecciones a la vez.
- Puedes activar perfiles con colecciones. Esto se explicará más adelante si no estás familiarizado con la función de perfiles de KOReader. (Por supuesto, también puedes activar perfiles con carpetas, pero colecciones no requiere que muevas tus libros para usar perfiles temporales, por ejemplo.)
Puedes crear colecciones que reflejen cualquier tipo de categorización. Algunos ejemplos:
- Géneros: Ficción, no ficción, memorias...
- Estado del libro: Actualmente leyendo, quiero leer, siguiente, no terminé...
- Serie: El Señor de los Anillos, Harry Potter...
- Tipo de documento: Libros, artículos científicos, artículos web...
Puede crear colecciones desde el cuadro de diálogo Colecciones ubicado aquí:
/ ColeccionesPuedes acceder a este cuadro de diálogo desde la vista del lector o desde el Explorador de archivos. Al abrir este menú, verás una lista de tus colecciones. Por defecto, verás Favoritos como un elemento de colección que incluye los libros que ya has añadido a tu lista de Favoritos.
- Agregar una nueva colección: Use el menú de hamburguesas ubicado en la esquina superior izquierda de esta pantalla > Nueva colección
- Eliminar una colección: Mantenga pulsado el nombre de la colección > Eliminar colección
- Cambiar el nombre de una colección: Mantenga pulsado el nombre de la colección > Cambiar el nombre de la colección
- Cambiar el orden de tus colecciones: Usa el menú de hamburguesas ubicado en la esquina superior izquierda de esta pantalla > Organizar colección
Hay tres lugares diferentes en KOReader donde puedes agregar libros a tus colecciones:
1. Desde la pantalla Explorador de archivos e Historial
Puedes añadir un libro a tus colecciones desde el Explorador de archivos o la pantalla Historial. Desde la pantalla Historial, puedes añadir libros uno a uno. Mantén pulsado el libro y selecciona Colecciones.... Después, puedes elegir a qué colección(es) quieres añadir este libro.
Si va a agregar varios libros, puede hacerlo desde el Explorador de archivos. Para varios libros, siga este procedimiento:
- Pulsación larga sobre un libro
- Seleccione Seleccionar en el menú emergente
- Seleccionar otros libros
- Toque el ícono de marca de verificación (✔️) en la esquina superior derecha
- Toca Colecciones
Para agregar un solo libro, simplemente manténgalo presionado en el Explorador de archivos y seleccione Colecciones en el menú emergente.
2. Desde el menú Colecciones
Este método te permite agregar uno o varios libros a tus Colecciones. La principal diferencia con el método del Explorador de archivos es que puedes agregar carpetas completas y sus subcarpetas a tus colecciones a la vez. Esto es muy útil si tus libros ya están organizados en carpetas. Por ejemplo, si todos tus libros de ciencia ficción están en una sola carpeta, puedes crear una colección llamada Ciencia ficción y agregarla a la vez.
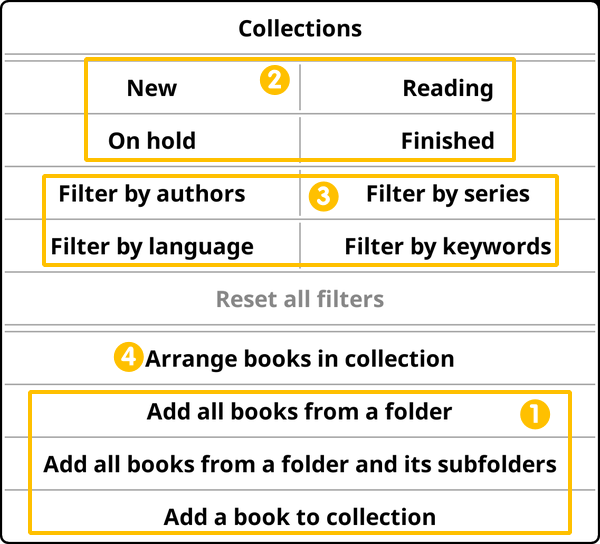
En la imagen de arriba, el Cuadro 1 muestra las opciones para añadir libros. Puedes acceder a este menú desde el menú desplegable de la pantalla de colecciones:
/ Colecciones / Nombre de tu colección / - Añadir todos los libros de una carpeta: Como su nombre indica, esta opción permite seleccionar una carpeta para añadir todos los libros que contiene a esta colección. Tenga en cuenta que esta opción no añade los libros de las subcarpetas de la carpeta seleccionada. Por ejemplo, si selecciona la carpeta Ficción y tiene carpetas llamadas Ciencia Ficción y Ficción Bélica, no se añadirán con esta opción.
- Agregar todos los libros de una carpeta y sus subcarpetas: Esta opción agregará todas las subcarpetas de la carpeta seleccionada. Tenga cuidado con esta opción, ya que se reducirá al máximo al agregar los libros. Por lo tanto, si tiene muchos niveles de carpetas anidadas, podría haber demasiados libros de los que pensaba.
- Agregar un libro a la colección: esta es la opción básica que le permitirá agregar un solo libro.
Puedes eliminar un libro de las colecciones desde el Explorador de archivos, la pantalla Historial o la pantalla Colecciones. En las pantallas Explorador de archivos e Historial, mantén pulsado el libro y selecciona Colecciones.... Verás una marca de verificación junto a las colecciones a las que añadiste este libro. Desmárcalas tocándolas para eliminar el libro de esa colección. También desde la pantalla Colecciones, puedes mantener pulsado un libro y seleccionar Eliminar de la colección.
Las colecciones pueden estar muy saturadas, pero KOReader te permite encontrar tus libros fácilmente gracias a sus numerosas opciones de filtrado. Si observas la imagen de arriba, puedes ver las opciones de filtrado en la Casilla 2 y Casilla 3. La Casilla 2 te permite filtrar por estado del libro (nuevo, en lectura, terminado, en espera) y la Casilla 3 te permite filtrar por metadatos (autor, serie, idioma, palabras clave). También puedes combinar estos dos grupos de filtros, como en este ejemplo: "Muéstrame los libros nuevos de esta colección escritos por Isaac Asimov (Filtrar por autores -> Isaac Asimov) que aún no he empezado (Filtrar por estado -> Nuevo)".
Puedes actualizar los metadatos del libro manteniendo pulsado el libro en el Explorador de archivos y seleccionando Información del libro en el menú. En la ventana emergente, puedes mantener pulsado cualquier campo para cambiar los metadatos, como el autor o las palabras clave. También puedes usar Calibre para esta tarea, una aplicación de terceros que facilita enormemente la gestión de los metadatos de tus libros.
Hay dos tipos de búsqueda que puedes realizar en las colecciones: puedes buscar una frase en los títulos y metadatos de los libros o dentro de los textos. Puedes abrir el cuadro de búsqueda desde:
/ Colecciones / / Búsqueda de coleccionesSi desea realizar una búsqueda en los textos de los libros, tenga en cuenta estos puntos:
- Este tipo de búsqueda solo está disponible si abre las colecciones desde el explorador de archivos. No está disponible desde la pantalla de lectura.
- Esta búsqueda puede ser lenta (unos 2 segundos por libro de la colección). Por lo tanto, si tienes una colección abarrotada, podría tardar bastante.
La función de búsqueda depende de dónde se encuentre en la ventana de colecciones. Si se encuentra en el nivel raíz, donde puede ver todas sus colecciones, la búsqueda se realizará en todas ellas. Si desea buscar solo en una colección específica, debe tocarla y acceder a ella. Esto es especialmente importante si también busca en los textos de los libros, ya que es una operación lenta.
Cuando realice una búsqueda, los resultados se guardarán automáticamente como una nueva colección.
Después de crear tus colecciones y añadirles libros, probablemente querrás mantenerlas sincronizadas con algunas carpetas. Por ejemplo, imagina que creaste una colección de Ciencia Ficción y que también tienes una carpeta de SF en tu biblioteca donde guardas tus libros de ciencia ficción. Si quieres que la colección de ciencia ficción se actualice automáticamente al añadir un nuevo archivo a esta carpeta, puedes hacerlo con la función de carpetas conectadas de las colecciones.
Con esta función, puede conectar una o más carpetas a su colección. Después, KOReader volverá a escanearlas para añadir o eliminar libros de sus colecciones en las siguientes condiciones:
- Al conectar una carpeta a una colección
- Al incluir subcarpetas de una carpeta conectada
- Al mostrar la colección
- Al iniciar el programa
Cómo conectar una carpeta a tu colección:
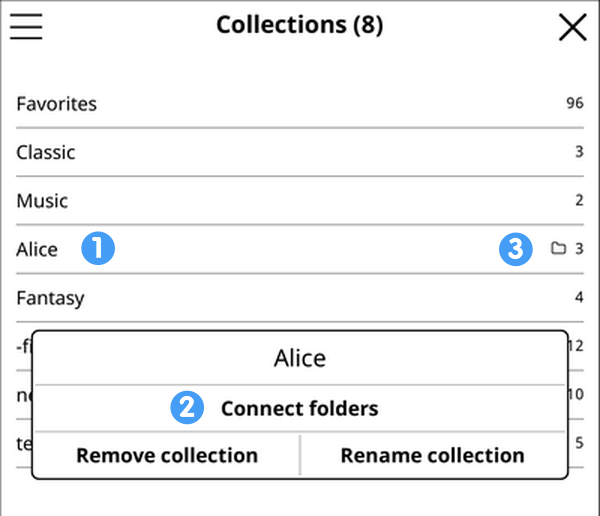
- Vaya a la pantalla Colecciones que se ve en la imagen de arriba.
- Mantenga presionado el nombre de la colección a la que desea conectar las carpetas (1).
- Selecciona Conectar carpetas en el menú emergente (2).
- Se abrirá la Lista de carpetas conectadas.
- Agregue una carpeta presionando el ícono MÁS en la esquina superior izquierda de esa pantalla, lo que abrirá la pantalla de selección de carpeta.
- Repita el último elemento si desea conectar más carpetas.
Las colecciones con carpetas conectadas tendrán un icono de carpeta como puede ver en la imagen de arriba (3).
Quizás quieras incluir también subcarpetas de una carpeta para la sincronización. En el paso 4 anterior, al abrir la Lista de carpetas conectadas, puedes mantener pulsada una carpeta para incluir o excluir subcarpetas desde el menú emergente.
Cómo desconectar una carpeta de tu colección:
- Vaya a la pantalla Colecciones que se ve en la imagen de arriba.
- Mantenga presionado el nombre de la colección a la que desea conectar las carpetas (1).
- Selecciona Conectar carpetas en el menú emergente (2).
- Se abrirá la Lista de carpetas conectadas.
- Mantenga presionada la carpeta que desea desconectar y elija Desconectar carpeta en el menú emergente.
Tus colecciones se pueden utilizar con la función perfiles de KOReader. Si aún no conoce los perfiles, aquí tiene una descripción de nuestra sección Perfiles:
Un perfil es básicamente un conjunto de acciones que se pueden activar con un solo gesto (como una macro).
Como ejemplo, imagina que cuando lees algún tipo de libro, siempre:
- Gira la pantalla a orientación horizontal
- Aumenta el tamaño de la letra y el contraste y
- Enciende la luz de la pantalla
Con el complemento de perfiles puedes hacerlo en una sola acción.
Puede ejecutar un perfil manualmente, pero se puede liberar el verdadero poder de los perfiles con su función ejecución automática. Con esta función, puede activar un perfil según algunas condiciones. Aquí está el enlace a la sección correspondiente de la guía: Ejecución automática de perfil. Por ahora, aquí solo explicaremos una condición desencadenante: Colecciones.
Básicamente, puede crear algunos perfiles y configurarlos para que se ejecuten automáticamente si un libro abierto se encuentra en una colección específica. Algunos ejemplos útiles:
- Puedes agregar todo tu manga a una colección de Manga y crear un perfil para cambiar la dirección de paso de página a de derecha a izquierda e invertir los toques y deslizamientos de página al abrir un libro de manga de esta colección.
- Puedes agregar tus cómics a una colección, lo que puede activar un perfil para disminuir el intervalo de actualización de la pantalla a cada página para evitar imágenes fantasma.
- Puede agregar sus archivos PDF problemáticos a una colección, de modo que cuando los abra, OCR automático o modo de ajuste de texto se active con un perfil.
KOReader puede ajustar el texto de documentos PDF (esta opción se puede encontrar en el menú inferior mientras se lee un documento de diseño fijo como PDF) para hacerlos adecuados para las pantallas pequeñas de los lectores electrónicos. Pero para obtener mejores resultados, es posible que desees convertir tus documentos a un formato EPUB más flexible.
Las aplicaciones más utilizadas para convertir u optimizar documentos para su dispositivo de lectura móvil son Calibre (centrada en EPUB, Kindle) y K2pdfopt (centrada en PDF).
Calibre puede convertir sus documentos entre muchos formatos. También tiene un editor incorporado que le permite editar libros electrónicos (y solucionar problemas) en los formatos de libros electrónicos más populares, EPUB y Kindle.
K2pdfopt optimiza archivos PDF/DJVU para lectores electrónicos móviles y teléfonos inteligentes. Funciona bien en archivos PDF/DJVU de varias columnas y puede redistribuir texto incluso en archivos PDF escaneados. También se puede utilizar como herramienta general de manipulación de copia, recorte, cambio de tamaño y OCR de PDF.
OCRmyPDF es una aplicación de línea de comandos que puede agregar una capa de texto OCR a archivos PDF escaneados (que contienen solo imágenes sin texto), lo que permite buscarlos o copiarlos. Puede resultar especialmente útil para leer libros antiguos escaneados. También puede optimizar las imágenes para un tamaño de archivo más pequeño.
SingleFile es una extensión de navegador para Mozilla Firefox, Google Chrome y Microsoft Edge. Esta extensión permite guardar una página web como un archivo .html único con todos los recursos (imágenes, hojas de estilo, scripts) integrados.
!!! AVANZADO
KOReader almacena configuraciones e información adicional relacionada con sus libros en el mismo directorio que el archivo de su libro. A esto lo llamamos metadatos e incluye:
- Configuraciones visuales para el libro
- Progreso de la lectura del libro
- Subrayados, marcadores y notas
En un cambio reciente, agregamos nuevas formas de almacenar estos metadatos para resolver ciertos problemas relacionados con la sincronización entre dispositivos. Actualmente existen tres métodos diferentes para almacenar los metadatos y cada método tiene sus propios beneficios/negativos.
Puede cambiar esta configuración desde este menú:
/ Documento / Ubicación de metadatos del libroADVERTENCIA Le recomendamos encarecidamente leer la sección siguiente para comprender las diferencias y cómo funciona cada método antes de realizar cambios. De lo contrario, existe el riesgo de perder la configuración, el progreso y las anotaciones del libro.
/ Documento / Ubicación de metadatos del libro: carpeta del libroEste es el método predeterminado utilizado en una nueva instalación de KOReader. En este método, cuando copias Alicia en el País de las Maravillas.epub a tu dispositivo y lo abres por primera vez, se creará una carpeta llamada Alicia en el País de las Maravillas.sdr en el mismo directorio. Este directorio contiene los archivos de configuración, anotaciones y progreso del libro para este libro.
Beneficios
- Puede realizar una copia de seguridad y restaurar manualmente la configuración de cada libro.
- Cuando realizas sincronización de directorios o copias de seguridad con un sistema como Syncthing o Dropbox, tu configuración se sincronizará junto con tus libros.
- Puede cambiar el nombre de los directorios principales donde reside su libro, esto no confunde a KOReader.
Negativas
- Si reorganiza su biblioteca moviendo/cambiando el nombre de los archivos de libros o la carpeta .sdr que los acompaña fuera del explorador de archivos KOReader, perderá los metadatos de esos libros sin previo aviso.
- Estas carpetas .sdr serán visibles cuando explores los directorios de tu biblioteca con otro explorador de archivos o desde tu PC, lo que puede saturar la vista.
/ Documento / Ubicación de metadatos del libro: .../koreader/docsettingsEste método es esencialmente igual que el predeterminado anterior. La diferencia es que, en este método, todas las carpetas .sdr de tus libros estarán bajo un solo directorio que está bajo la estructura de directorios principal de KOReader, en lugar de tu directorio de biblioteca, junto a los archivos de libros.
Beneficios
- Las carpetas de libros .sdr solo serán visibles y usadas por KOReader. No saturarán la vista de directorios de la biblioteca cuando accedas con otro explorador de archivos o desde tu PC.
Negativas
- Si reorganizas la biblioteca moviendo o renombrando los directorios, los libros o la carpeta .sdr que los acompaña desde fuera del explorador de archivos de KOReader, perderás los metadatos de esos libros sin previo aviso.
- Dado que los metadatos del libro no estarán en las carpetas de la biblioteca, ninguna sincronización o copia de seguridad esta los incluirá.
/ Documento / Ubicación de metadatos del libro: .../koreader/hashdocsettingsEste método es similar al anterior, ya que las carpetas .sdr estarán en un directorio interno. Sin embargo, este método se desarrolló para solucionar las deficiencias del anterior. Normalmente, si se renombra un libro fuera de KOReader (con el explorador/lector de archivos nativo del dispositivo o desde un PC conectado), el nombre de la carpeta .sdr ya no coincidirá y se perderán los metadatos de ese libro. Si solo se utiliza el explorador de archivos de KOReader para las operaciones con archivos, esto se gestiona automáticamente por lo que no hay repercusiones.
En el método HASHEADO, las carpetas .sdr no se identifican por la ruta o el nombre del archivo del libro. En su lugar, se utiliza un hash MD5 parcial para vincular los libros a su configuración. Este hash se usa como identificador único del libro y se calcula a partir del contenido del archivo del libro. También se usa el mismo hash para nombrar la carpeta .sdr.
Beneficios
- Las carpetas de libros .sdr solo serán visibles y utilizadas por KOReader. No saturarán la vista de los directorios de la biblioteca cuando los explore con otro explorador de archivos o desde su computadora.
- Puedes renombrar, mover y copiar tus libros con otro explorador de archivos o desde tu ordenador. KOReader seguirá reconociendo los libros después de estas operaciones.
- Con este método KOReader asocia la misma carpeta .sdr con todas las copias del libro, incluso si estas están en distintos dispositivos. Por ejemplo, si estás usando Syncthing, este método te permite sincronizar la carpeta /hashdocsettings junto a los archivos del libro entre varios dispositivos que tengan instalado KOReader. A pesar de las diferentes rutas relativas en cada dispositivo, aún puedes tener anotaciones y progreso sincronizados entre tus dispositivos, lo que no es posible con otros métodos.
Negativas
- Cualquier operación que modifique el archivo directamente (como destacar en PDF o descargar desde Calibre) cambiará el archivo, por lo que su ID MD5 cambiará (a diferencia de renombrarlo o moverlo, que es seguro con este método). En este caso, KOReader no podría reconocer el libro, por lo que estos libros perderían sus metadatos.
- El cálculo de los identificadores de archivos puede ralentizar la navegación en el Explorador de archivos cuando se exploran directorios más grandes.
Hay muchos tipos de gestos que puedes usar para controlar KOReader. Algunos gestos tienen limitaciones en cuanto a la ubicación de la pantalla y las direcciones compatibles. Estas limitaciones se indican a continuación.

|
TOQUE / TOQUE DOBLE Toque simple o doble con UN dedo FUNCIONA: En cualquier lugar de la pantalla |
 |
TOCA Y MANTÉN PRESIONADO Toca y mantén presionado con UN dedo FUNCIONA: Sólo en las cuatro esquinas |
 |
Swiping motion with ONE finger WORKS: Screen edges (HORIZONTAL and VERTICAL) Anywhere except edges (DIAGONAL) FUNCIONA: Sólo en las cuatro esquinas |
 |
Swiping motion with TWO fingers at the same time Igual que acercar o alejar en un teléfono o tableta. FUNCIONA: En cualquier lugar de la pantalla INFO Este gesto puede ser menos fiable según tu dispositivo. En ese caso, elige otro tipo de gesto. |
 |
DESLIZAMIENTO CON UN DEDO Movimiento de deslizamiento con UN dedo FUNCIONA: Bordes de pantalla (HORIZONTAL y VERTICAL) En cualquier lugar excepto bordes (DIAGONAL) |
 |
DESLIZAMIENTO CON DOS DEDOS Deslizamiento con DOS dedos al mismo tiempo FUNCIONA: En cualquier lugar de la pantalla |
 |
DESLIZAMIENTO MÚLTIPLE Se realizan varios deslizamientos seguidos sin levantar el dedo. Por ejemplo, dibujar la letra U (ABAJO-DERECHA-ARRIBA) FUNCIONA: En cualquier lugar de la pantalla |
Íconos de Econceptive del Proyecto Sustantivo |
Esta tabla muestra los gestos que incluye KOReader. Puede modificarlos según sus preferencias mediante:
/ Configurador de gestosEsquina superior izquierda > Activar o desactivar el cambio de página
Esquina superior derecha > Activar o desactivar marcador
Esquinas diagonales opuestas al mismo tiempo > Tomar captura de pantalla
↓ ↑ - Hojear documento
↑ ←: marcapáginas
↑ ↓ ↑ - Capítulo anterior
↓ ↑ ↓ - Siguiente capítulo
- Volver a la ubicación anterior
- Ir al último marcador
- Hojear el documento
- Marcadores
- Tabla de Contenidos
- Mostrar el cuadro de diálogo de la luz frontal
- Activar o desactivar ajuste de texto
- Historia
- Estado del libro
- Ir a la página
- Volver
- Capítulo anterior
- Siguiente capítulo
- Abrir documento anterior
- Favoritos
Esta es una lista de todas las acciones que puedes asignar a un gesto usando el menú del Administrador de gestos. Puedes usar la función de búsqueda de tu navegador (generalmente Ctrl+F) para buscar una acción. Estas acciones también se pueden usar en tu propio Menú rápido. Consulta la sección correspondiente en la guía para obtener más información.
- Explorador de archivos
- Abrir documento anterior
- Historial
- Buscar en historial
- Favoritos
- Colecciones
- Buscar en colecciones
- Buscar en diccionario
- Buscar en Wikipedia
- Mostrar menú
- Buscar en el menú
- Abrir siguiente archivo de la última carpeta
- Abrir archivo anterior de la última carpeta
- Archivo de notas
- Toggle touch input
- Conmutar repetición de teclas
- Buscar metadatos de Calibre
- Mostrar etiquetas de Calibre
- Mostrar series de Calibre
- Mostrar autores de Calibre
- Mostrar títulos de Calibre
- Conexión inalámbrica a Calibre
- Desconexión inalámbrica de Calibre
- Estadísticas de lectura: conmutar
- Estadísticas de lectura: ver progreso
- Estadísticas de lectura: por intervalos de tiempo
- Estadísticas de lectura: vista de calendario
- Estadísticas de lectura: cronograma de hoy
- Estadísticas de lectura: sincronizar
- Editor de texto: abrir el último documento
- Abrir el Desarrollador de vocabulario
- Recuperación de Wallabag
- Subir cola Wallabag
- Subir estados de Wallabag
- Progreso de lectura
- Invert page turn buttons
- Conmutar acelerómetro
- Giro
- Toggle orientation
- Salir de pantalla de reposo
- Reiniciar KOReader
- Salir de KOReader
- Conmutar pulsación prolongada en las esquinas
- Activar entrada táctil
- Show frontlight dialog
- Conmutar entrada táctil
- Set frontlight brightness
- Rotar
- Increase frontlight warmth
- Invertir rotación
- Conmutar modo nocturno
- Girar 90° en sentido antihorario
- Conmutar pantalla completa
- Mostrar información de red
- Estadísticas batería
- Estadísticas del sistema
- Emulador de terminal
- Iniciar almacenamiento USB
- Suspender
- Reiniciar el dispositivo
- Apagar
- Increase frontlight brightness
- Decrease frontlight brightness
- Actualización de pantalla completa
- Tasa de actualización completa (siempre)
- Tasa de actualización completa (en modo diurno)
- Mostrar diálogo Iluminación
- Conmutar luz frontal
- Ajustar brillo de la pantalla
- Aumentar brillo de la pantalla
- Reducir brillo de la pantalla
- Ajustar temperatura del color de la pantalla
- Aumentar temperatura del color de la pantalla
- Reducir temperatura del color de la pantalla
- Conmutar modo nocturno
- Configurar modo nocturno
- Establecer tamaño de letra
- Word spacing
- Frecuencia de actualización completa (no en modo nocturno)
- Frecuencia de actualización completa (en modo nocturno)
- Parpadear siempre en límites de capítulos
- Font hinting
- Font kerning
- Dos columnas
- Parpadear siempre en páginas con imágenes
- Conmutar parpadeo en páginas con imágenes
- Temperatura del color automática desactivada
- Usar la posición del sol para temperatura del color automática
- Horario de uso de temperatura del color automática
- Usar la temperatura del color automática cuando se acerque la medianoche
- Usar la temperatura del color automática cuando se acerque el mediodía
- Ciclo de temperaturas del color automáticas mediante modos
- Tipo de letra
- Aumentar tamaño de letra
- Disminuir el tamaño de la fuente
- Tamaño de letra
- Espaciado entre palabras
- Expansión de palabras
- Contraste
- Grosor de la Fuente
- Sugerencias de fuente
- Interletraje de fuentes
- Dos columnas
- Márgenes I/D
- Sincronizar márgenes S/I
- Margen superior
- Margen inferior
- Modo de visualización (página continua)
- Modo de renderizado
- Zoom
- Interlineado
- Barra de estado alternativa
- Estilo incrustado
- Fuentes incrustadas
- Escalado de imágenes
- Invertir imágenes
- Establecer el modo de visualización
- Ordenar por
- Invertir orden
- Mezclar carpetas y archivos
- Mostrar menú adicional
- Conmutar modo de selección
- Actualizar contenido
- Atajos a carpetas
- Buscar archivos
- Repetir última búsqueda de archivos
- Carpeta superior
- Ir a la pagina
- Volver
- Exportar todas las notas de todos los libros del historial
- Catálogo OPDS
- Mostrar menú inferior
- Conmutar barra de estado
- Conmutar barra de progreso del capítulo
- Book map (overview)
- Siguiente capítulo
- Primera página
- Última página
- Página aleatoria
- Pasar páginas
- Ir a la pagina
- Vista rápida del documento
- Descripción del libro
- Marcador siguiente
- Primer marcador
- Último marcador
- Marcador más reciente
- Volver
- Set highlight action
- Cambiar la acción de subrayado
- Seguir enlace más cercano
- Seguir enlace interno más cercano
- Mover libro actual al archivo
- Estadísticas del libro
- Buscar texto completo
- Repetir última búsqueda de texto completo
- Índice
- Mapa del libro
- Mapa del libro (visión general)
- Explorador de páginas
- Marcadores
- Buscar marcador
- Conmutar marcador
- Estado del libro
- Información del libro
- Descripción del libro
- Cambiar el factor del zum
- Traducir página actual
- Invertir página cambia toques y gestos
- Conmutar dirección de cambio de página
- Conmutar índice personalizado
- Alternar secciones ocultas personalizadas
- Configurar acción de subrayado
- Cambiar acción de subrayado
- Estilo de destacado de ciclo
- Zum a
- Exportar notas
- Exportar todas las notas del libro actual
- Exportar todas las notas de todos los libros del historial
- Mover el libro actual al archivo
- Estadísticas de lectura: libro actual
- Exportar posición de lectura de este dispositivo
- Importar posición de lectura de otros dispositivos
- Conmutar cambio de página
- Conmutar cambio de marcadores
- Alternar ajuste de texto
- Modo de zoom
- Calidad de representación
- Conmutar zoom a viñeta
- Recorte de página
- Margen
- Superposición horizontal
- Columnas del documento
- Adaptar
- Zoom a
- Número de columnas/filas para dividir la página
- Factor de ampliación
- Dirección
- Modo de visualización
- Espacio entre páginas
- Interlineado
- Alineación
- Tamaño de letra
- Cambiar tamaño de letra
- Espacio entre palabras
- Reajuste de texto
- Contraste
- Eliminar marca de agua
- Calidad de renderizado
- Idioma del documento
- OCR forzado
- Dirección de escritura
- Columnas del documento
- Enderezamiento automático
Si tienes un dispositivo con teclado como Kindle 2 o Kindle 3, incluyendo teclados y emuladores Bluetooth, puedes usar las teclas, botones y atajos del dispositivo para controlar KOReader. También es compatible con Kindle 4, que no tiene teclado completo, pero cuenta con suficientes botones para funcionar en este contexto. En estos dispositivos, KOReader activará un menú adicional llamado Atajos de teclado, al que puedes acceder aquí:
/ Navegación / Botones físicos / Atajos de tecladoEste menú es muy similar a la interfaz del Administrador de gestos. En este menú:
- Puedes ver los accesos directos que están disponibles en tu dispositivo
- Puedes ver las acciones predefinidas para algunos atajos
- Puede asignar acciones a los accesos directos disponibles
Todas las acciones del Administrador de gestos también se pueden asignar mediante atajos de teclado. Esto significa que puedes controlar casi todas las funciones de KOReader con estos atajos.
En la siguiente tabla, puedes ver las asignaciones de teclas y accesos directos predeterminados:
La tecla universal de INFO para captura de pantalla es Alt + Mayús + G. Está disponible en todas las pantallas, modos y plataformas. En Kindle 4, es Teclado + Menú.
INFO Si tienes un Kindle 4, la tecla Mayús en la tabla a continuación corresponde a tu botón de TECLADO. Por lo tanto, los atajos Mayus+ (ARRIBA/ABAJO/IZQUIERDA/DERECHA) corresponden a Teclado + (ARRIBA/ABAJO/IZQUIERDA/DERECHA) en tu Kindle 4.
Modo explorador de archivos | |
| Abrir menú superior | F1 |
| Ir a inicio | Inicio |
| Mover en la lista de archivos | Arriba / Abajo |
| Abrir libro seleccionado | Entrar |
| Salir de la aplicación | Esc |
Modo de lectura | |
| Abrir menú superior | F1 |
| Abrir menú inferior | Entrar |
| Atrás/Salir de la aplicación | Esc |
| Marcadores | Mayús + Izquierda |
| Conmutar marcador | Mayús + Derecha |
| Buscar en diccionario | Ctrl + D (Alt + D en Kindles) |
| Buscar en Wikipedia | Ctrl + W |
| Buscar texto completo | Ctrl + S |
| Búsqueda de archivos | Ctrl + F |
Enlaces | |
| Seleccione el enlace de la página siguiente | Tab |
| Seleccionar enlace de la página anterior | Mayús+Tab |
| Abrir el enlace de la página seleccionada | Entrar |
Visor de imágenes (mantenga pulsada la imagen) | |
| Ampliar | Avanzar Página |
| Alejar | Retroceder Página |
Destacando | |
| Entrar al modo de subrayado | H |
| Iniciar/detener subrayado | Entrar |
| Mover indicador de subrayado | Izquierda/Derecha Arriba/Abajo |
| Mover el indicador más rápido | Mayús + Izquierda/Derecha/Arriba/Abajo |
| Salir del modo de subrayado | Esc |
Navegando por el libro | |
| Pasar página | Izquierda-Derecha / Arriba-Abajo Página Arriba-Página Abajo |
| Índice | Mayús + Arriba |
| Mapa del libro | Mayús + Abajo |
| Ir al principio | 1 |
| Ir al 11% del libro | 2 |
| Ir al 22% del libro | 3 |
| Ir al 33% del libro | 4 |
| Ir al 44% del libro | 5 |
| Ir al 55% del libro | 6 |
| Ir al 66% del libro | 7 |
| Ir al 77% del libro | 8 |
| Ir al 88% del libro | 9 |
| Ir al final | 0 |
En el cuadro de diálogo Hojear Documento | |
| Ir al principio | Q |
| Ir al 11% del libro | W |
| Ir al 22% del libro | E |
| Ir al 33% del libro | R |
| Ir al 44% del libro | T |
| Ir al 55% del libro | Y |
| Ir al 66% del libro | U |
| Ir al 77% del libro | I |
| Ir al 88% del libro | O |
| Ir al final | P |
Zoom de página Sólo para PDF, DJVU e imágenes | |
| Zoom para ajustar a la página | A |
| Zoom para ajustar al ancho de la página | S |
| Zoom para ajustar la altura de la página | D |
| Zoom para ajustar el contenido | Mayús + A |
| Zoom para ajustar el ancho del contenido | Mayús + S |
| Zoom para ajustar la altura del contenido | Mayús + D |
El Menú Rápido es una función reciente de KOReader que te permite tener un menú personalizado de acceso rápido, como en la imagen de ejemplo a continuación. Puedes asignar este menú a un gesto y acceder a él con un solo deslizamiento. Incluso puedes tener un menú más largo que la pantalla, ya que es desplazable.
Básicamente, cualquier acción a la que se le pueda asignar un gesto se puede añadir al Menú Rápido. Sus ventajas son:
- No es necesario memorizar muchos gestos para cada acción.
- Algunas acciones poco frecuentes pueden no merecer la pena, pero encontrarlas en el sistema de menús puede ser complicado. Puedes añadir este tipo de acciones poco utilizadas a este menú.
- Si está instalando KOReader para un familiar o amigo, puede agregar sus acciones favoritas a este menú para que ni siquiera necesiten ingresar al sistema de menú mientras usan KOReader.
Un ejemplo de Menú Rápido:
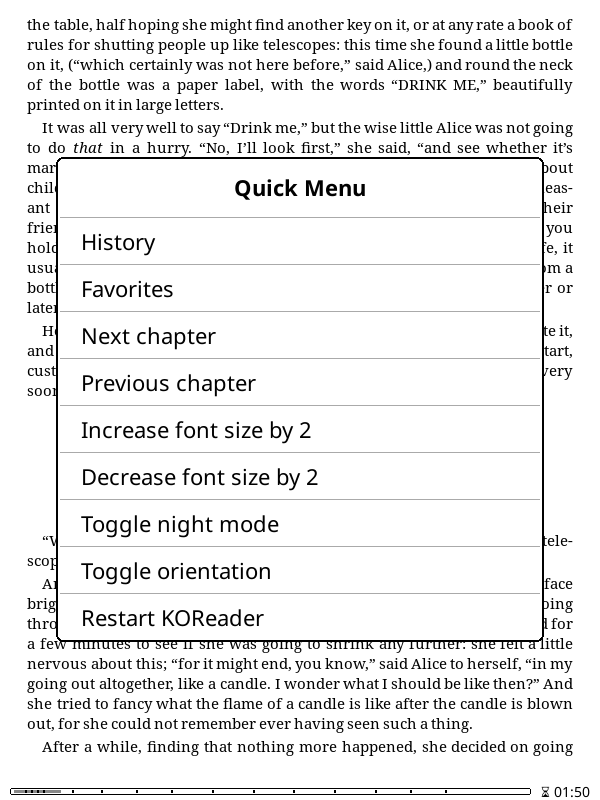
Hay dos métodos para crear un Menú Rápido: Fácil y Avanzado. Si solo necesita un menú, el Método Fácil debería ser suficiente. Si desea mostrar diferentes menús con diferentes gestos, debe usar el Método Avanzado. Otra ventaja del Método Avanzado es que facilita la reasignación de gestos. Si desea cambiar el gesto de su menú, puede moverlo fácilmente a otro gesto con el menú del Método Avanzado. Si desea usar otro gesto mientras usa el Método Fácil, debe volver a crear su menú con el nuevo gesto.
- Vaya al menú Administrador de gestos a través de:
MENÚ SUPERIOR / / Toques y gestos / Configurador de gestos
- Decide un gesto para abrir tu menú y tócalo.
- Elige las acciones que quieres ver en tu menú desde el menú de configuración de gestos. Puedes seleccionar varias acciones a la vez, por supuesto.
- Después de seleccionar todas las acciones, deberá indicarle a KOReader que trate este gesto como un menú. Para ello, active la opción Mostrar como menú rápido en la segunda página, como puede ver en la imagen de abajo.
- Puede ordenar los elementos del menú con la opción Ordenar que se encuentra justo debajo.
Ahora puedes abrir tu menú con el gesto que seleccionaste. Si quieres cambiar los elementos del menú, puedes abrir la página de gestos y añadir o eliminar elementos.
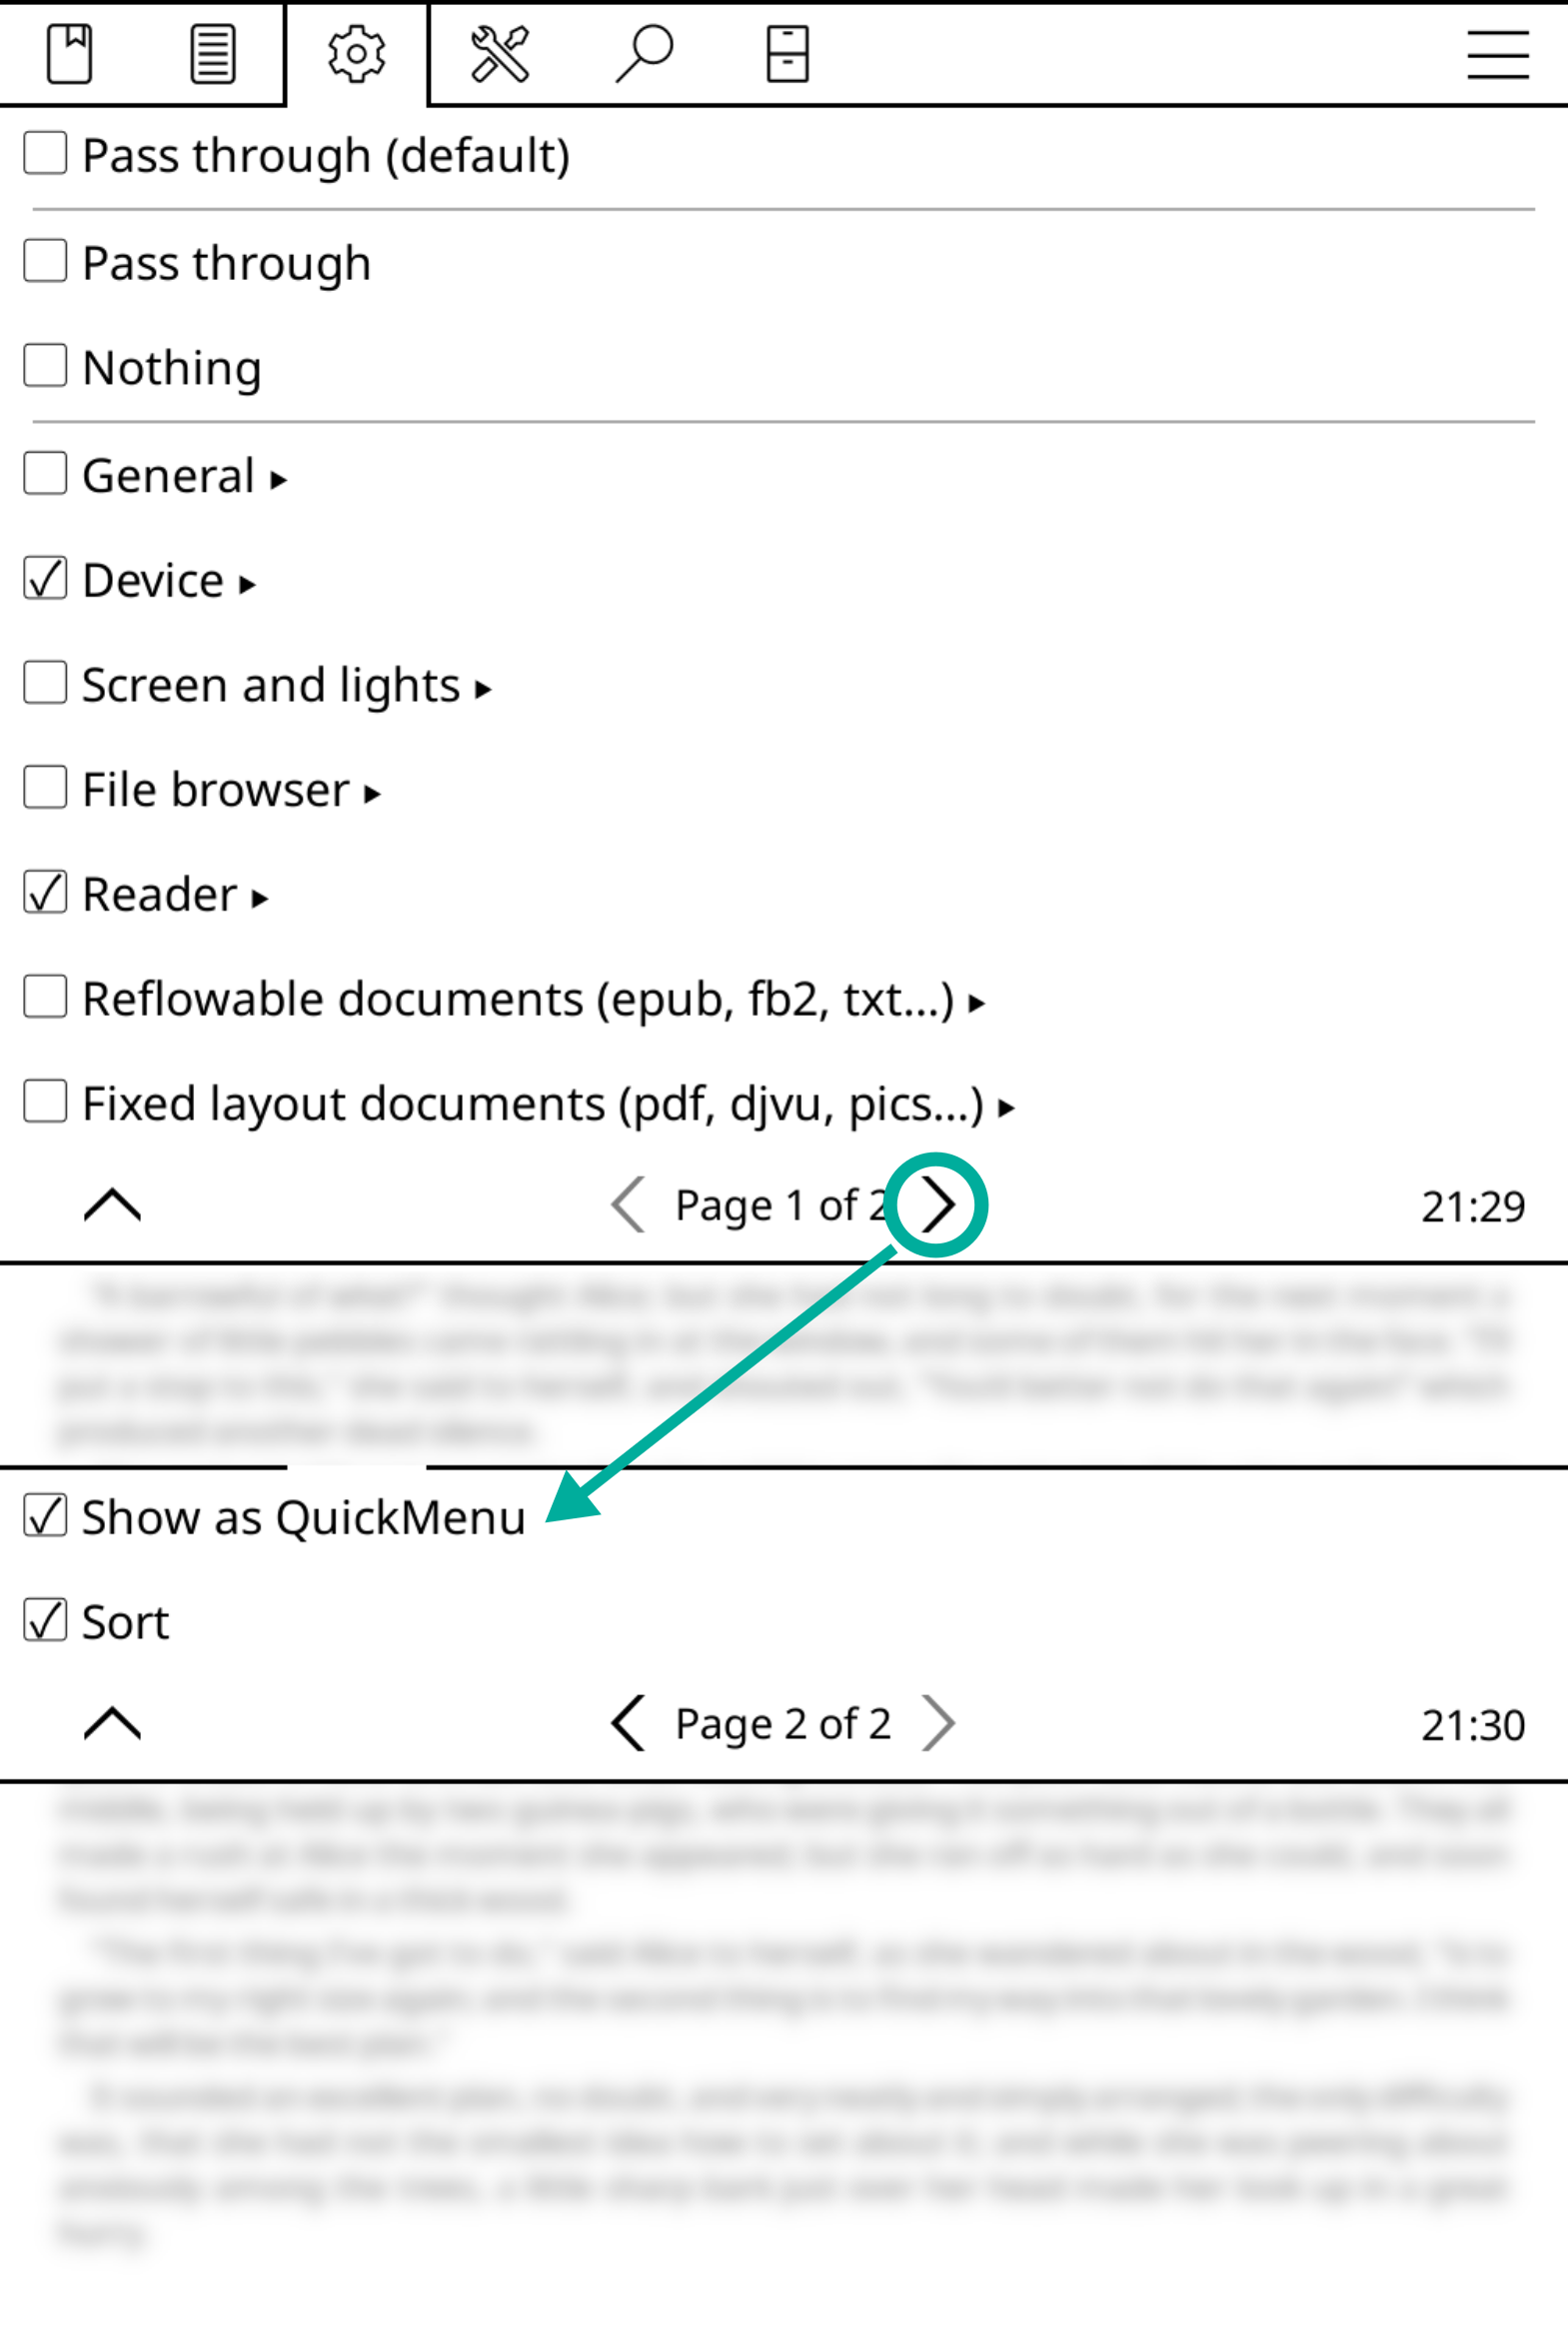
Este Menú Rápido es en realidad un Perfil que aparece en la pantalla como un menú. Primero, debes aprender sobre los Perfiles. Si ya sabes cómo usarlos, puedes continuar leyendo; de lo contrario, ve al apartado Perfiles (siguiente sección), crea un Perfil con algunos elementos y regresa aquí.
Antes de continuar, asumimos que ya has creado un Perfil como se indica en el párrafo anterior. Ahora, convertiremos nuestro Perfil en un Menú rápido.
1. Ve a tu Perfil recién creado y activa la opción Mostrar en la lista de acciones (imagen a continuación). Esto hará que tu Perfil sea visible en el Administrador de gestos. También activa la opción Mostrar como menú rápido (imagen a continuación) para que tu perfil se muestre como un menú en lugar de ejecutarse silenciosamente.
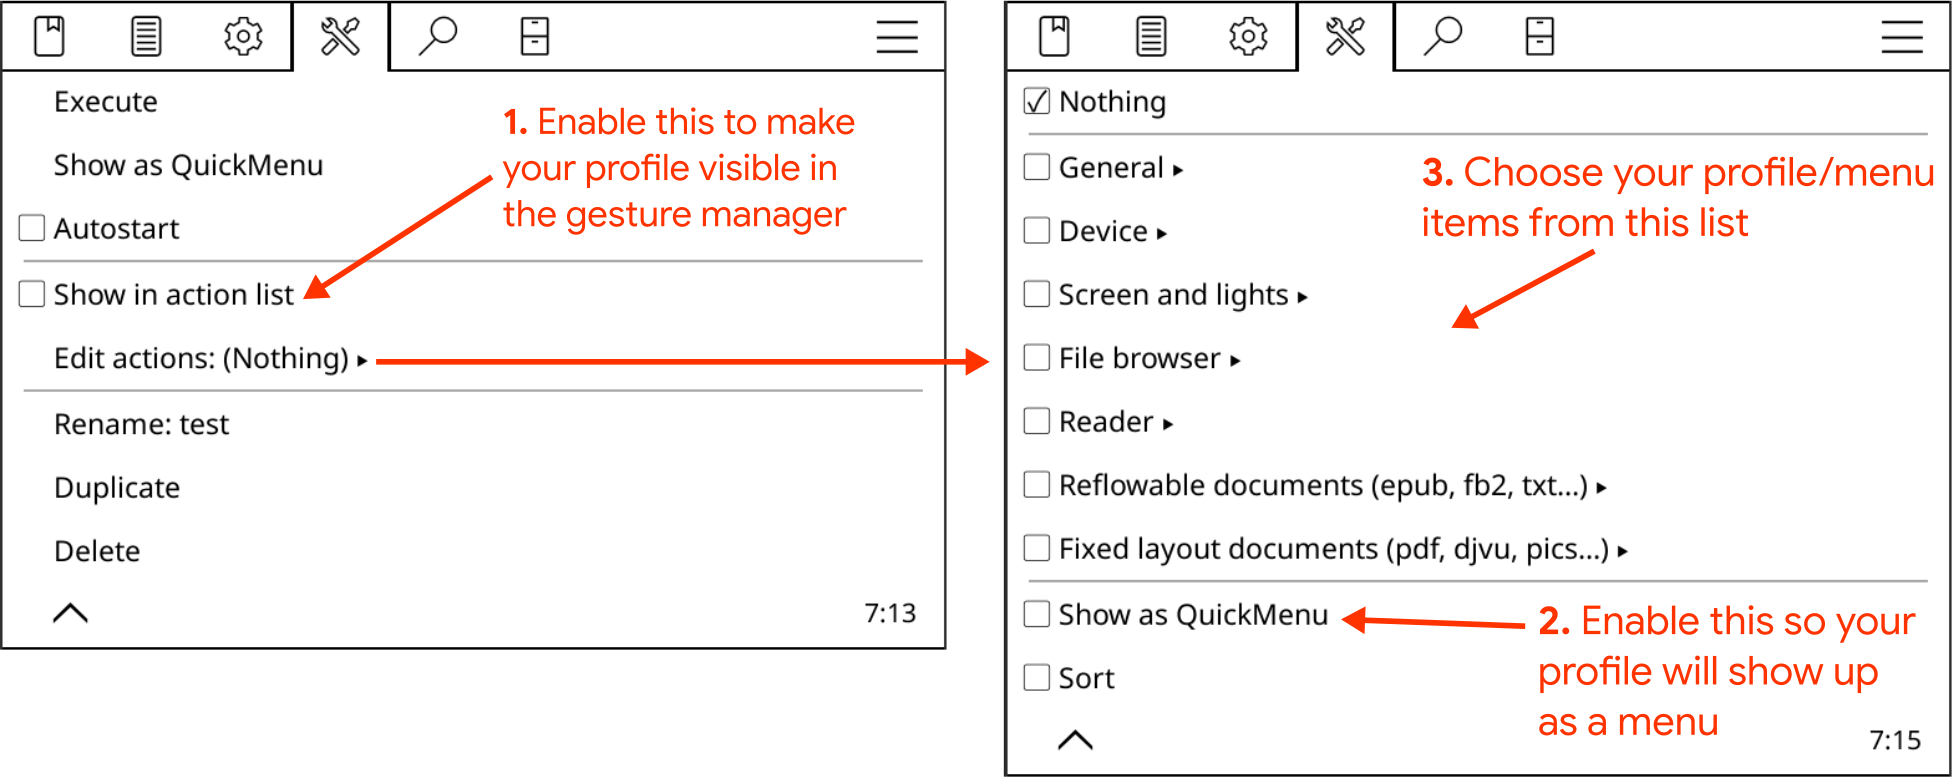
2. Ahora necesitamos acceder a nuestro menú. Ve al Administrador de Gestos y elige un gesto de la lista para asignarlo a nuestro menú. Supongamos que queremos tocar la esquina de la pantalla para mostrar el menú. Ahora toca Tocar esquina y luego elige Abajo a la izquierda. Ahora toca General y ve a la segunda página. Encontrarás tu perfil como Perfil x, donde x es el nombre que le diste a este Perfil. Toca su casilla para asignar tu perfil a este gesto.
Después de todos los pasos, deberías ver tu menú al tocar en la esquina inferior izquierda. Puedes editarlo en la página Perfil, donde puedes añadir o eliminar elementos. También hay una opción Ordenar para cambiar el orden de los elementos del menú.
Como dijimos, un Menú Rápido es en realidad un Perfil. Esto significa que puedes tener más de un menú. Puedes crear otro Perfil y seguir los mismos pasos para crear otro menú si lo deseas.
Normalmente tras seleccionar un elemento en el Menú Rápido el menú desaparece de la pantalla. A veces puede que quieras mantenerlo abierto después de seleccionar un elemento. Esto te permite ajustar la configuración como en los siguientes ejemplos:
- Cambios incrementales, como aumentar/disminuir el brillo, tamaño de fuente más grande/más pequeño, páginas o capítulos anteriores/siguientes, etc.
- Grupo de opciones que se activan sucesivamente (pero no simultáneamente), como activar el wifi y después iniciar el servidor SSH
Puedes habilitar esta opción desde el siguiente menú si tienes un Menú Rápido basado en Configurador de gestos (método fácil):
/ Toques y gestos / Configurador de gestos / “Tu gesto del Menú rápido” / Mantener abierto el Menú rápidoO desde este menú, si tiene un Menú Rápido basado en perfiles (método avanzado):
/ Perfiles / “Tu perfil del Menú rápido” / Editar acciones / Mantener abierto el Menú rápidoNormalmente, el Menú Rápido se abre centrado en la pantalla. Si usa su lector electrónico con una mano, puede activar una configuración que abrirá el menú en la posición del gesto. De esta forma, el menú estará más cerca de su dedo y será más fácil de acceder. Para usar esta función, active esta opción:
/ Toques y gestos / Administrador de gestos / “Tu gesto del Menú rápido” / Anclar el Menú rápido a posición del gestoUn perfil es básicamente una colección de acciones que pueden activarse con un solo gesto (como una macro).
Como ejemplo, imagina que cuando lees algún tipo de libro, siempre:
- Gira la pantalla a orientación horizontal
- Aumenta el tamaño de la letra y el contraste y
- Enciende la luz de la pantalla
Con el complemento de perfiles puedes hacerlo en una sola acción.
Para crear un perfil, primero asegúrese de que el complemento Perfiles esté activado. Si no lo ve en:
/ Perfilesluego tienes que encenderlo desde:
/ Más herramientas / Gestión de complementosEn el menú Perfiles, pulsa Nuevo y dale un nombre descriptivo a tu perfil. Deberías ver tu nuevo perfil en el menú. Pulsa sobre él y verás la pantalla a la izquierda. También puedes Eliminar, Renombrar o Duplicar un perfil desde este menú.
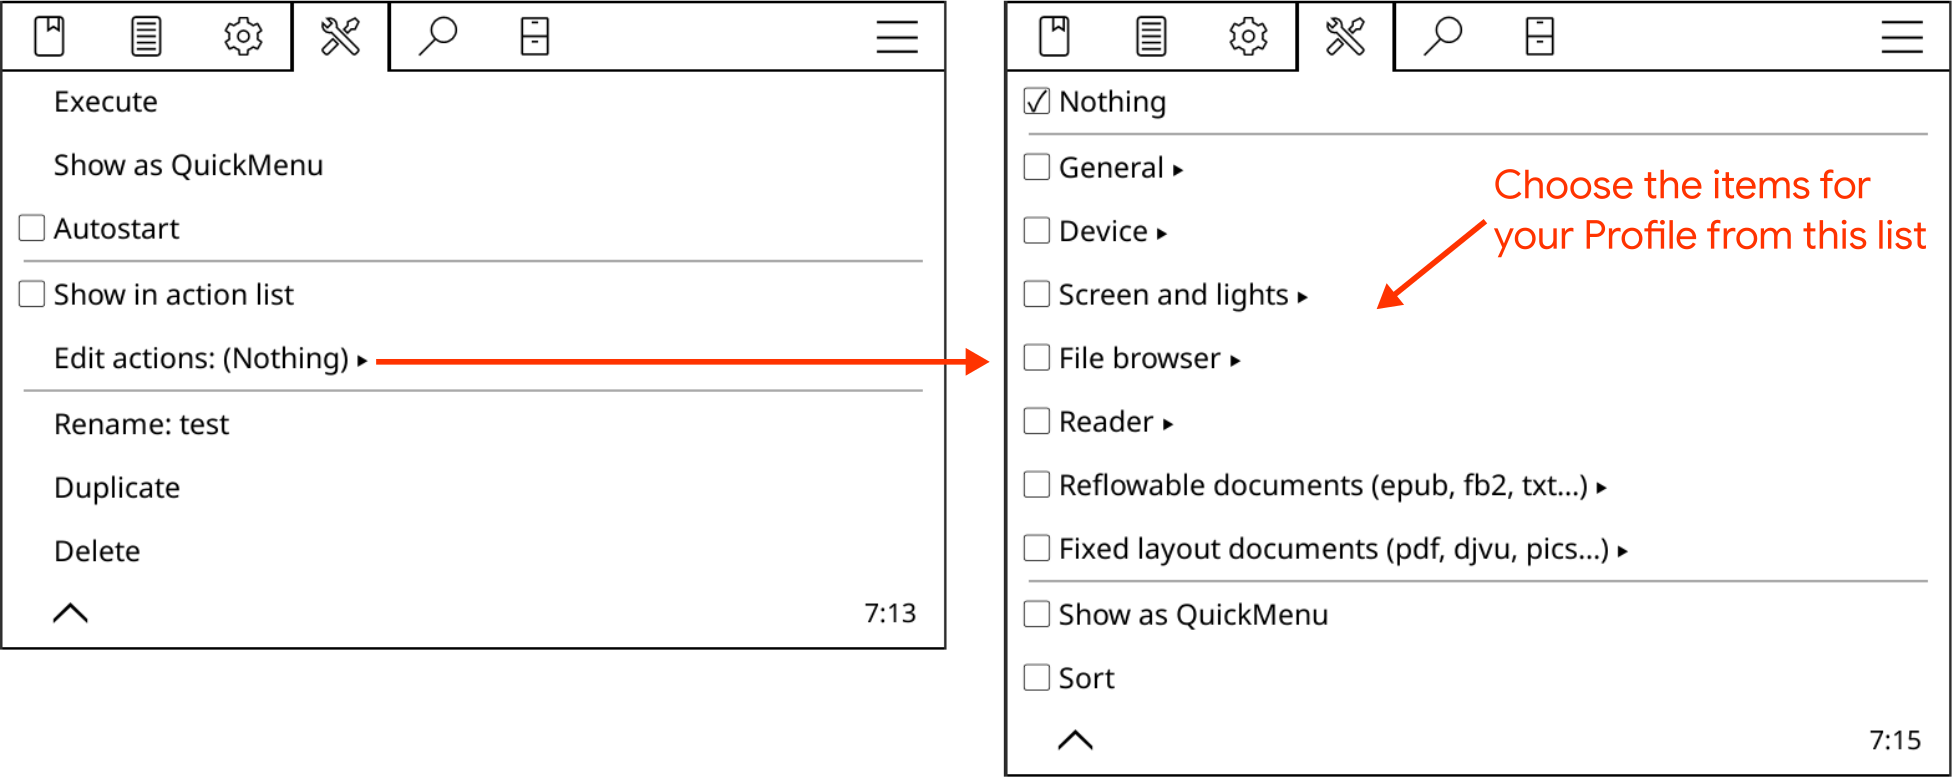
Al pulsar el elemento de menú Editar acciones, verá el menú a la derecha. Es el mismo menú que el de selección de gestos y ofrece acciones en varias categorías. Esto significa que puede realizar cualquier acción de Gesto con un Perfil.
Ahora puedes seleccionar varios elementos de todas estas categorías. Las acciones que seleccionaste aquí se realizarán al activar este perfil.
Hay muchas formas de activar un perfil:
- Puedes activar un perfil con una toque largo sobre su nombre desde el mismo menú Perfiles
- Puedes activar un perfil con un gesto. Para ello, debes habilitar la opción Mostrar en la lista de acciones en el menú del perfil. Ahora puedes seleccionarla mediante:
MENÚ SUPERIOR / / Toques y gestos / Configurador de gestos / “CUALQUIER GESTO” / General / Perfil “Tu nombre de perfil”
- También puedes activar un perfil automáticamente según ciertas condiciones. Consulta el siguiente apartado para aprender a usar esta potente función.
Puedes ejecutar un perfil manualmente como se explicó anteriormente, pero puedes aprovechar al máximo su potencial con su función de autoejecución. Con esta función, puedes activar un perfil según ciertas condiciones y subcondiciones:
| Desencadenar | Subcondiciones |
| Al iniciar KOReader Ejecute este perfil cada vez que se inicie KOReader. Tenga en cuenta que esto solo es posible cuando KOReader se inicia con el Explorador de archivos o el Último archivo. | - |
| Al despertar Ejecute este perfil cada vez que el dispositivo se active | - |
| Al rotar Ejecute este perfil cuando la pantalla gire según las rotaciones seleccionadas. Ejemplos: Cambiar a doble columna cuando el dispositivo gira a horizontal. Activar el modo nocturno cuando el dispositivo gira boca abajo. |
|
| Al mostrar la carpeta Ejecute este perfil al acceder a esta carpeta en el explorador de archivos. Puede usar este disparador para cambiar el modo de visualización del explorador de archivos. Por ejemplo, al acceder a una carpeta, puede cambiar el modo de visualización de mosaico a vista detallada. |
|
| Al abrir el libro
Este disparador se ejecuta cuando abres un libro (opcionalmente) combinado con subcondiciones específicas. Las primeras 4 subcondiciones coinciden con O, por lo que cualquiera de ellas es suficiente para activar la ejecución del perfil. |
|
| Sobre el cierre del libro
Esta opción es igual a la anterior, pero se activa al cerrar un libro. Puedes usarla, por ejemplo, para habilitar o deshabilitar las estadísticas de lectura al abrir ciertos documentos y excluirlos de tus estadísticas. |
|
Ejemplos de perfiles:
Aquí tienes algunos ejemplos de perfiles de nuestros desarrolladores para que te inspires a usar esta potente función de KOReader. También se incluyen condiciones de ejecución automática y funciones de colecciones:
- Habilite el modo de dos columnas cuando gire su dispositivo a orientación horizontal.
- Habilite el modo nocturno cuando coloque el dispositivo boca abajo.
- Añade todos tus mangas a una colección. Crea un perfil que cambie la dirección de paso de página a de derecha a izquierda e invierta los toques y deslizamientos al abrir un manga de esta colección.
- Agrega tus cómics a una colección, lo que puede activar un perfil para disminuir el intervalo de actualización de la pantalla a cada página para evitar el efecto fantasma.
- Active un perfil para ajustar el tipo de letra, el tamaño de fuente y establecer el modo de dos columnas al abrir un archivo por primera vez desde la carpeta Publicaciones periódicas.
- Agregue sus PDF problemáticos a una colección, de modo que cuando los abra, el OCR automático o el modo de ajuste de texto se activen con un perfil.
- Cambia el modo de visualización (cubiertas, lista detallada, etc.) del explorador de archivos cuando entras en determinadas carpetas.
- Desactivar las estadísticas de lectura al abrir un libro de la colección de Libros de referencia. Activar las estadísticas al cerrar el libro.
- Si expones los ajustes de estilo en el administrador de gestos, puedes crear un perfil para habilitarlos o deshabilitarlos según ciertas condiciones. Por ejemplo, puedes activar un perfil "Deshabilitar estilos de editor Y aplicar mis ajustes de estilo de usuario" según la ubicación/colección del libro o mediante una palabra clave en los metadatos del libro. Consulta la sección ajustes de estilo de la guía para obtener más información.
!!! AVANZADO
En KOReader tenemos un conjunto de acciones/configuraciones y este conjunto se puede crear de dos maneras:
- Como un perfil (que se explica como el Método avanzado y se almacena en settings/profiles.lua)
- Como una lista de acciones asignadas a un gesto (que se explica como el Método fácil y se almacena en settings/gestures.lua)
Este conjunto también se puede ejecutar de dos maneras diferentes:
- Aplicar cada acción en el orden (ordenado) cuando se activa (como un Perfil)
- Mostrándolo como un Menú rápido
Añadir o eliminar acciones de un conjunto y habilitar o ordenar el Menú rápido se realizan mediante el mismo menú de acciones. La única diferencia es que el menú de acciones del Configurador de gestos tiene dos elementos más (Transferir), por eso los elementos Mostrar como Menú rápido y Ordenar se encuentran en la segunda página.
INFO Puedes hacer una copia de seguridad de tus perfiles y transferirlos a otro dispositivo. Consulta la sección Hacer una copia de seguridad de la configuración de KOReader.
Los complementos son pequeños programas de KOReader, similares a los complementos del navegador, que amplían las funciones del programa base. KOReader se divide en tres categorías:
Los complementos internos son parte del programa principal.
- Se puede acceder directamente a ellos desde el menú de complementos de KOReader.
- Estos no necesitan instalación. Puedes activarlas desde el menú.
- Nuestros desarrolladores los revisan, por lo que se consideran seguros.
- Se actualizan automáticamente cuando actualizas KOReader.
Puedes habilitarlos / deshabilitarlos a través de:
/ Más herramientas / Gestión de complementos!!! AVANZADO
Este grupo contiene complementos no oficiales que no forman parte de la lógica central de KOReader.
- Deben instalarse manualmente y luego activarse desde el menú de complementos.
- Deben actualizarse manualmente .
- Son revisados por nuestros desarrolladores en el momento en que se agregan a nuestro repositorio por lo que se consideran seguros.
Puedes acceder a ellos desde esta página. Generalmente, se instalan descargando el directorio del complemento desde la página anterior y copiándolo en la carpeta koreader/plugins de tu dispositivo. Consulta la página del complemento para obtener otras instrucciones.
!!! AVANZADO
Estos son complementos que se desarrollan independientemente del equipo de KOReader.
- Deben instalarse manualmente y luego activarse desde el menú de complementos.
- Deben actualizarse manualmente .
- Nuestros desarrolladores NO los revisan, así que tenga en cuenta que puede haber riesgos al usarlos.
Algunos ejemplos notables de estos complementos externos con enlaces a sus páginas de GitHub:
- Plugin AskGPT: Puedes hacer preguntas a ChatGPT sobre partes de tu libro. También puedes usar este plugin para simplificar, explicar, comentar o traducir texto a otros idiomas.
- Asistente: complemento AI Helper: una bifurcación del complemento anterior con funciones más avanzadas, como múltiples proveedores de IA y avisos integrados o personalizados.
- Complemento de Anki: complemento de KOReader que permite la generación de tarjetas Anki (un software de tarjetas didácticas de código abierto) para palabras buscadas en el diccionario interno.
- Complemento de Zotero: Este complemento le permite explorar sus colecciones de Zotero (un software de gestión de referencias de código abierto) desde KOReader.
- Complemento Syncthing: Este complemento te permite ejecutar el programa de sincronización de archivos punta-a-puntaSyncthing en KOReader (probado solo en dispositivos Kobo, pero podría funcionar en otros dispositivos según el autor). Esto permite sincronizar archivos automáticamente entre tu lector electrónico y tu ordenador/teléfono.
También puedes hacer clic en este enlace para abrir una página de búsqueda en Github para descubrir más proyectos del complemento KOReader.
Reading statistics - Calculates reading sessions statistics and reading speed for use in chapter/book remaining time estimations
Temperatura del color y modo nocturno automáticos: permite ajustar la calidez de la luz frontal en dispositivos con luz natural (amarilla/naranja) y configurar el modo nocturno automático según un cronograma
Ahorro automático de energía - Pone el dispositivo en modo de espera, suspensión o apagado después de períodos específicos de inactividad
Suspensión automática: suspende el dispositivo después del período de inactividad seleccionado (disponible en todos los dispositivos de tinta electrónica, excepto el sistema operativo Android)
Terminal emulator - Starts a shell (command prompt) on your device that can run full terminal apps
Ejecutor en segundo plano - Servicio para otros complementos: permite que las tareas se ejecuten regularmente en segundo plano.
Time sync - Synchronizes the device time with NTP servers
Tweak document settings - Allows tweaking settings of a document before it is loaded based on external factors
Calibre: Puedes enviar documentos desde tu biblioteca de Calibre directamente a tus dispositivos KOReader mediante conexión wifi. Para más información consulta nuestra página wiki.
Explorador de cubiertas : permite modos de visualización de cubiertas para el explorador de archivos y el historial
Imagen de cubierta: guarda la imagen de cubierta del libro actual como un archivo (disponible en dispositivos Android/PocketBook/reMarkable)
Exportar subrayados - Exporta los subrayados y notas a archivos locales o a Joplin (aplicación para tomar notas)
Entrenador de tarjetas didácticas: muestra tarjetas didácticas usando la repetición espaciada (SM2) de los subrayados de la biblioteca
Gestos: proporciona soporte para gestos en KOReader
Inspector HTTP - permite controlar el dispositivo desde otro dispositivo a través de wifi. Ve abajo para más información
Compatibilidad con japonés - compatibilidad con el japonés para KOReader que amplía el diccionario integrado y el sistema de selección
Mantener activo - mantiene el dispositivo activo para evitar desconexiones automáticas de la wifi
Mover a carpeta para archivar - Mueve el documento actual a la carpeta de archivo
Descargador de noticias - recupera noticias RSS y Atom y las guarda como archivos HTML. Para más información consulta nuestra página wiki.
OPDS : permite descargar libros de catálogos en línea
La Percepción expandida - permite usar la visión periférica para leer más rápido. Mira este video de YouTube para ver cómo funciona: Cómo triplicar tu velocidad de lectura en 20 minutos (Tim Ferriss)
Perfiles: permite combinar múltiples configuraciones para crear perfiles intercambiables
Sincronizar progreso de lectura - Sincroniza tu progreso de lectura entre distintos dispositivos con KOReader. Consulta nuestra wiki para más información.
QR desde portapapeles : genera un código QR a partir del contenido del portapapeles
Temporizador de lectura - temporizador de cuenta atrás que muestra un mensaje después de un tiempo definido por el usuario
Estadísticas de lectura - calcula las estadísticas de las sesiones de lectura y la velocidad de lectura para usarlas en la estimación de tiempo restante de capítulos o libros
SSH: permite el acceso a tu dispositivo mediante el protocolo SSH. Puedes acceder mediante aplicaciones FTP o incluso el explorador de archivos si lo admite. Para más información consulta nuestra página wiki.
Estadísticas del sistema - puedes ver la información de la CPU/RAM/BATERÍA a través de este complemento en:
/ Ayuda / Estadísticas del sistemaEmulador de terminal - inicia un shell (símbolo del sistema) en el dispositivo que puede ejecutar aplicaciones de terminal completas
Editor de texto - editor de texto básico para crear y editar archivos de texto sin formato
Sincronización horaria - sincroniza la hora del dispositivo con los servidores NTP
Configurar ajustes del documento: - permite los ajustes de un documento antes de cargarlo en función de factores externos
Wallabag - Descarga los artículos más recientes de un servidor Wallabag como archivos EPUB individuales. Consulta nuestra página wiki para más información.
!!! AVANZADO
Este complemento te permite controlar tu dispositivo desde otro dispositivo por wifi. Funciona ejecutando un servidor HTTP simple en tu dispositivo que muestra una página con los controles de KOReader. Puedes acceder a esta página a través de tu red y controlar tu lector. Sin embargo, ten en cuenta lo siguiente al usar este complemento:
- Este es un complemento experimental, así que úselo bajo su propio riesgo
- Este complemento está habilitado por defecto, pero el servidor NO se inicia por defecto. Puedes iniciarlo manualmente o configurarlo para que se inicie automáticamente.
- Debe ejecutar este complemento solo en redes confiables, ya que es altamente inseguro (sin HTTPS, sin restricción de acceso, sin autenticación)
Puede leer un ejemplo de caso de uso para este complemento en el foro de MobileRead
!!! AVANZADO
Los parches de usuario son pequeños archivos escritos en lenguaje Lua. Pueden cambiar la funcionalidad de KOReader sin modificar la instalación permanentemente. Pueden ser escritos por desarrolladores, otros usuarios o por tí mismo (si tienes los conocimientos necesarios sobre el funcionamiento interno de KOReader).
Puedes encontrar una lista actualizada de Parches de usuario en nuestra wiki y en la lista de problemas de GitHub, marcada con la etiqueta Parche de usuario disponible. Puedes consultarlos siguiendo este enlace.
- Crea un directorio llamado patches en el directorio koreader del dispositivo (en Android, esta carpeta se encuentra en la tarjeta SD)
- Descarga y coloca el archivo de parche con la extensión .lua en este directorio patches
- Reiniciar KOReader
Cuando creas un directorio de parches según las instrucciones, estará disponible un nuevo complemento llamado Administración de parches en el menú de complementos tras reiniciar KOReader. Con este complemento, podrás ver la lista y el estado de tus parches, así como habilitarlos o deshabilitarlos. Para más información pulsa el elemento de menú Acerca del administrador de parches.
El orden de ejecución de un parche se determina por el primer dígito del número en su nombre. Por ejemplo: 2-TOC-title-patch.lua. Si hay varios parches que empiezan con el mismo dígito, el orden de ejecución es el natural (1<10<11<12<13<…<109<…<10010). Si solo descargas un parche ya creado, no necesitas cambiar el nombre del archivo.
Nombres que empiezan por:
- 0 - Se ejecuta al principio y solo una vez después de una actualización
- 1 - Se ejecuta muy temprano cada vez que se inicia KOReader (pero después de 0 si corresponde)
- 2 - Se ejecuta después de que UIManager esté listo en cada inicio de KOReader
- 3-7 - Reservado
- 8 - Se ejecuta antes de salir y antes de que se guarde la configuración
- 9 - Se ejecuta justo antes salir
Si tienes un problema con un parche de usuario, puedes volver a la configuración anterior eliminando el archivo del parche.
→ Taps and Gestures → Links → Tap to follow linksSi necesitas cambiar entre dos documentos (por ejemplo, al compararlos), hay una forma más rápida que usar el Explorador de archivos. KOReader puede abrir el último documento con un gesto ( multideslizamiento). Si define la acción de un gesto como Abrir documento anterior, puedes cambiar entre dos documentos rápidamente de forma similar a la función Alt+Tab en un PC. Encontrarás esta función en:
/ Toques y gestos / Configurador de gestos / “CUALQUIER GESTO” / General / Abrir documento anteriorTambién puedes usar el cuadro de diálogo Historial para cambiar rápidamente de documento. La pantalla del historial se puede abrir con el gesto de multideslizamiento . Por supuesto puede definir cualquier otro gesto para esta función.
Puedes cambiar la cubierta de un libro desde este menú:
/ Información del libro / / Establecer imagen de cubiertaAlgunos libros no vienen con las cubiertas adecuadas. O puede que tengan la cubierta en la segunda página por lo que no se muestra correctamente. O tal vez no sea adecuada para tinta electrónica (demasiado clara u oscura). O prefieres poner alguna imagen del libro como cubierta.
En situaciones como ésta puedes tomar una captura de pantalla y ponerla como cubierta del libro actual. El gesto de captura de pantalla predeterminado es un deslizamiento diagonal largo. Además tocando las esquinas diagonales opuestas se tomará una captura de pantalla. Puedes usar este segundo atajo al visualizar una imagen. Después de tomar la captura puedes seleccionar Establecer como cubierta del libro en el cuadro de diálogo.
Puedes eliminar la cubierta personalizada aquí:
/ Información del libroEn la página de información del libro mantén presionado el elemento Imagen de cubierta y luego selecciona Reiniciar datos personalizados.
También puedes reiniciar la cubierta del libro con el cuadro de diálogo Reiniciar, al que puedes acceder manteniendo presionado el nombre del archivo en el Explorador de archivos.
Si su documento tiene enlaces y accidentalmente los toca mientras pasa la página o utiliza otros gestos, puede desactivar Seguir enlaces tocando a través de este elemento del menú:
/ Toques y gestos / Enlaces / Toque para seguir enlacesDespués de deshabilitar esta configuración, para seguir un enlace debes hacer toque largo en él y seleccionar Seguir enlace en el menú emergente. Si tienes el problema opuesto y deseas que tocar el enlaces sea más fácil, puedes habilitar Aumentar superficie de toque de los enlaces en el mismo menú.
Al leer estadísticas, puede cambiar el inicio del día utilizado para los cálculos. Esto es útil si está leyendo después de medianoche, por ejemplo, y desea que su sesión de lectura se cuente como hoy en lugar del día siguiente. Esto se aplica sólo a la vista de línea de tiempo del día y, opcionalmente, a la vista de calendario; no se aplica a ninguno de los otros informes estadísticos. Puedes configurar este horario en:
/ Estadísticas de lectura / Configuración / El cronograma diario comienza a las...KOReader puede actualizarse a sí mismo a través de Wi-Fi. Puede activar la verificación a través de este elemento de menú:
/ Actualizar / Buscar actualizacionesNo tenemos una opción directa para esto en KOReader. Pero existe una solución para lograr este tipo de funcionalidad de pantalla de bloqueo. Puede configurar KOReader para mantener el protector de pantalla en la pantalla hasta que ingrese un gesto elegido. Para lograr esto:
- Elija cualquier gesto (incluidos los complejos con múltiples deslizamientos personalizados) y conviértalo en su gesto de "desbloqueo" yendo a:
MENÚ SUPERIOR / / Toques y gestos / Configurador de gestos / "su gesto seleccionado" / Dispositivo / Salir del protector de pantalla
- Y luego habilita esta opción:
MENÚ SUPERIOR / / Pantalla / Protector de pantalla / Configuración / Mantener el protector de pantalla en pantalla después de reactivar / Hasta el gesto 'Salir del protector de pantalla'
KOReader puede atenuar la luz frontal para conservar la batería si su dispositivo está inactivo por un tiempo. Puede activar y ajustar esta función a través de:
/ Pantalla / Atenuador de luminosidad automático → Taps and gestures → Gesture manager → “ANY GESTURE” → General → Open Previous DocumentSi desea saber cuántas líneas o palabras se muestran en la página actual, puede verlo en:
/ Información del libroLas baterías de iones de litio experimentan una mayor degradación en los extremos de sus niveles de carga. Para minimizar esta degradación y prolongar la vida útil de la batería, puede limitar el nivel mínimo de descarga al 20 % y el nivel máximo de carga al 80 % (como en los vehículos eléctricos y algunos teléfonos más nuevos). Lo que significa que comienzas a cargar tu dispositivo cuando la batería baja al 20% y lo desconectas cuando llega al 80% (o entre el 25% y el 75% si tienes mucho cuidado).
KOReader puede avisarte mostrándote una alerta cuando el nivel de carga alcance los límites definidos:
/ Alertas de estado del dispositivo / Nivel de bateríaPuede ver sus estadísticas detalladas de uso de la batería a través de este elemento de menú:
/ Más herramientas / Estadísticas de la bateríaPuede ver la información de su sistema, como el uso de CPU/ESPACIO EN DISCO/RAM, a través de este elemento de menú:
/ Ayuda / Estadísticas del sistemaEn dispositivos Kindle más antiguos, algunos de nuestros usuarios informaron fallas debido a la memoria limitada. El uso de la memoria de KOReader puede aumentar si abre muchos archivos en una sesión. Especialmente los PDF aumentan esta cantidad. Puede agregar un indicador de memoria a su BARRA DE ESTADO y reiniciar KOReader si este valor aumenta, para evitar fallas o reinicios.
/ Barra de estado / Uso de memoria de KOReaderTambién puede configurar KOReader para que se reinicie automáticamente si el uso de la memoria alcanza un umbral a través de:
/ Dispositivo / Alertas de estado del dispositivoSi no puede encontrar una solución a su problema en esta guía, puede abrir un problema al respecto en la página GitHub del proyecto o hacer una publicación en la sección KOReader del foro Mobileread. Consulte la última sección de esta guía para obtener más detalles.
KOReader tiene dos versiones diferentes:
- ESTABLE Esta versión es la principal que puedes encontrar en la página Versiones del proyecto GitHub. Se llama así: "KOReader 2024.11", lo que significa que esta versión específica se lanzará en noviembre de 2024. Generalmente se trata de una versión mensual, pero a veces puede tardar más.
- NIGHTLY Estas versiones son las versiones compiladas diarias de KOReader con optimizaciones y correcciones agregadas continuamente. Los lanzamientos nocturnos están destinados a un grupo reducido de evaluadores y desarrolladores, por lo que pueden ser menos estables.
Normalmente, si eres un usuario medio, la versión estable es la que debes utilizar. Pero en algunos casos específicos es posible que necesites utilizar una versión nightly:
- Su dispositivo es muy nuevo (un modelo Kobo lanzado recientemente, por ejemplo) y recientemente se agregó soporte para KOReader.
- Hay un error o problema específico de su dispositivo que ya se ha solucionado pero que aún no se ha publicado. Y no querrás esperar a que la versión estable tenga esta solución.
- Después de actualizar KOReader, observa que se eliminó una función que estaba utilizando. No querrás perder esta función, por lo que puedes instalar una versión nocturna que todavía la tenga. Por supuesto, también puede volver a la versión estable anterior, pero nightly sería más nueva, por lo que podría tener más funciones y correcciones.
Esta sección fue solo una introducción general al tema. Para obtener información detallada y solicitar ayuda sobre las versiones nocturnas, puede visitar la página de discusión: Preguntas frecuentes: cómo realizar un seguimiento de las últimas versiones nocturnas
CONSEJO Si está utilizando KOReader en un dispositivo Android, puede utilizar la función Perfil de trabajo del sistema operativo Android para probar las versiones Nightly sin afectar su instalación principal de KOReader. Las aplicaciones de código abierto como Shelter e Island pueden ayudarte con esto.
En casos excepcionales en los que desee hacer una copia de seguridad y restaurar su KOReader con todas sus configuraciones, puede hacer una copia de seguridad de estas carpetas y archivos en el directorio de instalación de KOReader. Luego puedes sobrescribirlos después de una instalación limpia para restaurar tu configuración:
- ajustes
- ajustes de estilo
- data/cr3.ini
- defaults.persistent.lua
- history.lua
- settings.reader.lua
- settings/profiles.lua
- Archivos en los directorios data/dict/ y /data/tessdata/ (si existen)
Podría deberse a la función Escribir subrayados en PDF de KOReader si está habilitada. Guardar los subrayados del PDF modificará el archivo, por lo que la sincronización fallará. Si planeas usar ambas funciones en la configuración del complemento Sincronizar progreso de lectura, cambia el Método de coincidencia de documentos a Nombre de archivo en lugar de la coincidencia Binaria predeterminada:
/ Sincronizar progreso de lectura / Método de coincidencia del documentosKOReader está optimizado para funcionar rápidamente incluso en el hardware limitado de los lectores de libros electrónicos. Generalmente se pueden abrir libros de mil páginas en segundos y pasar las páginas es inmediato. Aquí hablaremos sobre las razones por las que su libro se siente muy lento al abrirlo, pasar las páginas o ajustar su apariencia.
Si el libro problemático es un PDF:
- El archivo PDF en sí puede ser demasiado grande para la memoria de su dispositivo.
- El archivo PDF puede contener archivos de imágenes muy grandes. Incluso en documentos con una capa de texto normal (que puede seleccionar y resaltar) puede haber otra capa de imagen incrustada (generalmente un escaneo de la página). Esto ralentiza la apertura y el cambio de página porque estas imágenes grandes deben cambiarse de escala para que quepan en la pantalla y este proceso puede consumir mucha CPU.
- El archivo PDF puede tener muchos elementos individuales que necesitan una ubicación precisa, como la página de una revista con muchas imágenes y cuadros de texto. En este caso KOReader tiene que calcular y dibujar todos estos elementos, lo que puede llevar tiempo.
- La función enderezamiento automático (que le permite ajustar la inclinación de la página) también puede ralentizar el lector.
- Si configura su CALIDAD DE PRESENTACIÓN en ALTA mientras el MODO DE AJUSTE DE TEXTO está ACTIVADO, el texto será más agradable pero puede ser mucho más lento (hasta varios segundos por vuelta de página) que POR DEFECTO dependiendo de su documento.
MENÚ INFERIOR / / Calidad de renderizado
Si el libro problemático es un EPUB:
- Los archivos EPUB se componen básicamente de texto e imágenes con algunas reglas para determinar cómo se formatean estos elementos en la pantalla. En condiciones ideales, este es un proceso bastante simple, por lo que los archivos EPUB generalmente son rápidos en KOReader. Pero algunos libros EPUB agregan una gran cantidad de reglas de formato que KOReader tiene que hacer muchos cálculos solo para mostrar incluso una sola oración. Esto ralentizará la apertura del libro, el paso de las páginas y el cambio de las propiedades de apariencia como el grosor de la fuente o el interlineado.
INFO KOReader no admite EPUB de diseño fijo. Se abrirán, pero se representarán como EPUB con ajuste de texto y probablemente no se verán bonitos ni legibles.
- Los archivos EPUB son archivos ZIP que contienen archivos HTML. Algunos libros pueden ser un único archivo HTML, mientras que otros pueden estar compuestos por varios archivos HTML, como si cada capítulo del libro fuera un archivo HTML independiente. Si su libro es solo un archivo HTML, la representación parcial no puede funcionar. Por lo tanto, los cambios de apariencia serán más lentos que los libros de capítulos divididos, porque para cada cambio, KOReader aún tiene que calcular el libro completo en lugar de solo el capítulo actual.
- Otro caso raro de lentitud es cuando el contenido está envuelto en una etiqueta de tabla HTML. KOReader tiene que renderizar/dibujar cada celda en cada paso de página, por lo que si una celda (que contiene muchos párrafos) abarca 50 páginas, esto hará que el paso de página sea bastante lento. Vea a continuación la solución.
Si todo va lento:
Las razones mencionadas anteriormente son generalmente válidas si sólo algunos de sus libros son lentos. Si todos sus libros van lentos, su problema podría estar relacionado con el dispositivo:
- CPU muy lenta o poca RAM.
- Su memoria flash (donde residen sus libros) puede estar degradándose, lo que generalmente se debe a la antigüedad del dispositivo.
- Te estás quedando sin espacio de almacenamiento.
- Si está utilizando un dispositivo basado en Android, su sistema operativo Android podría estar interfiriendo con el funcionamiento de KOReader o algunos procesos en segundo plano podrían estar utilizando los recursos de su sistema.
SOLUCIONES:
Desafortunadamente, para los archivos PDF defectuosos no existen muchas soluciones. Generalmente, la mejor solución para los archivos PDF y EPUB problemáticos es intentar encontrar una versión mejor. O si hay otro tipo de archivo disponible para descargar, como EPUB en lugar de PDF (o al revés), puedes probar ese formato.
Las siguientes soluciones son para archivos EPUB y pueden requerir conocimientos avanzados:
- Puede configurar Estilos incrustados en DESACTIVADO en el menú inferior para ver si ignorar todas las hojas de estilo del documento lo hace más rápido (por supuesto, probablemente perderá cualquier formato agradable, pero sabrá cuál es el culpable).
- Si tiene conocimientos de HTML y CSS, puede inspeccionar los archivos HTML y CSS directamente desde KOReader y juzgar usted mismo su calidad o complejidad innecesaria. Para hacer esto, puede mantener presionado algún texto y elegir Ver HTML en el menú emergente.
- Si tiene el problema de “contenido incluido en una tabla” como se mencionó anteriormente en la sección de problemas, puede agregar esta table, tr, td { display:block; } ajuste de estilo específico del libro para:
MENÚ SUPERIOR / / Ajustes de estilo / Ajuste específico del libro
- El editor de libros electrónicos de Calibre puede comprobar los archivos EPUB en busca de problemas y tiene herramientas para solucionar algunos de los problemas.
Puede descargar Calibre desde aquí.
Puede ver las instrucciones para la herramienta de chequera de Calibre aquí.
- La aplicación EPUBCheck puede comprobar la validez de los archivos EPUB y detectar muchos tipos de errores. Puede leer un problema de ejemplo, donde el problema se detecta con EPUBCheck aquí.
Puede descargar la versión de línea de comando desde aquí.
O descargue una versión de interfaz gráfica de usuario desde aquí.
Abriendo un problema:
Si abres una incidencia sobre este problema es importante que inspeccionemos el archivo problemático. Puedes compartirlo directamente arrastrándolo y soltándolo en tu mensaje de GitHub después de comprimirlo como archivo ZIP. Si el libro es un EPUB y no quieres compartirlo por cuestiones de derechos de autor o privacidad, existe un complemento para Calibre llamado ScrambleEbook, cuya descarga e instrucciones puedes consultar desde esta página del foro de Mobileread.
Este complemento leerá un archivo de libro electrónico sin DRM (EPUB/KEPUB/AZW3) y creará una copia del libro con su texto reemplazado con caracteres aleatorios. Puede compartir esta versión codificada con nosotros en su hilo de problemas. El texto del libro no será legible y no habrá ninguna violación de derechos de autor pero aún podemos usar este archivo con fines de diagnóstico.
Puede ver este procedimiento en un problema real que involucra un archivo EPUB muy problemático aquí.
Esos números pequeños son la numeración de página de la edición impresa y son los números de página reales de la versión impresa del libro. Para obtener más información, haz clic en Pantalla de Lectura para ir a la sección relevante.
Probablemente tocaste la zona táctil BARRA DE ESTADO en la parte inferior de la pantalla. Puedes recuperarlo tocando la misma zona.
Esto puede suceder en casos como darse la mano o problemas con la pantalla táctil del dispositivo. Si tiene este problema, puede intentar aumentar el intervalo de pulsación. Al aumentar este intervalo, le indica a KOReader que ignore los toques rápidos en la misma ubicación.
/ Toques y gestos / Intervalos de gestos / Intervalo de toqueSi sus dos toques consecutivos están separados por una distancia, esto no se aplicaría. Por lo tanto, aún puede navegar rápidamente por las páginas tocando rápidamente con dos dedos.
En dispositivos Android, KOReader no puede escribir en el almacenamiento externo debido a restricciones del sistema Android. Si deseas cambiar la ubicación donde se guardan las capturas de pantalla, asegúrate de seleccionar el almacenamiento interno del dispositivo.
Incluso si KOReader está configurado para actualización completa después de cada página, es posible que aún veas algunas imágenes fantasma/residuos después de pasar las páginas. Esta es una limitación de la tecnología de pantalla de tinta electrónica y se puede observar en los dispositivos de última generación, especialmente al leer documentos de contenido mixto (texto+imágenes). Como solución alternativa, puede actualizar una vez más manualmente después de pasar la página para deshacerse de estos artefactos si le molestan (gesto de deslizamiento diagonal corto de forma predeterminada).
Las fundas para dormir suelen tener un imán integrado que activa el dispositivo al activar un sensor. Este sensor se conoce como sensor Hall o sensor de efecto Hall. En los casos de imanes desalineados o débiles esta activación puede ser problemática. Si la funda no activa el dispositivo puedes desactivar esta función a través del siguiente menú:
/ Dispositivo / Ignorar eventos de la tapa de la fundaSi obtiene títulos, encabezados o separadores mal centrados, o sangría de texto inesperada, intente cambiar el estilo de su documento. epub.css a html5.css. Este tipo de problemas ocurren porque algunos editores asumen que sus libros sólo se leerán en lectores basados en motores de navegador web, por lo que no se molestan en "restablecer" los estilos.
/ Estilo- El HTML/EPUB (epub.css) predeterminado es nuestra hoja de estilo orientada a libros, con text-align: justify, text-indent en P. Es mejor para libros sin estilo y podría hacer que los libros con estilo sean más legibles.
- Puede intentar cambiar a HTML5 (html5.css) si su libro tiene problemas de sangría como se mencionó anteriormente. Este estilo proporciona una hoja de estilo base como lo hacen los navegadores web al renderizar: text-align: izquierda, sin sangría de texto en P, espaciado entre P. Pero no se ve bonito cuando los editores no han hecho ningún estilo.
KOReader guarda un caché de las cubiertas de los libros para mostrarlas más rápido. En condiciones normales esta caché no crece demasiado. Si eliminas muchos libros o cambias el nombre de directorios, es posible que desees limpiar la base de datos de la caché de cubiertas de libros para recuperar algo de espacio. Puedes hacerlo desde este menú:
/ Configuración / Configuración de lista en mosaico y lista detallada / Gestión caché de información de librosCuando estás leyendo un documento PDF/DJVU, KOReader guarda un caché de la última página que has leído. Así, cuando vuelvas a abrir el libro, será más rápido. Pero este caché puede crecer mucho si usa KOReader durante mucho tiempo y lee muchos documentos PDF/DJVU. Estos archivos de caché se guardan en el directorio de instalación de KOReader, en la carpeta de caché. Para borrar este caché y recuperar el espacio puedes ir a:
/ Más herramientas / Opciones de desarrollador / Borrar cachésKOReader usa GitHub como base de proyecto. Puedes informar de problemas o hacer sugerencias en nuestra página de GitHub. Sólo necesitas una cuenta de GitHub que es gratuita. Haz clic en este enlace para abrir nuestra página Problemas de GitHub.
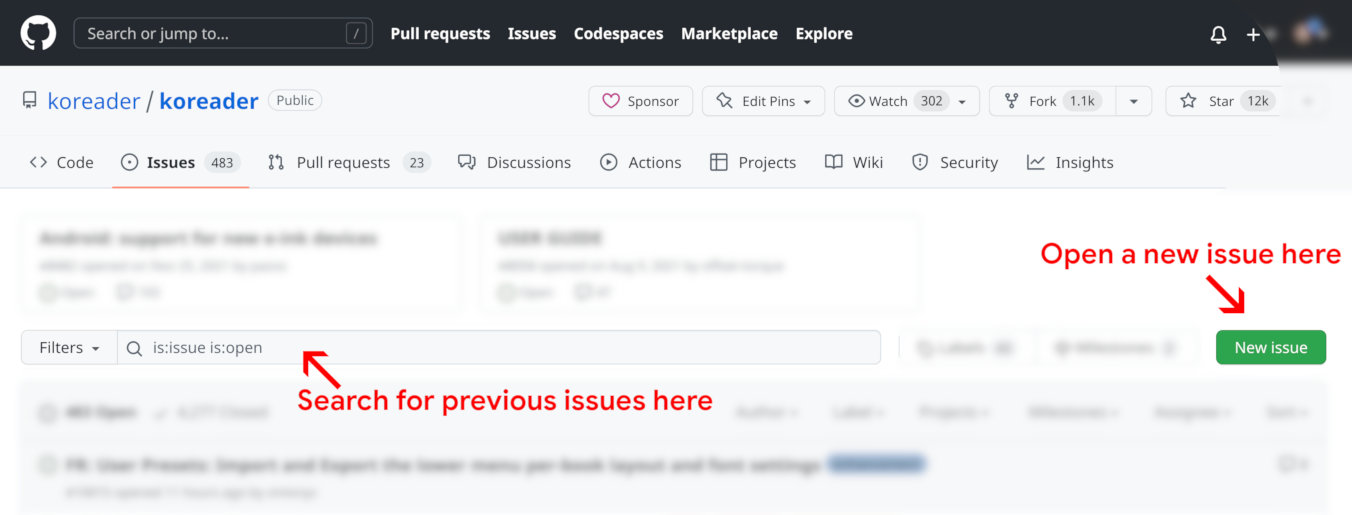
En la página Issues, haz clic en el botón New issue. Pero antes de hacer eso, sugerimos usar la barra de búsqueda para ver si ya existe un problema sobre el mismo tema. También puedes consultar otros números abiertos para tener una idea sobre el proceso.
Cuando hagas clic en el botón New Issue, se presentarán dos opciones:

Haz clic en el correspondiente y sigue las instrucciones de la página para informar del problema o sugerencia.
Si estás informando de un error, los registros de depuración detallados son muy útiles para determinar el problema. Puedes habilitarlos a través de:
/ Ayuda / Informar de un error / Activar registro detalladoTambién puedes encontrar la versión de KOReader y el tipo de dispositivo en el mismo cuadro de diálogo para generar informes.
Si tienes alguna sugerencia o pregunta relacionada con la Guía del usuario, puedes escribir al hilo de discusión de GitHub
Encuentra otros usuarios de KOReader en los foros de MobileRead |
Contáctanos en Gitter chat |
Apoya el proyecto mediante Liberapay |